Application Tracking [U08]
Links to Related Documents
In this Document
- Introduction
- Application
Menu
- New Application
- Change/View
Application
- Delete Application
- Application Assets
- Asset Meter Maintenance
- Application Meter Maintenance
- Documents and Tasks
- Enhanced
IDC/IDR
- Insurance
(Application)
- Status Transfer
- Credit Bureau
- Book Requirements
- Data
Entry Requirements
- Client Exposure
Links to related documents
- Application
Tabs [U0801]
- Tab 1: Lessee, PCRO
- Tab 2: Co-Lessee, Guarantor
- Tab 2: User Defined Fields
- Tab 2: User Defined Tables
- Tab 3: Terms of Lease
- Tab 4: Acq Cost, Residual
- Tab 5: Late Charges, Other
- Tab 6: Misc Charges
- Tab 7: Billing Info, Misc
- Tab 8: Rec Charges, Pmt Schd
- Tab 9: Accrual Meth, Int Rates
- Tab 9: Precomputed or Operating
- Tab 9: Simple Interest or IBL
- Tab
10: Lease-Level Addresses
- Application (Pending) Asset Tabs [U0801]
- Batch
Book Requirements [U0801]
- Drawdown
Tracking [U0801]
- Application Pricing
- Application Tracking Setup [U08] (overview of updates)
Introduction
The Application update [U0801] is part of the Application Tracking module, a separately purchased module of LeasePak. The Application Tracking module is used to process and track an application from proposal to completion.
Benefits of the Application Tracking module include:
- Tracking an application from entry into the system to the time it is booked, declined or withdrawn;
- Salesperson prospect tracking
- Credit investigation and approval tracking
- Documentation tracking
- IDC/IDR tracking
- Additional client definable tracking
- Data entry in stages from the initial submission to the fully defined contract and assets prior to booking
- Definable data entry requirements for each application status
- Data entry required only when status is changed
- Summary of incomplete data entry requirements for booking
- Search to avoid duplicate applications
- Lessee application history, including pending and rejected
- Ability to delete an application entered in error
- Lessee/lease history, including active and terminated
- Customer, lessee, guarantor credit exposure/performance
- Work schedule / note recording (follow-ups)
- Established credit line and auto-approval limits on customers and lessees
- Credit analyst approval limits
- User definable lessee, application, and asset fields
- Activity, productivity and exception reporting
User Defined Application Statuses
Application statuses are used to define the general progress of the application. Statuses are classified into 8 categories, with the first character of the status code determining the category to which it belongs:
- Entry
- Investigation
- Approval
- Booking
- Rejected
- Suspended
- Default
- Withdrawn
The actual name and use of each application status may be defined by the user, providing the first character of the status code belongs to a general category. Examples of possible user defined approved statuses:
APRV The application has been approved.
ADOC The application has been approved and is being reviewed by the documentation department.
ACTN The application has been approved and is being reviewed by the accounting department.
ATRN The application has been approved and is being reviewed by the attorney.
Status does not, by itself, define who may work on the application or what type of work may be done. For example, if an application is in INVESTIGATION, it means that the credit of the applicant is being investigated and a decision on the application has not yet been made. INVESTIGATION status of does not prevent a salesperson from entering additional information or a documentation clerk from starting work on it. It only defines the general progress of the application.
User Defined Application Flow
User management can define standard flows of applications from one status to another, as the application proceeds from initial entry to booking. Flows can describe both forward and reverse progress of applications as they reach predictable milestones or are sent back to a prior status for additional work. Because status flow is part of the application profile of each user within a portfolio or team, it will also serve as a form of security to determine which users may investigate, approve or book the application.
User Defined Field Defaults
Field values can be automatically defaulted when an application is created. Field defaults can be defined for portfolio, company, region, office, customer or vendor. Examples of portfolio or office level defaults are interest accrual type and asset depreciation method. Customer defaults would be master lease information that could be defaulted on all applications for a customer.
User Defined Data Entry Requirements
Data entry requirements can be defined for each application status. This flexibility allows the application to be built in stages, from initial entry of whatever information is available to complete data entry immediately before the application is booked. Also, when a user is processing status changes, all failed edit checks for data correctness are displayed as warnings. Fields are only validated when status is changed. The following is an example of user defined application flow and data entry requirements:
- Initial Entry by Salesperson
When the application is initially entered by the salesperson, no fields are required. However, before the salesperson can change the status to investigation, certain fields must be completed to enable the investigators to complete their duties. These fields can be defined as requirements for investigation status.
- Investigation
As investigators prepare the application, they add additional data in any order they wish, and they enter and exit application screens without pausing for any data entry requirements. However, before an investigator can change the status to credit review, certain fields needed by the credit officer must be completed. These fields can be defined as data entry requirements for the credit review status.
- Credit Approval
The credit approval officer is also able to enter and exit the application freely, unrestricted by data entry requirements. If any application fields are necessary before the approval officer can transfer the application to the documentation clerk, they can be defined as data entry requirements for approved status.
- Documentation
The documentation officer can enter additional lease information as it arrives. However, before the application status can be changed to booked, or to another user defined status such as legal review, the fields required for booking must be entered.
User Defined Field Security
A user's security for access to specific application fields can be defined for each application status. This feature would allow a salesperson or investigator to add or modify any application field while it is still under investigation, for example. Once the application is approved or enters a restricted status, the salesperson or investigator could be limited in the ability to modify certain fields and dollar amounts.
Field security by application status could also be used to require a documentation officer to return an application to credit review for significant changes to the application approval conditions. Refer to the Application Field Security update [U0814] for more information on security for each field.
Application User Profile
The Application User Profile update [U0831] defines the following characteristics for each user of the Application Tracking module:
- Approval credit limits
- Application status flow/security
- Field security by status
- Screen defaults for:
- Work schedule selection
- Work schedule sort order
- Transfer of application on status change
- Manager for higher credit approval
Application Teams
Application teams can be defined as a group of users that will be working together on a specific area of the application process, such as sales or credit. Any number of application teams may be defined, and a user may be assigned to multiple teams. Application teams provide an easy means of selecting application work schedules or reports.
Rate Plans
Rate plans are used to default and/or verify application values for rental factor, frequency, purchase option, security deposit, and advanced rental payments for various combinations of total lease cost and lease term. Rate plans may be manually entered or automatically determined from a list of valid rate plans for each vendor. Refer to the Application Rate Plan update [U0816] for more information.
Adding Applications
Adding an application should start with client searches to determine if the new applicant has an existing relationship. If an existing client relationship is found, it can be selected for the new application. If an existing client relationship cannot be found, the client will be entered as a new lessee, customer, and/or guarantor. Selecting an existing client relationship will cause the address information of the existing client to default to the new application, and allow for calculation of exposure and previous history for that client. Existing client relationships that may be related to an application are:
- Customer
- Lessee
- Guarantor
- Vendor
- Broker
- Investor
Note that there are no data requirements when adding an application. Thus, partial information for an application may be entered initially and completed later. Data entry requirements are user- defined and enforced only when the status is changed.
The ability to add and modify applications in LeasePak allows the entry of all information required to book the application. The following information can be entered at any time for an application:
- Application type; vendor, broker and multiple salesperson information
- Applicant, applicant mailing or billing address, co-lessee, and customer information
- Any number of: guarantors, bank/trade/professional/personal references, current/previous employer, previous and miscellaneous address.
- Lease terms
- Asset information
- Informational codes and recurring charge information
- Insurance, receipt or billing of advance payments, charges or fees due on or before lease commencement.
Refer to the New Application options for more information on adding applications.
Work Schedule and Processing Options
The Application update [U0801] provides a work schedule or list of applications scheduled to be processed in the current session. The size and content of the work schedule may be determined by the user through various selection criteria described on the following pages. If the user chooses to end a processing session before all applications are processed, the work schedule may be saved and then later restored when the user returns to the Applications module.
Client Search
A fast search by short name of all applicants, lessees, customers, guarantors, vendors and brokers is provided by pressing the HELP key on any input of applicant, lessee, customer, guarantor, vendor or broker number. When the correct client is found and selected, the help utility will return the applicable client number to the field where HELP was pressed. Refer to the document Getting Around in LeasePak for more information on performing searches using the HELP key.
Recording Notes
The Notebook update is used to create new notes and to select existing notes for viewing or modification. This update may be accessed by pressing <F3> from any LeasePak screen. These notes may be reminders of future action that must be taken, or historical records of previous actions, problems, and concerns for an application, lease, lessee, customer, or vendor.
For example, if a documentation clerk contacts a client who says, "The contract is in the mail," the clerk may want a follow-up note to check for receipt of the contract. Once a note is processed, it becomes an historical record of action taken. If the user wishes to record a comment when no follow-up action is necessary, a note may be created with a "processed" status. Since all notes created remain on file for the life of the lease, this comment will be available for future reference.
Unprocessed notes can be used to create a work schedule or list of applications scheduled for processing. A work schedule contains entries for all unprocessed notes for a user. In the previous example, the work schedule will remind the documentation clerk to check for receipt of the contract. When the contract is received, the note may be marked as processed, and the entry no longer appears on the clerk's work schedule, but remains on the historical record.
Modifying Applications
Applications can be completed or modified with simple menu selections for each application screen. Since no data entry is required until the status changes, the user may quickly access any application screen in any order. This allows users to jump from one screen to another, without being forced to pass through unnecessary screens. Only when the user is ready to change the status are user defined data entry requirements checked. Refer to the Change/View Application section of the Application Tabs [U0801] document for more information on modifying applications.
Status Transfer
The Status Transfer option changes application status and/or transfers application ownership and responsibility to another user. Since every application has one owner responsible for it, transfer of responsibility and ownership may be appropriate when the application changes statuses, such as when it goes from credit approval to documentation tracking. Applications may be tracked and processed by non-owners as well, as when a credit approval officer or investigator records a follow-up note for their manager to review. Refer to the Notebook for more information on notes.
Documentation
Documentation tracking can track up to 50 documents per application. This option also allows default document lists to be created and used for new applications, and allows modifications to the document list for each application. Documents can be marked as required for any of the application statuses. For example, a signed Lease Agreement should be required before the application status is changed to booked.
Other Menu Options
In addition to the Application Tracking module options, other LeasePak updates and reports may be selected from the Application Main Menu. When an update or report is selected from the Application Main Menu, the applicant, lessee, and possibly customer and vendor numbers are already known. Applicable updates and reports won't require re-entry of these numbers and will go directly to the update or report. For example, the Notebook report [R0922] may be selected by entering the menu option 'R0922' from the Application update [U0801].
Application Menu
The Application Tracking screen is accessed either through the Tracking menu, Application option or by entering [U0801] from the Fast Menu.
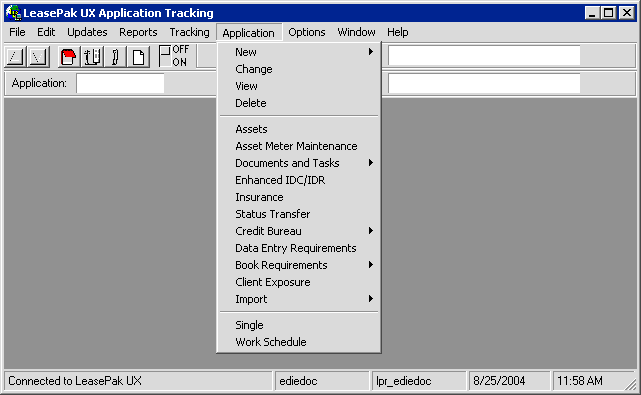
Once inside the Application Tracking screen, the Application menu displays several options.
-
Application, allows the user several options when entering an application; New, Change, View and Delete.
-
Assets, associates pending assets to the application being entered.
-
Documents and Tasks, generates predefined document templates and establishes and tracks tasks associated with the application.
-
Enhanced IDC/IDR, establishes additional IDC/IDR information for the application.
-
Insurance allows the detailed insurance related information to be entered for the application.
-
Credit Bureau option allows the user to submit and review credit reports requested from the credit bureaus when the Credit Scoring -MicroBilt module is purchased.
-
Data Entry Requirements establishes required user defined fields.
-
Book Requirements verifies fields and data required for LeasePak to book an application.
-
Client Exposure calculates the financial exposure for all clients associated with the application.
-
Import Pricing option allows the user to tansfer data from SuperTrumpô or other pricing tool applications, into LeasePak's database when the Pricing Tool Interface module is purchased.
New Application
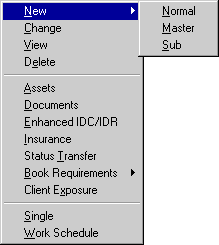
There are 3 choices when entering a new application:
- NORMAL
This choice adds a new application not tied to Application Drawdown Tracking or a master application.
- MASTER
This choice adds a new master application, part of Application Drawdown Tracking. Drawdown Tracking is an optional LeasePak module that is available separately. Please refer to the Application Drawdown Tracking document for more information.
- SUB
This choice adds a new sub-application, which must be tied to a previously entered master application.

When adding a new (normal) application,
this screen is used to specify a template (default) application, if desired.
Selecting on the ![]() help button accesses the Application Search by Lessee function.
help button accesses the Application Search by Lessee function.
To facilitate entry of the new application, it may be useful to clone an existing application. The Application Portfolio update [U0822] offers the ability to establish a default application for all new applications by portfolio. One technique is to create a special application which is never processed (i.e. approved, rejected, or booked), containing only the applicable default information. Such special applications can be given the application status of "Default" so they are not included on exception and progress reports as a normal application. Refer to the Status Transfer option of the Application update [U0801] or the Application Status update [U0811] for more information.
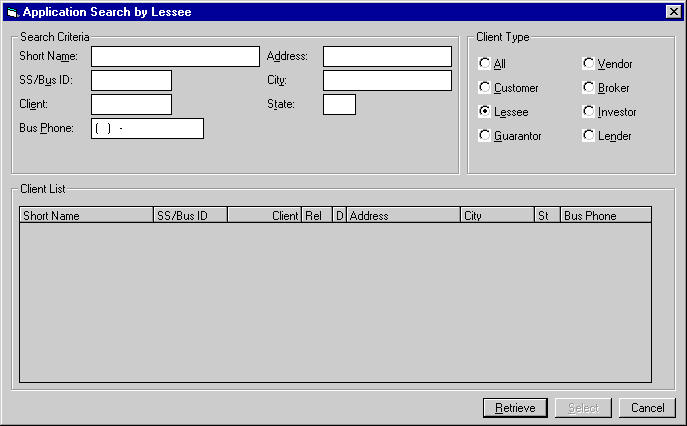
This screen is used to specify the criteria for the application search.
- SHORT NAME
This is the client Short Name from the RCX table.
- SS/BUS ID
This is the client Social Security or ID number from the RCX table.
- CLIENT
This is the Client ID from the RCX and respective client (RAL, RCU, etc.) tables.
- BUS PHONE
This is the Business Phone Number from the respective client table.
- ADDRESS
This is the Short Address from the RCX table.
- CITY
This is the City from the RCX table.
- STATE
This is the State from the RCX table.
- CLIENT TYPE
Initially the Client Type defaults to lessee, so that LeasePak will compare the search criteria entered against all lessee information stored and display matches. To search by vendor, broker, etc., select on the appropriate Client Type in the top right of the screen.Select Retrieve to search for clients matching the specified criteria.
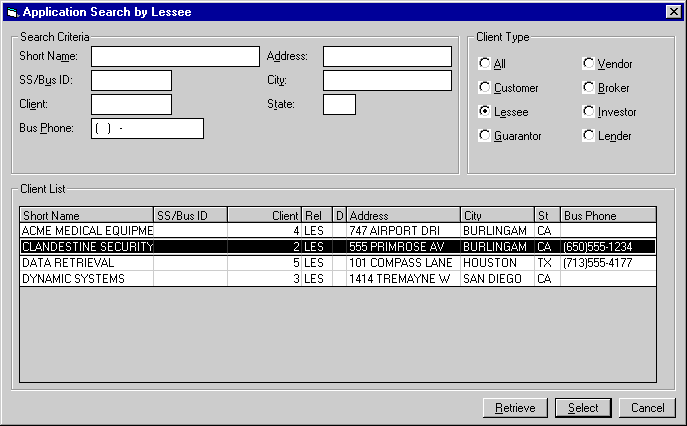
This screen is used to select which lessee's application(s) to retrieve. selecting on Select will bring up a list of applications belonging to the highlighted lessee, if there are any.
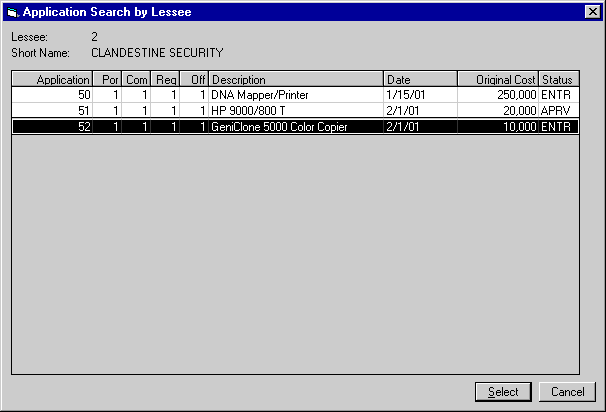
From this screen, clicking on Select will choose the highlighted application as the default application and return the user to the New Application screen.

All data from the default application is defaulted except:
- Application number
- Advanced Payment Money Received
- Asset information
- Information pertaining to receipt of documents on the Documents option of the Application update [U0801].
Once a default application is chosen, or if no default is desired, selecting on OK will open the screen containing the application entry fields. These fields are arranged on 10 tabs. Please refer to the Application Tabs [U0801] document for a detailed explanation of the content of these tabs.
Change/View Application
In order to change or view an application, the user must first select an application using either the Single Application Selection or the Application Work Schedule.
Once an application has been selected, both the Change and View options open the Application Tabs [U0801] screens. Change allows the user to modify the application, View allows read-only access.
Please refer to the Application Tabs [U0801] document for a detailed explanation of the content of the 10 application tabs.
Delete Application
As with Change and View, the user must first select an application using either the Single Application Selection or the Application Work Schedule.
Once an application has been selected, using the Delete option will remove the selected application.
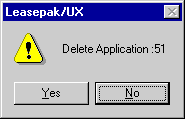
The above message appears to confirm or cancel the deletion.
Any application may be deleted, even those in booked status. However, an application may not be deleted if it is used as a default for any customer (RCU), name (RNM) or vendor (RLR) files.
It's possible to prohibit a user from deleting applications. This is controlled by the Security tab of the Application User Profile [U0831]. Leaving the box blank next to Delete Application will prevent this option from appearing on the user's menu.
Application Assets
The Application Tracking module provides an Assets dialog for managing application assets. The asset attachment process should follow application definition. LeasePak imposes no limit on the number of assets that you may attach to a pending application. You can only attach assets as long as an application is in pending status. Once an application status changes to Approved, options on the Asset dialog become unavailable to prevent addition of new assets and any type of modifications in the existing ones.
Three types of assets may be associated with an application:
- pending (application asset)
- booked in inventory
- booked on lease
A pending asset is created using Assets option of the Application Tracking menu, and is always associated with an application. Its information is stored primarily in the RAQ table and does not affect LeasePak's general ledger accounting and doesn't appear on any reports other than Application reports [R05] until such time as the asset is booked and the information is transferred to the REQ table.
An asset booked in inventory, on the other hand, is usually not attached to any particular lease, but is recorded as part of inventory in LeasePak's general ledger balances. For more information on booking assets directly into inventory, please refer to the Add Asset update [U0101]. The Assets option is also used to associate booked assets with applications.
An asset currently on lease may also be associated with an application. This in effect reserves that asset so that when it comes off one lease, it can be leased again. An application cannot be booked as a lease while any of its assets are in "not available, on lease" status. On-lease assets must first be returned to inventory. An off-lease asset returned to inventory may also be associated with an application through the Add Booked button.
An asset in a different accounting unit (portfolio, company, region, and office) may be tied with the application. Use the Change Key option of Change Asset [U0120] to change the accounting unit of the asset before booking the application.
Assets may be tied only to one application at a time. If an asset is tied to an application, that asset may only be booked to the lease resulting from the application. For example, if an asset is tied to application 123, it may not be booked to any lease other than the one created by application 123. This feature, in effect, functions as a reservation system for assets.
In order to modify the asset associations of an application, the user must select an application using either the Single Application Selection or the Application Work Schedule prior to using the Assets option.
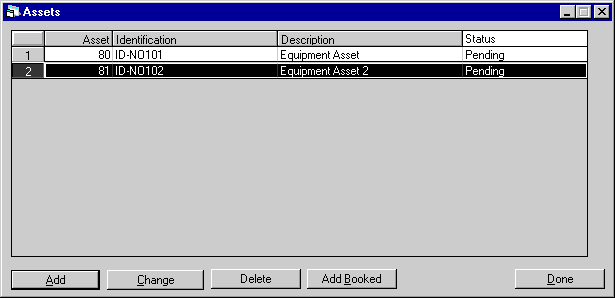
This screen is used to create or change the assets associated with an application.
- ASSET
The asset number is displayed.
- IDENTIFICATION
The asset identification or serial number is displayed.
- DESCRIPTION
The description of the asset is displayed.
- STATUS
The status of the asset is displayed. For application (pending) assets, this will be "Pending". For booked assets, this will usually be "New Pre Inventory".
Add
This button adds a new pending asset to the application.
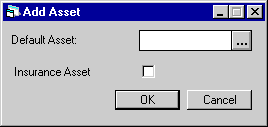
This screen is used to input a default
asset, if desired. selecting on the help ![]() button accesses the Asset Search.
button accesses the Asset Search.
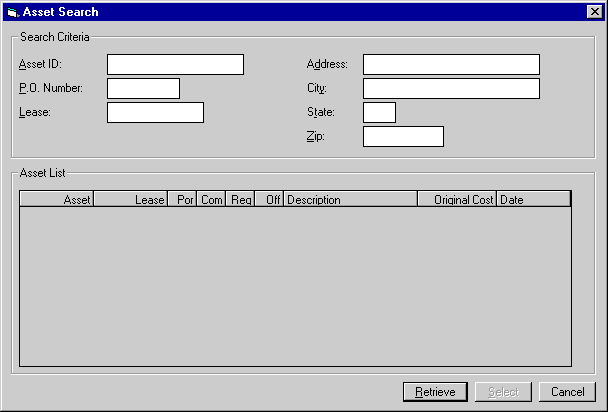
The initial Asset Search screen allows entry of Search Criteria. selecting Retrieve without entering criteria will generate a list of all booked assets in LeasePak. Narrow the search by entering one or more criteria. For example, enter a lessee's address or city to focus the search to assets for a particular lessee.
- ASSET ID
An identification is entered for each existing asset in LeasePak. Often it is the asset's serial number. It does not have to be unique; more than one asset may have the same ID. If the ID code is known, but the asset number is not, enter the ID as search criterion.Additionally, if the asset is cloned from an existing asset, the asset ID of the insurance asset will default as the cloned asset id and an 'I' will be placed in front of it.
- P.O. NUMBER
If the asset's purchase order number is known, but the asset number is not, enter the P.O. number as search criterion.
- LEASE
If the asset is on lease and the lease number is know, but the asset number is not, enter the lease number as search criterion. All assets for that lease will appear on the Asset List.
- ADDRESS
When an asset is added, its location is entered. Asset Search looks at addresses entered at the asset level to record asset locations. It does not search lessee, vendor, or other addresses.
- CITY / STATE / ZIP
Enter a city, state or ZIP code to narrow the search to assets at that location.Selecting Retrieve displays a list of assets matching the specified criteria.
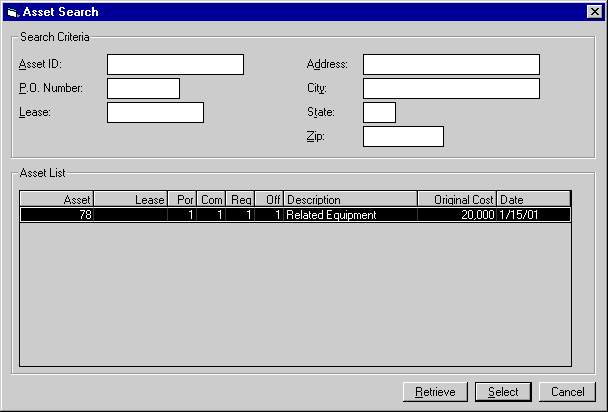
From this screen, clicking on Select will choose the highlighted asset as the default asset and return the user to the New Asset screen.

Additionally, if Multiple Banks is purchased and it is an insurance asset, the Insurance Asset field must be selected. LeasePak will perform an edit check to verify that the INS FINANCE switch in Portfolio [U0212] is set to 'Y'.
Once a default asset is chosen, or if no default is desired, selecting on OK will open the screen containing the application asset entry fields. These fields are arranged on 8 tabs. Please refer to the Application Asset Tabs [U0801] document for a detailed explanation of the content of these tabs.
Change
This button allows the user to modify information on a pending asset already associated with the application (the pending asset must appear on the Assets list). An asset booked in inventory must be changed using the Change Asset update [U0120].
As with Add, the pending asset is modified through the Application Tabs [U0801].
Delete
If the asset highlighted in the Assets list is an application (pending) asset, this button deletes the pending asset record from the RAQ table. If the asset is booked in inventory, this button disassociates the asset from the application, but does not delete the booked asset record.
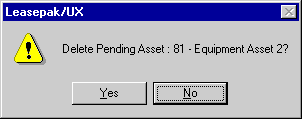
The above message appears to confirm or cancel the deletion.
Assets may also be disassociated from an application by Using the Status Transfer option of Application update [U0801] to reject or withdraw an application. The information for pending assets is retained. That way, if an application is reactivated after a rejection, the pending assets would still be tied to the application.
Add Booked
This button associates a booked asset (either in inventory or on lease) with the application.
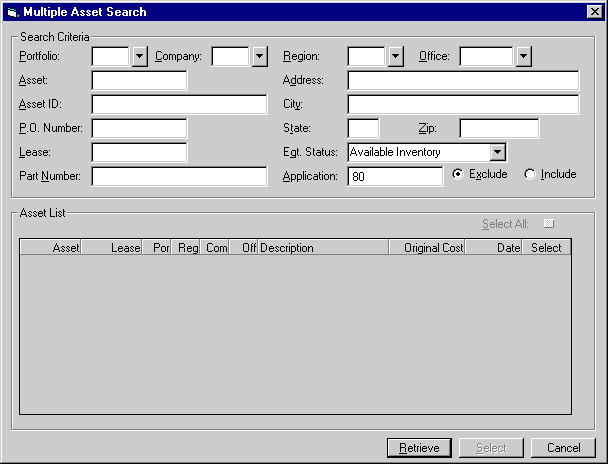
This screen is to add assets to a lease from inventory. You can search for assets using the several criteria specification fields available on the form.
Field Description
 Portfolio
-
(Optional)
Type the portfolio number for which to retrieve asset records, or click
 to select from the list. Leave blank if retrieving across portfolios.
 Company
-
(Optional)
Type the company number for which to retrieve asset records, or click
 to select from the list. Leave blank if retrieving across companies.
 Company
 Region
-
(Optional)
Type the region number for which to retrieve asset records, or click
 to select from the list. Leave blank if retrieving across regions.
 Region
 Office
-
(Optional)
Type the office number for which to retrieve asset records, or click
 to select from list. Leave blank if retrieving across offices.
 Office
 Part Number
-
(Optional)
You can also search for assets on basis of its part number, if the asset has any. Type here the part number of the booked asset to search. Leave blank if retrieving across all parts.
 Part Number
 Eqt. Status
-
(Optional)
Select from this list the equipment status code to search for assets matching that status. Select [None] from the list to search across all equipment statuses.
 Eqt. Status
 Application
-
(Optional)
Type here the application number to specifically include or exclude in the search. This field works in conjunction with the Include and Exclude options. The default selected option is Exclude. Leave this field blank to search across all applications.
 Application
Asset Meter Maintenance
Cost Per Use module only, asset-level meters: selecting this option starts the Asset Meter Maintenance [U0231] update. From Application, you can use this update for pending assets. For assets already booked and on lease, use the Asset Meter Maintenance update directly from the LeasePak Updates menu. For more information, refer to the overview document Cost Per Use.
Application Meter Maintenance
Cost Per Use module only, lease-level meters: selecting this option starts the Leasse Meter Maintenance [U0233] update for the application. For booked leases, use the Lease Meter Maintenance update directly from the LeasePak Updates menu. For more information, refer to the overview document Cost Per Use.
Documents and Tasks
As with other Application menu options, the user must first select an application using either the Single Application Selection or the Application Work Schedule.
The Documents and Tasks option from the Application Tracking menu allows the user to add or modify documents for an application and keeps track of the receipt of these documents. The option also allows a document list to be defaulted depending on the application type and its requirements. If the document list is created from a default list, it may be appended or modified as required for each application. (Refer to the Application Document List update [U0815].)
Documents can be marked as required for any application status. In order to change the application's status, the required documents for the new status should have been received. For example, the Lease Agreement must have been received in order to change the application status to booked.
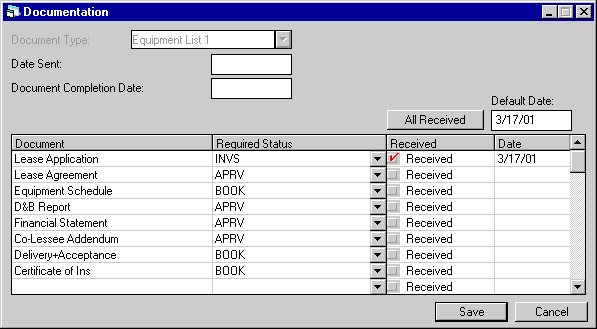
This screen is used to add or modify documents for an application and to track the receipt of those documents. It may also be used to select documents to appear on a missing document letter. Up to 50 documents can be tracked through the scrolled area from the screen above.
- DOCUMENTATION TYPE
This field can be accessed only if the user has the privilege to modify the document list. (Refer to the Application User Profile update [U0831].) Without this privilege, a user may record the receipt of documents on this screen, but not modify the list of required documents.The list of default documents for each documentation type is defined by the Application Document List update [U0815]. Use Help for a list of valid documentation types.
Once any document has been marked as received, the DOCUMENTATION TYPE cannot be changed. If it's necessary to change the type, it is possible to delete the "received" code and date, change the type, and then re-enter "received" and the date.
- DEFAULT DATE RECEIVED
Enter the date (in MM/DD/YY format) to be defaulted into the DATE RECEIVED field when a document is marked as received. This field is defaulted to today's date.
- DATE SENT
If a document package was sent to the lessee, enter the date it was sent in MM/ DD/YY format. This field is informational only.
- DOCUMENT COMPLETION DATE
Enter a date when the documents are expected to be complete in MM/DD/YY or DD/MM/YY format, depending on the Date Format Preference field in Security [U0706]. This field is informational only.
- ALL RECEIVED/DEFAULT DATE
If all or most documents are completed and received at once, enter the date of their receipt as DEFAULT DATE in MM/DD/YY or DD/MM/YY format, depending on the Date Format Preference field in Security [U0706]. Today's date automatically appears as the default, but may be changed if desired.Then select on All Received to mark all remaining documents as received. When All Received is selected, checks are automatically placed in the RECEIVED field of all remaining documents.
If most documents are to be marked as received, it may be easier to place select ALL RECEIVED and then individually remove the checks on those documents not yet received.
- DOCUMENT (scrolled area)
This field can be accessed if the user has the privilege to modify the document list. (Refer to the Application User Profile update [U0831].)
The names of documents from the Document List are displayed. Additional documents may be entered, or documents not required may be deleted. Documents which have not yet been received will be at the top of the list.
- REQUIRED STATUS (scrolled
area)
This field also can be accessed if the user has the privilege to modify the document list.If this field can be accessed, enter the earliest application status for which this document is required. If no code is entered the document is not required. Use Help for a list of valid required status codes. The Status Transfer [ST] update will not allow the application status to be changed to status shown here if this document has not been received.
Example: If "approved" status appears here, then this document is required before the application's status may be changed to approved.
- RECEIVED (scrolled area)
select the box to mark the document as received.
- DATE RECEIVED (scrolled
area)
Enter the date the document was received in MM/DD/YY format. This field is defaulted from DEFAULT DATE RECEIVED when the field RECEIVED is selected
Enhanced IDC/IDR
As with other Application menu options, the user must first select an application using either the Single Application Selection or the Application Work Schedule.
When the Vehicle Finance module is purchased along with the Application tracking module [U0801] and the Application User Profile [U0831] security switch is set to allow access to the Enhanced IDC/IDR option in the Applications Tracking module.
This option allows the user to establish IDC/IDR information for the application that is being booked. The IDC/IDR fees entered will be tracked during the life of the lease, as well as provide an Amortization Schedule based on the accrual methods used when the lease was booked.
LeasePak may cause a $0.01 difference for IDC/IDR's when the amortized IDC/IDR is reversed.
Fifty-three additional G/L accounts that have been added in LeasePak v3.1a will track receivables, fees, expenses, debits and credits. All G/L accounts can be reconciled via the Lease Inquiry [R0905]. Specific accounts may reconciled via the G/L Reconciliation [R0403], G/L Entries Listing [R0406] and the Master G/L Reconciliation [U0460] reports. Refer to General Ledger Accounting for detailed in formation.
When the Partial Deductions module is purchased, all A/R records will default to the lease at time of booking.
Leases with Operating type accrual methods will be amortized with straight line methods. All other accrual methods, will be amortized with a proportional income basis method. However, IDRC-Warranty Insurance will use only straight line methods.
Leases that are booked with IBL type accrual methods must have the Estimated Unearned income manually entered into the L_EST_UE_D field in the RAP table in order to calculate the earned IDC/IDR:
New Earned IDC/IDR: ((Lessor Rental Income Y-T-D/Estimated Unearned) *Original IDC/IDR) - IDC/IDR Y-T-D
LeasePak may cause a $0.01 difference for IDC/IDR's on some IBL's when an accrual, accrual reversal and a re-accural is performed.
If there is nothing entered in this field, LeasePak will calculate the Estimated Unearned as follows:
Estimated Unearned = Minimum Payments Receivable - Total Contract Acquisition Cost
The Total Contract Acquisition Cost is calculated as follows:
+ Unguaranteed Residual
- (Acquisition Cost - Down Payment)
- Other Charges
Minimum Lease Payments Receivable is calculated as follows:
Number of Payments *
payment amount (according to payment schedule)
+ Guaranteed Residual
+ Interim Rent (when Interim Rent is set to N in [U0212NL])
If the yield/rate (Total Interest Rate) is zero, a straight line amortization method will be used for IBL's.
The INCLUDE IDC IN 'NPV' and 'OPR' PAYOFFS' switch in the Payoff Customizations option of the Portfolio [U0212] update have no affect on the new IDC/IDR fields.
The Enhanced IDC/IDR supports the following accrual methods when only one asset is tied to the lease:
- xAPR
- xAXx
- xOPM
- xOSL
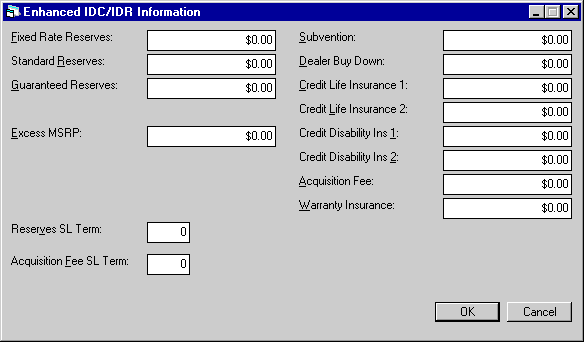
This screen allows the IDC/IDR information to be entered in the Application Tracking module [U0801].
The following steps must be taken before you enter Enhanced IDC/IDR information for rebate calculation:
- Setup or adjust a Lease Form [U0721] last screen by applying any one of the following Credit Life and A_H Rebates option. This is required to calculate the rebate amounts for the Payoff [U0103] or Payoff Quote [U0213].
- Rule of 78ths = ‘Y > 0’
- Actuarial = ‘Y > 0’
- Sum of Balance = ‘Y > 0’
- Simple Interest = ‘Y > 0’
- Input and save initial application information.
- The application must be in pending status.
Once the application is approved, fields on the Enhanced IDC/IDR dialog become unavailable to prevent any type of modifications in the existing values.
- FIXED RATE RESERVES
Enter the IDC3- Fixed Rate Reserve total amount for the application.
- STANDARD RESERVES
Enter the IDC4 - Standard Reserve total amount for the application
- GUARANTEED RESERVES
Enter the IDC5 - Guaranteed Reserves total amount for the application.
- EXCESS MSRP
Enter the total Excess MSRP amount for the application.
- SUBVENTION
Enter the total IDR5 - Subvention amount for the application.
- DEALER BUY DOWN
Enter the total IDR6 - Dealer Buy Down amount for the application.
- CREDIT LIFE INSURANCE 1
Enter the total IDR7 - Credit Life Insurance 1 amount for the application. This is required to calculate the rebat amount for Payoff [U0103] or Payoff Quote [U0213].
- CREDIT LIFE INSURANCE 2
Enter the total IDR8 - Credit Life Insurance 2 amount for the application. This is required to calculate the rebat amount for Payoff [U0103] or Payoff Quote [U0213].
- CR DISIBILITY INS 1
Enter the total IDR9 - Credit Disability 1 amount for the application. This is required to calculate the rebat amount for Payoff [U0103] or Payoff Quote [U0213].
- CR DISABILITY INS 2
Enter the total IDRA - Credit Disability Insurance 2 amount for the application. This is required to calculate the rebat amount for Payoff [U0103] or Payoff Quote [U0213].
- ACQUISITION FEE
Enter the total IDRB - Acquisition Fee amount for the application.
- WARRANTY FEE
Enter the total IDRC - Warranty Insurance Fee amount for the application.
Insurance (Application)
This option from the Application menu is used to enter insurance information related to the application. As with other Application menu options, the user must first select an application using either the Single Application Selection or the Application Work Schedule.
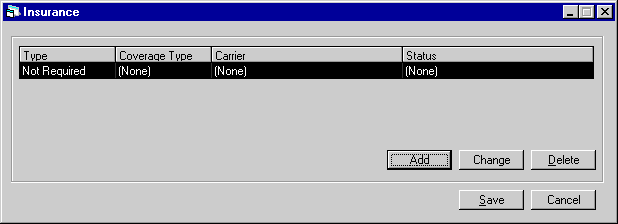
When the option is initially chosen, this screen appears showing all insurance information entered to date. If no insurance information has yet been entered, the screen is blank and only the Add button is active.
Select the Add button to add a line of information on an additional insurance policy. To change information on a policy already entered for the application, select it from the list and click the Change button.
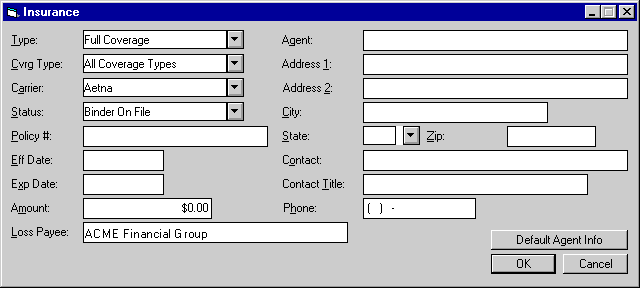
This screen appears to add or change insurance information.
When a new policy is added and OK is selected, a new line of insurance information appears on the initial screen. The new data is edited when Save is selected or Enter is pressed. Edits ensure required information is present. Requirements depend on the TYPE chosen from the list of valid TYPE codes:
| TYPE |
FIELDS REQUIRED |
| Not required |
Type |
| Self-Insured |
Type, Status |
| Full Coverage |
Type, Carrier, Status, Exp(iration) Date |
The Insurance Risk Fee enhancement will only function if the Type selected is 'Full Coverage' and 'Self Insured'. If 'Not Required' is selected, no Insurance Risk Fee will be charged.
Additionally, the Status will have no bearing on this enhancement,e.g. 'Binder on File', 'Complete and Correct', 'Due to Expire' etc., will not affect the Insurance Risk Fee charges.
- TYPE
Select from the pull-down list of insurance type codes which are established by the LeasePak system. See the table above of required fields for each valid TYPE.
- CVRG TYPE
This code identifies the type of coverage provided by the insurance policy. Select from the list of valid insurance coverage type codes, which are established using the Custom Code update [U0722].
- CARRIER
Use Help for a list of valid insurance carriers and select the company which is providing insurance. This code is established on the Custom Code update [U0722].
- STATUS
Use Help to select from a list of valid insurance status codes established by the LeasePak system. The insurance status indicates whether or not the insurance is complete and correct. Once an application is booked, the lease appears on the Insurance Follow-up report [R0904] until the insurance is complete and correct.
- POLICY #
Enter the insurance policy number.
- EFF DATE
Enter the starting date on the insurance policy in MM/DD/YY or DD/MM/YY format, depending on the Date Format Preference field in Security [U0706].
- EXP
DATE
Enter the date the insurance expires in MM/DD/YY or DD/MM/YY format, depending on the Date Format Preference field in Security [U0706]. Thirty days prior to this date, LeasePak automatically changes the insurance status to due to expire. On this date, LeasePak automatically changes the insurance status to expired. Insurance policies that have expired or are due to expire appear on the Insurance Follow-up report [R0904].
- AMOUNT
Enter the amount of coverage for this policy.
- LOSS PAYEE
Enter the name of the person or company to whom money should be paid in the case of any accident or loss.
- AGENT
Enter the name of the agent or insurance broker.
- ADDRESS 1
Enter the first address line of the agent or insurance broker. Use this field if there is only one address line.
- ADDRESS 2
Enter the second address line of the agent or insurance broker.
- CITY
Enter the city of the agent or insurance broker.
- STATE
Enter the state of the agent or insurance broker. STATE must be a valid post office abbreviation. Use Help for a list of valid states.
- ZIP
Enter the ZIP or postal code of the agent or insurance broker.- For U.S. use 5 or 9 digits
- For Canada use 6 characters (alternating letters and numbers)
- For Mexico use 5 digits
- For other locations any entry
is accepted, or field may be blank
- CONTACT
Enter the name of the contact person at the insurance brokerage.
- CONT TITL
Enter the title or job position of the contact person.
- PHONE
Enter the area code and phone number of the insurance agent or broker. The phone number must be entered if the area code is entered.
Status Transfer
The Status Transfer option is used to change the status of an application and/or transfer application ownership to another user.As with other Application menu options, the user must first select an application using either the Single Application Selection or the Application Work Schedule.
Status Change
An application's status represents its current stage of processing. For example, applications that have just been entered through the New Application module may have the status ENTR (Entry), while applications that are undergoing credit investigation may have the status INVS (Investigation).
The first character of the application status code defines its major category:
- Exxx Entry
- Ixxx Investigation
- Axxx Approved
- Bxxx Booked
- Wxxx Withdrawn
- Sxxx Suspended
- Dxxx Default
- Rxxx Rejected
The actual values of these status codes are defined and customized with the Application Status update [U0811].
It is important to note that application statuses do not, by themselves, define who may access the application at a given time. For example, the fact that an application is in the Investigation (Ixxx) phase does not prevent a salesperson from entering additional information, or a documentation clerk from starting work on it. Field level security, previously defined for each user through the Application User Profile update [U0831], restricts the fields a user may modify. Refer to the Application Field Security update [U0814] and the Application User Profile update [U0831] for more information on defining field security for each status.
In addition, data entry requirements are used to define those fields which must be entered before an application's status may be transferred to that level. The purpose is to allow the contents of the application to be "built- up" as the application evolves from the "Entry" status to the "Booked" status. Thus, a status change is only allowed if all minimum entry requirements have been met for the selected status. For more information on entry requirements, refer to Data Entry Requirments.
Ownership Transfer
The owner of the application is the person primarily responsible for the next step in its processing. To transfer ownership, the initial username of the new owner is entered in the NEW OWNER field. An application may be owned by only one user at a time. The ownership of an application can be transferred at any time, not just when the application status is changed. The significance of ownership is:
- The owner of a particular application
(i.e., the user with primary responsibility) will find that application appearing
on his/her work schedule even though no unprocessed follow-up notes are outstanding
for that application.
If a follow-up date is specified when selecting a work schedule, only those applications with unprocessed notes on or before the date entered will appear on the work schedule.
- Other users (non-owners) will only see that application on their work schedules if they have oldest unprocessed follow-up notes for that application is(i.e., notes assigned to them).
Thus, ownership insures that every application will appear on at least the owner's work schedule, providing tracking of all applications regardless of whether unprocessed notes exist.
Rather than transferring ownership to another user, it may be more appropriate to simply record a follow-up note for another user using the Notebook update (accessed by pressing <F7> or <GOLD-N> F3 or selecting Notebook from the Options menu). Ownership of the application would then remain with the original user, but there would be at least two follow-up notes for the application on the other user's work schedule: one for the original owner and one for the other user. This may be more efficient if the other user is simply to check on something for the application. Upon completing the task indicated, the user would then mark the follow- up note as processed, causing it to no longer appear on the work schedule.
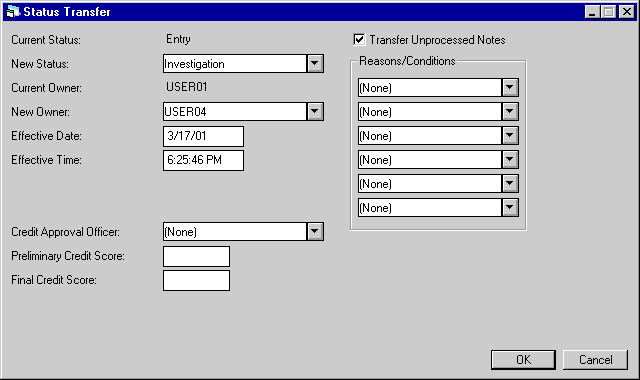
This screen is used to change the status of an application and/or transfer the ownership of an application to another user.
- CURRENT STATUS
The current status of the application is displayed.
- NEW STATUS
Use Help for a list of valid statuses. Only a valid status as defined for the user in the Application Profile update [U0831] and Application Flow update [U0812] may be entered. A valid status is determined by the values of both the current and the new status.A new status is not valid unless all documents required for the status are received and all minimum entry requirements defined for the status have been met. If the application does not meet these requirements, a message is displayed and the status transfer is not allowed.
Refer to the Documentation option of the Application update [U0801] for more information on required documents.
Additional conditions and notes apply to status transfers to the following categories:
- Investigation (Ixxx)
When the application status is changed from "Entry" to "Investigation," the system resets the application's time outstanding for work schedule purposes, if the RESET TIME OUTSTANDING (Y/N) field of the Application Portfolio update [U0822] is active. This is useful if the application is entered and tracked by a salesperson before it is ready for investigation, so that the investigator sees no time outstanding when the application first appears on his/her work schedule. Note, however, that the Application Inquiry [R0502] always reports the time outstanding for all statuses (i.e., since initial entry of the application).
- Approved (Axxx)
The following conditions must be met before an application may be changed to "Approved" status:
- USER CREDIT LIMIT
The total dollar amount of the application must not exceed the credit limit defined on the Application User Profile [U0831] for the user performing the status change. If the amount exceeds the user's limit, a warning message is displayed: "User's approval credit limit exceeded. New owner defaulted.", and the NEW OWNER field is set to the DEFAULT MGR FOR HIGHER CREDIT APPROVAL, previously defined for the user in the Application User Profile update [U0831].
- USER CREDIT LIMIT
- CLIENT ACTIVITY STATUSES
- If a broker, investor, or vendor is defined for the application, its ACTIVITY STATUS must not be inactive, rejected, or terminated. The activity status for these clients is established with the Broker [U0219], Investor [U0216], and Vendor [U0201] updates.
- RATE
PLAN CHECKS
If a rate plan is assigned for the application, all values on the rate plan must agree with the corresponding Application fields. In addition, if a vendor is tied to the application and the vendor is tied to a rate plan group, the rate plan entered for the application must be from the rate plan group. Finally, the status transfer EFFECTIVE DATE must fall between the rate plan start and end dates.These checks do not apply if the user has the privilege to bypass the rate plan edit checks. Refer to the OVERRIDE RATE PLAN field of the Application User Profile update [U0831] for more information on this bypass privilege. Refer to the Rate Plan update [U0816] for more information on rate plans and the specific fields which must agree.
- Booked (Bxxx) - using [U0101]
To transfer an application to booked status, use the Book Lease option of the New Lease update [U0101]. If a user selects "Booked" as NEW STATUS on the Application Status Transfer update, a message appears to this effect.
- LeasePak REQUIRED FIELDS
All fields (both application and asset) required by LeasePak to book an application must be entered. Note that these requirements may be different than the entry requirements associated with the "Booked" status. Refer to Data Entry Requirments.
- APPROVAL EXPIRATION DATE
The current date (i.e., the date on which the status is being changed) must not be after the approval expiration date. Otherwise, the application must be re-approved. The approval expiration date is entered in APPROV EXPIRATION on this screen.
- ASSET CONSISTENCY
The following amounts entered for the application must equal the sum of the corresponding amounts for all assets associated with the application:ACQUISITION COST
OTHER CHARGES
RESIDUAL AMOUNT
UPFRONT SALES TAXAll booked assets associated with the application must be off-lease and in the same Portfolio/Company/Region/Office as the application.
- CLIENT ACTIVITY STATUSES
If a broker, investor, or vendor is defined for the application, its ACTIVITY STATUS must not be inactive, pending, rejected, or terminated. All other activity statuses are valid. The activity status for these clients is established with the Broker [U0219], Investor [U0216], and Vendor [U0201] updates.For Master Applications, LeasePak will require that any increase in the Master Application credit limit beyond the original credit limit stay within the tolerance and approval credit limit in the user's Application User Profile [U0831].
- RATE PLAN CHECKS
Identical rate plan checks apply for the "Booked" status as the "Approved" status. Refer to the RATE PLAN CHECKS section under the "Approved" status requirements.Note that once an application status is changed to "Booked," it cannot be changed to any other status. To remove a lease that has been booked, use the Remove Lease option [RM] of the New Lease update [U0101].
- Default (Dxxx)
The following conditions must be met before an application may be changed to "Default" status:
- No advanced money was received.
- No assets, either pending
or booked, are tied to the application.
- CURRENT OWNER
The current owner of the application is displayed.
The following conditions must be met before an application may be booked:
- NEW OWNER
Enter the initials username of the Application user who will receive ownership and responsibility for the application. Use Help for a list of valid users. CURRENT OWNER and NEW OWNER may not be the same; to leave ownership with the current owner, select [None] as NEW OWNER. Transfer of ownership and responsibility may be done at any time, not just when the application status is changed.NEW OWNER may be defaulted with a user previously identified on the Application User Profile update [U0831] when a status is changed or when the current user's credit limit is insufficient. Refer to the Application User Profile update [U0831] for more information on these defaults.
- EFFECTIVE DATE
Enter the effective date for the status or ownership transfer in MM/DD/YY or DD/MM/YY format, depending on the Date Format Preference field in Security [U0706]. The current date is the default. EFFECTIVE DATE and EFFECTIVE TIME may only be changed to a date/time combination before or equal to the current date/time.EFFECTIVE DATE and EFFECTIVE TIME are reported in the application history section of the Application Inquiry [R0502]. They may only be changed by users with the privilege to modify the date and time, as established with the Application User Profile update [U0831].
- EFFECTIVE TIME
Enter the effective time for the status or ownership transfer. The current time is the default and will display depending on the Date Format Preference field in Security [U0706]. EFFECTIVE DATE and EFFECTIVE TIME may only be changed to a date/time combination before or equal to the current date/time.
- APPROVAL EXPIRATION
Enter the expiration date of the approval in MM/DD/YY or DD/MM/YY format, depending on the Date Format Preference field in Security [U0706]. The application must be booked before or on this date or it must be re- approved. This field is accessible only when the CURRENT STATUS or NEW STATUS is "Approved."When the status is first changed to "Approved," a default expiration date is calculated by adding the APPROVAL EXPIRATION DAYS from the Application Portfolio update [U0822] to the effective date of the application. Note that calendar days, not business days, are used in this calculation.
Users with proper security may modify this date. Refer to the CHANGE APPROVAL EXPIRATION DATE field of the Application User Profile update [U0831] for information on the security needed to change this date.
- CREDIT LINE EXPIRATION
The expiration date of the drawdown line of credit, if any, displays. It is information only. The credit line expiration date for the master application is displayed.If the drawdown expiration date of the application is later than the Lessee [U0203] drawdown EXP DATE and/or the Customer [U0205] drawdown EXP DATE, then the lessee/customer date will be changed to the Application drawdown expiration date. If the Master Application has been in Master Application Status (DMAS), at any time in the past, any change to the Drawdown Expiration Date will cascade to all sub-applications tied to the Master Application.
- CREDIT APPROVAL OFFICER
Select from the pull-down list the name of the person who made a credit decision on the application, if applicable. Approval officer names are established on the Approval Officer table [U0707].
- PRELIMINARY CREDIT SCORE
Enter the preliminary credit score assigned to the application, if applicable. This field is informational only.
- FINAL CREDIT SCORE
Enter the final credit score assigned to the application, if applicable. This field is informational only.
- TRANSFER UNPROCESSED NOTES
Select to X the box and transfer all unprocessed work schedule notes for this application from the CURRENT OWNER to the NEW OWNER.
- REASONS/CONDITIONS (scrolled
area)
Enter up to 6 codes indicating the reasons or conditions for the status or ownership change. Use Help for a list of valid codes. These codes are established with the Reason/Condition update [U0818].
Credit Bureau
The Credit Scoring Interface is a bridge system between MicroBilt's credit report software and LeasePak. This module works in conjunction with the LeasePak Application Tracking [U0801] module and gives the user the ability to select client data (lessee, co-lessee, guarantor etc.) and transmit it securely to the Microbilt servers.
Data, including credit scores, from requested bureaus are pulled and stored on the MicroBilt servers for later retrieval and review. The bureaus reports and scores can be transferred to LeasePak, in real-time or left on the MicroBilt servers. LeasePak uses MicroBilt's Systems Integration Tool Kit to access selected bureau products from D&B, Experian Business, Experian Consumer, Equifax and Trans Union.
Book Requirements
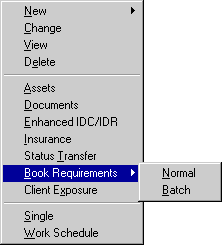
As with other Application menu options, the user must first select an application using either the Single Application Selection or the Application Work Schedule.
This option performs either the Normal Book Requirements or Batch Book Requirements. Please refer to Batch Book Requirements for more information on Batch Applications and Batch Book Requirements.
Normal Book Requirements checks all data that has been entered in association with the application, including Asset data, Lessee data, data entered on the Insurance and the Documentation optional screens. It may take some time for LeasePak to check all related data against booking requirements and display the results.
A lessor may have additional data requirements beyond those established by LeasePak. The Book Requirements option addresses only LeasePak's internal, hard-coded requirements.
For Normal Book Requirements, the option offers 3 alternative ways to summarize and view missing or contradictory data which would prevent the application from being booked.

This screen appears when the Normal Book Requirements option is chosen for the current application. Select the most appropriate format for displaying remaining requirements.
An error message appears if the current application is already in booked status.
Correction
Select this alternative to initiate a process of correcting the application's data problems, one by one .Selecting Correction initially causes LeasePak to display the message: Validation in Process at the bottom of the Book Requirements screen.
The system edits all data entered for the current application and, if it encounters a problem which would prevent booking, displays and error message then goes to the the data entry screen and field on which the problem may be corrected. It repeats this action for every correction needed to meet Book Requirements. Thus the user has a chance to make all required corrections.
For example, the STATEMENT CODE field on Application Tab 7 may have been left as [None] when the application was added. The application cannot be booked without a STATEMENT CODE.
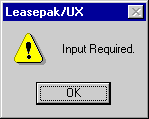
Book Requirements will display the above error message, then move the user to the STATEMENT CODE field on Application Tab 7. The user then has the opportunity to select a STATEMENT CODE and select Save (or press Enter) to continue the process.
If the user must interrupt the process, he or she may select Cancel from any data entry screen. Corrections made and saved to that point will be stored. The process may later be resumed where it left off by again selecting the Correction alternative from the Book Requirements option.
Visual Listing
Before the user selects Correction from the Book Requirements option, it is advisable to generate a Visual Listing.
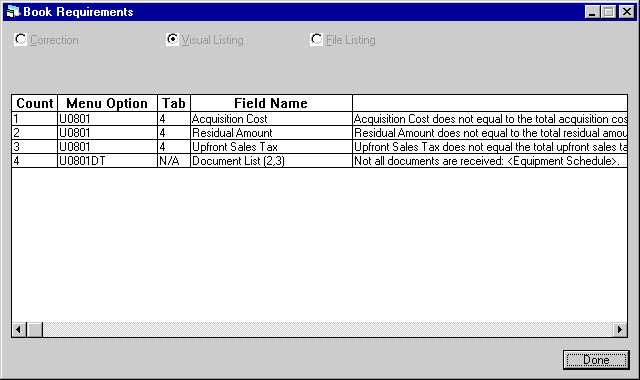
This alternative displays an on-line summary of all the requirements not yet met. It includes the menu option and field name where the problem can be corrected and the first 45 characters of the error message for each. The user thus has a complete picture of the application's data problems and how they relate to each other. He or she may do any necessary research before beginning to enter corrections.
Of course, it is possible that entering or changing one field's data will invalidate the value in another field. Thus a Visual Listing may need to be updated, i.e., requested again, after changes are made.
File Listing
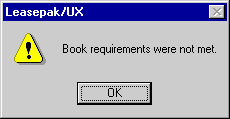
The above message appears when the File Listing alternative is selected and Book Requirements have not been met.
For this alternative, LeasePak compiles the same list of requirements not yet met which displays in a Visual Listing. However, the File Listing does not appear on the screen. Instead it is saved as the text file U0801br.txt in the user's LeasePak version directory on the PC. It can be opened by any program able to read text files, such as MS Word or Windows Notepad.
The File Listing differs from a Visual Listing in that the reader can scroll through the entire text of messages, not just the first 45 characters, and the listing may be edited. Text may be added or cut. This is useful if the listing will be sent to someone else whose help is needed to complete the booking requirements.
Only one File Listing may be stored in the Notepad at once. As soon as a Book Requirements File Listing is generated for a second application, it replaces U0801BR.TXT for a first application. To preserve a File Listing, save it under a different file name.
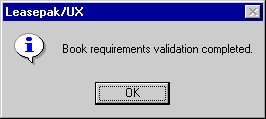
The above message appears when all Book Requirements have been met for the application.
Data Entry Requirements
When the Application Tracking [U0801] module and JULE Fund 1999 module are purchased, LeasePak will allow the user to perform Data Entry Requirements on the application. This new validation function will call a Sybase stored procedure that can be customized to perform status based validations on the applications according to the user's business requirements.
Client Exposure
The Client Exposure option is used to calculate the financial exposure for all clients who have a financial connection with the application. This includes the lessee, co-lessee, guarantor and customer. Calculations occur behind the scenes when the option is chosen; there is no Client Exposure screen that appears.
As with other Application menu options, the user must first select an application using either the Single Application Selection or the Application Work Schedule.
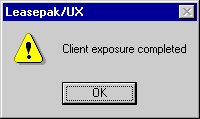
When LeasePak completes the client exposure calculations, the above message is displayed.
The results are stored on the respective client files for future access. The Client Exposure option can be updated for an application whenever the latest calculations are desired.
Following the execution of the Client Exposure option, the results can be viewed on the Current Outstanding Balance, Credit Limit or Delinquency Aging sections of the Application Inquiry [R0502].
Client Exposure provides up-to-date information that should be used for credit decisions on whether to approve or reject an application. Therefore, it is imperative that the Client Exposure option be executed prior to changing the application's status to approved or rejected. If a new Client Exposure is not run, the credit decision may be based on obsolete or incorrect client exposure information.
The client exposure calculations performed by this option may take a long time, depending on the number of leases and/or approved applications found for any of the clients connected to the current application. For this reason, these calculations are not automatically performed whenever an Application Inquiry [R0502] is generated or an approval/rejection is processed using the Status Transfer update. Instead, NetSol suggests that the Client Exposure option be executed once, prior to approval/rejection. If a significant amount of time passes between the last client exposure calculation and approval/rejection, simply re-execute the client exposure. The Application Inquiry will display the date and time of the last client exposure calculation next to the results.
Import Pricing
The Import Pricing option from the Application Tracking menu is displayed when the T-Value/Pricing module is purchased. The T-Value/Pricing is a bridge system between Ivory Consulting's SuperTrumpô pricing tool software and LeasePak. This module transfers data from SuperTrumpô to the LeasePak database; importing the data without the need to re-type the information over again.
This module is integrated into the LeasePak Application Tracking module and allows the ability to locate a SuperTrumpô pricing run (parameter file), on the users PC or network share. All applicable fields from the pricing run will be stored into the current LeasePak application.
Single Application Selection
The Single option from the Application Tracking menu is used to select a single application for modification or deletion.

This screen is used to input the
application number to be selected. As described previously, using the ![]() help button accesses the Application Search by Lessee function.
help button accesses the Application Search by Lessee function.
Once an application has been selected, the other options on the Application Tracking menu are available to be used on the application.
Application Work Schedule
The Application update [U0801] provides a work schedule (or list) of applications assigned to an individual user or team of users. Items appear on the work schedule in the priority established for the user on the Application User Profile [U0831].
Using the work schedule, the user may select applications to be processed, one after another. Once an individual application has been highlighted, it becomes the "current" application. Information for this application is displayed at the top of the screen. Various application operations and functions may be selected from the menu and performed on this application, without having to re-enter the application number.
Applications are assigned to a user's work schedule in several ways:
- The person who enters an application into LeasePak through the New Application option initially owns that application.
- An application may be assigned to the user through the Status Transfer menu option.
- An unprocessed note may be created for an application and assigned to a user's work schedule for follow-up.
Several unprocessed notes may be associated with an application. The oldest determines to which work schedule the application is assigned. Information from that note alone appears on the Work Schedule screen.
Applications are removed from a user's work schedule in several ways:
- After its status is changed to rejected, default or withdrawn (or any status beginning with R, D or W), an application is no longer assigned to any work schedule.
Rejected, withdrawn and default applications may be accessed through the Single Application option of the Application menu.
- An application may be assigned to another owner through the Status Transfer menu option.
- A note may be processed, so no further follow-up is required.
- An application may be deleted using the Delete option on the Application menu.
As new applications are added, statuses change, notes are created and processed during the day, the user may immediately update his or her work schedule at any time by selecting on the Retrieve button at the bottom of the Work Schedule screen. Applications no longer eligible for processing disappear and newly assigned applications appear. If the user chooses to sign out of LeasePak before all applications are processed, the work schedule is restored when the user returns to the Application module.
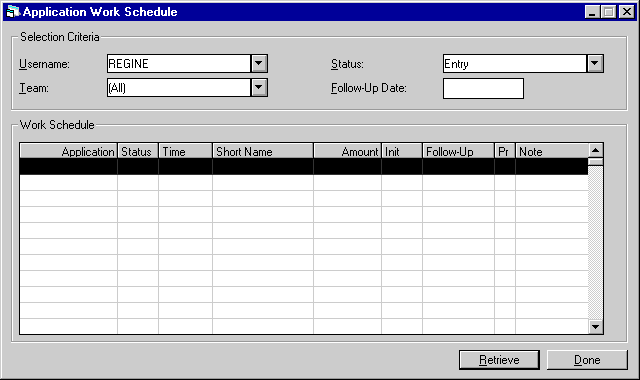
This screen appears when Work Schedule is selected from the Application menu. It is used to enter selection criteria for the work schedule. USERNAME, TEAM and STATUS display what was entered the last time a work schedule was created. The follow-up date always defaults to today's date.
Applications that meet the selection criteria entered will be sorted according to the order specified in the Application User Profile [U0831]. One user may view another user's or a team's work schedule. The order in which applications are sorted is based on the profile of the user who signed in to LeasePak, even if another USERNAME is used for selection criteria.
- USERNAME
Enter your own or someone else's LeasePak sign-on username to create a work schedule containing only applications associated with that user. Use Help for a list of valid usernames. Enter All to create a work schedule containing all the applications in the work schedule file. This field is cleared if TEAM CODE is entered. - TEAM
Enter a team code to create a work schedule containing all applications associated with members of that team. Use Help for a list of valid team codes. Applications are owned by individual users, not by teams. The applications on a team's work schedule are a compilation of those owned by all the team members. Teams are created and usernames are assigned to teams through the Team update [U0724]. This field is cleared if USERNAME is entered. - STATUS
Use Help to select a status code and create a work schedule containing only applications in that status. Select All to include more than one status. - FOLLOW-UP DATE
Enter a date to create a work schedule containing only those applications whose unprocessed notes have follow-up dates on or before the date entered. The initial default is the current date. If a future date is desired, enter the date in MM/ DD/YY or DD/MM/YY format, depending on the Date Format Preference field in Security [U0706]. Entering a date in the past is not permitted. A blank date selects applications without regard for follow-up date.
Once selection criteria are entered, select Retrieve. All applications which meet those criteria will display.
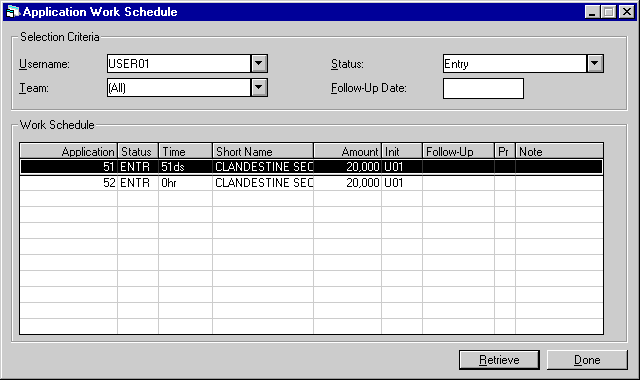
To make an application active, highlight it on the work schedule. The order in which applications appear for a user is determined by the Application User Profile [U0831]. For example, the primary sort may be by application number, vendor number, status, etc.
Once an application is active, choose function(s) from the Application menu to be performed. All updates to an active application must be complete (i.e., Save, OK, Cancel or Done must be selected) before another application can be made active. If a second application on the work schedule is highlighted before updates to the first are complete, the message, "Current update must be completed before moving to another application," appears.
- APPLICATION (scrolled area)
The field name is APPLICATION, but either application number or vendor number may be displayed. Refer to the Application User Profile update [U0831] for information on defining which number displays on a user's work schedule. - STATUS
The status of the application is displayed. - TIME
The time elapsed since the application was entered into LeasePak is displayed the format will depend on the Date Format Preference field in Security [U0706]. If the application was entered on the current date, the number of hours is displayed. Otherwise, the number of days is displayed.
The time outstanding displayed in this field is reset when an application status is changed from "Entry" to "Investigation" if the RESET TIME OUTSTANDING field in the Application Portfolio update [U0822] is Y. Note, however, that the Application Inquiry [R0502] reports the time outstanding regardless of status (i.e. the time since initial entry of the application).
- SHORT NAME
The lessee short name is displayed. Note that the field may be truncated due to space limitations. - AMOUNT
The application amount is displayed, rounded off to the nearest dollar. - INIT
The initials of the person assigned to follow-up an unprocessed note or, if there are no unprocessed notes for the application, the initials of the application's owner are displayed. If there are multiple unprocessed notes for an application, only the one with the oldest follow-up date appears on the work schedule. - FOLLOW-UP DATE
The date for follow-up action entered on a note for the application is displayed in MM/DD/YY or DD/MM/YY format, depending on the Date Format Preference field in Security [U0706]. If there are multiple unprocessed notes for an application, only the one with the oldest follow-up date appears on the work schedule. If there are no unprocessed notes for the application, this field is blank. - Pr
The priority of the oldest unprocessed note is displayed. Priorities range from 1 to 4, with priority 1 appearing before priority 2, etc. The priority is assigned when the note is recorded for the application. If there are no unprocessed notes for the application, this field is blank. - NOTE
The title of the unprocessed note is displayed. If there are no unprocessed notes for the application, this field is blank.
LeasePak Documentation Suite
©
by NetSol Technologies Inc. All rights reserved.
The information contained in this document is the property of NetSol Technologies Inc. Use of the information contained herein is restricted. Conditions of use are subject to change without notice. NetSol Technologies Inc. assumes no liability for any inaccuracy that may appear in this document; the contents of this document do not constitute a promise or warranty. The software described in this document is furnished under license and may be used or copied only in accordance with the terms of said license. Unauthorized use, alteration, or reproduction of this document without the written consent of NetSol Technologies Inc. is prohibited.