LeasePak Basics
Contents
- Signing On, Changing Password, Exiting LeasePak
- Navigating LeasePak
- Using
the Keyboard and Mouse
- Entering Data
- Running Reports
- Notebook
LeasePak Setup
The Setup option is used to select and control various aspects of LeasePak's functionality. The initial set up of these tabs occurs during the initial environment set up performed by the LeasePak Administrator. For more detailed explanation regarding these controls, please refer to the LeasePak Systems Administration Guide pertaining to your current release. This control panel can be selected prior to signing on to LeasePak, by selecting the File option on the main menu bar.
Setup
The setup screen allows the user and/or administrator to set up the database and server parameters for LeasePak. If the Credit Dial-up module is purchased, additional fields will be displayed.
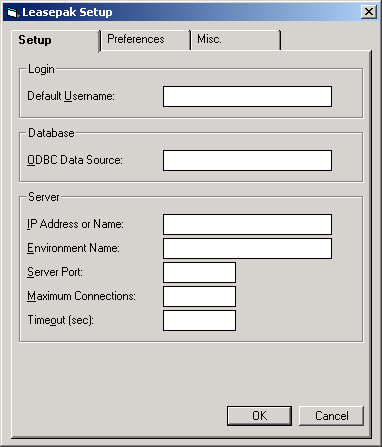
- DEFAULT USERNAME
The default name on launching the LeasePak client. This is an optional field and can be entered at log-in
- ODBC DATA SOURCE
The Data Source name defined in "Adding a Data Source", section of the LeasePak System Administration Guide, is displayed. This field is case sensitive and must match the ODBC Data Source entered in the initial setup.
- IP ADDRESS or NAME
The IP hostname or IP address of the Unix Server is displayed. The IP Address or Name is defined by the administrator during initial environment creation.
- ENVIRONMENT NAME
The LeasePak client will connect to the database environment displayed. The environment name is defined by the administrator during initial environment creation.
- SERVER PORT
The server port assigned to the LeasePak daemon is displayed. The server port is defined by the administrator during initial environment creation.
- MAXIMUM CONNECTIONS
The number entered defines the maximum number of open server windows per running session of leasepak.exe that the client can have. The maximum connections are defined by the administrator during initial environment creation.
- TIMEOUT (SEC)
The number of seconds the PC client will wait for the Server to respond to a request without prompting the user with a message. The number of seconds are defined by the administrator during initial environment creation.
- CREDIT DIAL-UP
If the credit dial-up module has been purchased and you wish this PC to have credit scan capabilities, obtain the configured TCP/IP port for credit dial-up services (creditd) on your Unix server and enter it here.
- SUBSCRIBER CODE
If credit dial-up module has been purchased and you wish this PC to have credit scan capabilities, place the desired two digit Ubicon CSERVER credit bureau subscriber code into this field.
Preferences
The Preferences screen allows the user and/or administrator to set the searching capabilities and appearance of LeasePak.
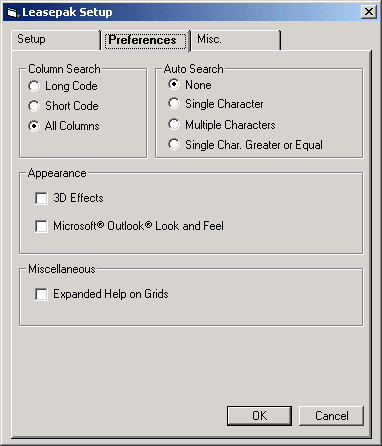
- COLUMN SEARCH
This option allows the user and/or administrator to set the column search capabilities for all drop down combo box menus. Each entry contains a long and short code name and LeasePak will sort and search based on the selection chosen in this field. The LeasePak default value is All Columns.
- AUTO SEARCH
This option allows the user and/or administrator to set the auto search capabilities within LeasePak. The default value is None.
- None: LeasePak default value. This option will search based on the characters entered.
- Single Character: This option requires a single character to be entered and will display all entries listed within that character.
- Multiple Characters: This option allows multiple characters to be entered and will display all entries listed within those characters.
- Single Character
Greater or Equal: This option displays the entries listed for the single
character entered plus characters of equal or greater value.
- 3D
EFFECTS
This option allows the user to view all editable fields with a 3D effect or shadow type view. The default value is 2 dimensional.
- MICROSOFT® OUTLOOK®
LOOK and FEEL
This field changes LeasePak's traditional tab views to an updated MICROSOFT® OUTLOOK® look and feel. Updates containing tabs will display a new screen column with shortcuts to each tab within the update. Additionally, this option allows the user to re-size the screen by placing the cursor on the screen border and dragging the mouse to the desired size. The shortcut icons are not customizable.
- EXPANDED HELP ON GRIDS
This option allows the user to select additional expanded help on Native VB grids within LeasePak. With this option on, multi-column dropdown help and client search capabilities may be invoked within certain grids in LeasePak. This option does not support all grids within LeasePak.Prior to version v5.0a, native VB grids did not feature client search capabilities, nor did they display multi-column descriptions for drop-down help. Due to the complexity of existing LeasePak code, grids that support the expanded help option, may impact normal LeasePak behavior and cause unexpected results.
This enhancement will remain in beta status until it is determined that it can be fully supported by MSI.
Miscellaneous
The Miscellaneous tab allows the user and/or administrator to set CLAPI Configuration for the DAVOX module and to set the [F1] Reference Guide Configuration.
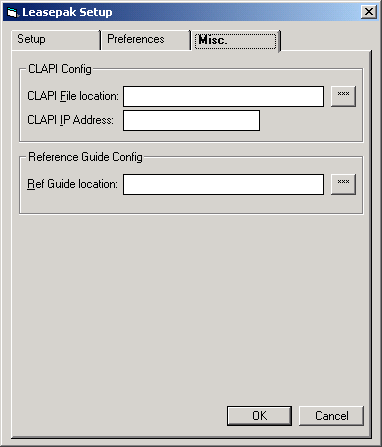
- CLAPI CONFIGURATION
These fields configure the location and address of the Client API to be entered for the Davox Interface.
- REFERENCE
GUIDE LOCATION
This field allows for the user and/or administrator to configure the LeasePak Reference Guide location from the (users) network. The configuration entered for the Reference Guide will be stored in the LeasePak INI file.
Enter the network path where the Reference Guide is located, use the search button (...) to browse for the file location. The location specified should point to the\\...\refguide\index.htmlfile where(\\...) is the users network connection path. Theindex.htmlfile is the "homepage" or Table of Contents of the LeasePak Reference Guide.
Once the location has been configured, the user can select the Help [F1] button from any update or report within LeasePak. The default browser (Microsoft® IE is recommended) will launch the LeasePak Reference Guide and open the file for the current active window. This function allows access to the first and second level of all LeasePak updates and reports within the Reference Guide.
For example, if the users active window is New Lease [U0101] from the Daily Works [U01] menu, the browser will launch the main page of the New Lease [U0101] chapter of the LeasePak Reference Guide. If the users active window is Book Lease [U0101] within the New Lease update, the browser will launch the Book Lease [U0101] section of the Daily Works, New Lease [U0101] chapter.
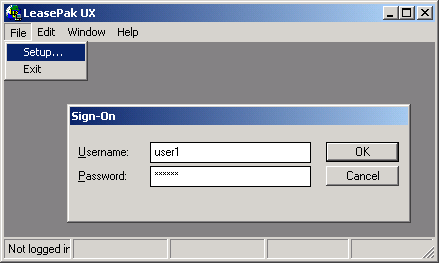
Signing On
LeasePak runs in a Microsoft Windows environment. Most of the conventions used for all Windows applications, such as icons and pull-down menus, are used in LeasePak. The instructions in this document of the Reference Guide assume the user has some familiarity with Windows and its terminology.
During initial installation of LeasePak at your office, users were identified and assigned USERNAMEs linked to each user's PC. To sign in to LeasePak from a PC, first double click on the LeasePak icon on your desktop or from the Windows Start menu.
When a user selects LeasePak to run, a Sign On box appears with the USERNAME defaulted.
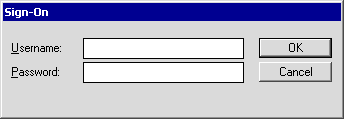
Defaults assigned to your USERNAME can be reviewed by pulling down the File menu from the Main Menu and selecting Setup.
To sign in from a PC not your own, override the defaulted USERNAME with yours.
Type your password. Asterisks appear for each letter typed, but the password cannot be read from the screen.
The Unlock Account box is only available to administrative users. Other users will see this box but it will be greyed out and inaccessible. If checked, it means that an administrator has password-locked the account and the user cannot change the password without first having an administrator unlock the account. LeasePak includes the ability to lock out a user after a specified number of failed logon attempts. An administrative user can unlock the user's account by clearing this check box. For a server-side procedure for unlocking an account, refer to the Housekeeping section of the System Administration Guide document LeasePak Server Configuration and Maintenance. Contact your NetSol representative for more information.
Note that USERNAME and PASSWORD are case sensitive, that is, LeasePak will not recognize a password typed in capital letters if it was established in lower case letters, or vice versa. If this message appears:
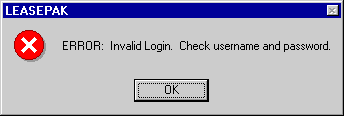
check to see whether the Caps Lock key on your PC is activated. Turn off Caps Lock and re-enter the password.
Once USERNAME and PASSWORD are correctly entered, the hourglass appears while your PC is being connected to the server driver and database. The hourglass changes to an arrow when LeasePak is ready for data entry.
Changing Client Password
LeasePak will allow a user to change his/her client password by selecting the Change Password option from the Options menu of LeasePak. This functionality will be based on the user's Security [U0706] record.
In
addition to changing the client password, the users encrypted UNIX and DBMS
passwords will be changed based on the new password entered.
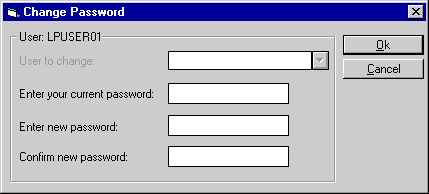
This screen will allow the user to change his/her password only.
- USER
The users name is displayed.
- ENTER YOUR OWN PASSWORD
Enter the current password for verification. The password entered will be displayed by asterisks '*'.
- ENTER NEW PASSWORD
Enter the new password. The password entered must be between 6 to 8 characters in length and different from the previous four password changes.LeasePak doesn't allow using following special characters in the password string.
ASCII Character ASCII Code Description " 34 Double quote ' 39 Single quote ` 96 Grave accent ~ 126 Tilde
For more information, refer to Custom General [U0712]: Minimum special chars for passwords.
- CONFIRM NEW PASSWORD
Re-enter the new password for confirmation.
After confirming your password you must log off and back on the LeasePak for the change to take effect.
For users whose Security [U0706] record allows them the ABILITY TO CHANGE OTHER USERS' PASSWORDS, the following screen will appear:

This screen will allow the user the ability to select a user from the drop down Help menu and change the user's password.
Note that you must also grant the user the "alter user" privilege (Oracle) or SSO role (Sybase) on the LeasePak server in order for that user to be able to change others' passwords.
- USER
TO CHANGE
Select the user whose password is to be changed form the help menu. A list of valid LeasePak users will be displayed.
- ENTER
YOU CURRENT PASSWORD
This field is for the user who has the ability to change passwords to enter his/her password for verification of accessibility. The password entered will be displayed by asterisks '*'.
- ENTER
USER'S NEW PASSWORD
Enter the new password for the user selected. Password requirements will vary according to your system's configuration. For more information, refer to Custom General [U0712]: Miscellaneous Customizations.
- CONFIRM USER'S NEW PASSWORD
Re-enter the user's new password for confirmation. - UNLOCK ACCOUNT
LeasePak includes the ability to lock out a user after a specified number of failed logon attempts. An administrative user can unlock the user's account by clearing this check box. For server-side procedure for unlocking an account, refer to the Housekeeping section of the System Administration Guide document LeasePak Server Configuration and Maintenance. Contact your NetSol representative for more information.
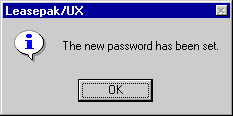
Once passwords have been entered and confirmed, LeasePak will display the following message:
When
the user's Password Settings have been set in Security
[U0706] to expire within a certain number of days, the following message will
appear when the user attempts to log on to LeasePak:
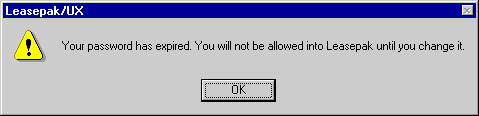
Click OK. This will prompt the user to the Change Password option so that his/her password can be changed prior to entering LeasePak.
Exiting LeasePak
Signing out of LeasePak is accomplished simply by selecting Exit from the File option of the Main Menu. Another method is to double click on the button in the upper corner of the screen. Data entered will be lost unless OK was clicked or Return was pressed (see "Entering Data" below).
Navigating LeasePak
- Menu Cross Referencing
- Edit Menu
- Updates/Reports Menus
- Tracking Menu
- Options Menu
- Window Menu
- Printing Screens
LeasePak offers a graphical user interface (GUI), which means screens and fields can have such features as "tabs" which have the appearance of file folders, and "buttons" which look 3-dimensional.
Multiple windows may be on the PC screen at the same time, so long as your PC has adequate memory. For example, it's possible to run a report and, while it is being generated, select and work on another report or update. It's even possible to open the same update or report more than once, e.g., to compare data for several leases.
If overlapping windows are hard to read, click in the title bar at the top of an update or report and drag the window to a better location on the screen. Also experiment with the options (cascade, tile) in Window on the Main menu.
It's also possible to minimize an update or report to an icon at the bottom of the screen without closing it. Click on the minimizing button in the upper right corner of the window. That's useful for a report which requires a long time to run.
LeasePak's Main Menu appears at the top of the LeasePak window.
Menu Cross Referencing
LeasePak menus are designed to allow quick processing and ease of use. This includes a fast menu access feature, where the experienced user has the ability to enter specific functions by code without stepping through menu lists. This "expert mode" may be used for any menu within LeasePak. Alternately, the user may access the required menus step by step to arrive at the desired function.
For example, in order to arrive at the Book Lease option of the New Lease update [U0101], the user may click on Updates at the Main menu, then click on the Daily Work Update menu, then click on the New Lease update. The experienced user may press <F2> to bring up the fast menu and type "U0101" to arrive at the printer selection screen and select the line printer as output device for the New Lease Audit report.
Similarly, the experienced user may press <F2> and type R0905 at the New Lease update menu to view the Lease Inquiry report [R0905] on the screen after completing the New Lease update. The user may alternatively press Escape to return to the Main menu, then select the Report menu, then select the Operational Reports menu, then select the Lease Inquiry report, and then select the terminal as the output device.
Thus, selection options (digits or letters) of successive LeasePak menus may be strung together in the sequence of their appearance in order to bypass the menus. In addition, a report profile is kept for each user containing the parameters governing report generation, such as which totals to print, which devices are defined as output devices, whether to run the report as a batch job or interactive, etc. These parameters may be changed anywhere within LeasePak by pressing a function key.
Edit Menu
The copy function in the Edit option of the Main Menu allows users to copy data from a LeasePak screen to the PC clipboard, from which it may be pasted into other Windows files. Select the portion of the screen to be copied by clicking on the first line, holding down the Shift key, and clicking on the final line. The selected data will be highlighted. Choose copy from the Edit menu (or key Control and C) and the selected portion will be stored on the clipboard.
Updates/Reports Menus
Click to select updates or reports and pull-down menus appear. If a secondary menu of options is available for a particular update, an arrow appears to the right of that update's name on the pull-down menu. Click on the update's name to reveal the secondary menu.
An alternative way to make selections from menus relies on the keyboard only and does not require use of a mouse. Refer to "Using the Keyboard and Mouse" below.
Tracking Menu
If any of LeasePak's tracking modules has been purchased (e.g., Applications, Collections), a Tracking option appears on the Main Menu. Use it to access your work schedule. As mentioned above, the Application Tracking module is accessed through separate icons. The Application work schedule can be accessed by opening the Leaseapp.exe icon.
Only one tracking module may be active at one time. A check mark on the menu indicates a module is active. To exit a tracking module, click on it again in the Tracking pull-down menu. The check mark disappears, and another module may be activated if the user has the required security.
The Customer Service Tracking module offers a Lease Summary screen which may be accessed even if another tracking module is active. Use the <F5> key or select Lease Summary from the Options pull-down menu.
Options Menu
Options on the Main Menu accesses several features which allow quick navigation within LeasePak. Each of these features can also be accessed with a function key at the top of the keyboard.
The Fast Menu option displays a box in which the 5-character designation for a LeasePak update or report (e.g., R0905, U0101) may be entered.
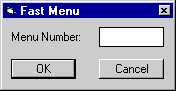
Using the fast menu bypasses main and secondary pull down menus. The 5- character codes for each update (beginning with U) and report (beginning with R) appear on pull down menus and in the Menu Structure appendix to the Reference Guide.
The Notebook option, Report Profile option and Lease Summary option are discussed elsewhere in this document.
The Refresh Codes option is related to pull-down help available on many LeasePak fields. Selecting this option or using the <F6> hot key brings all newly added values into the pull-down help lists.
Window Menu
The Window menu includes several options to allow the user to update the look of LeasePak. Cascade updates the LeasePak desktop when multiple updates and/or reports are open and displays a cascading effect. The Toolbar option is described in detail below.
User Defined Toolbar
The User Defined Toolbar option allows the user the ability to define and customize a toolbar with quick access buttons for commonly used updates and/or reports in LeasePak.
Defining the Toolbar
Select Toolbar from the Window menu.
Then select Show.
A blank toolbar will be displayed.
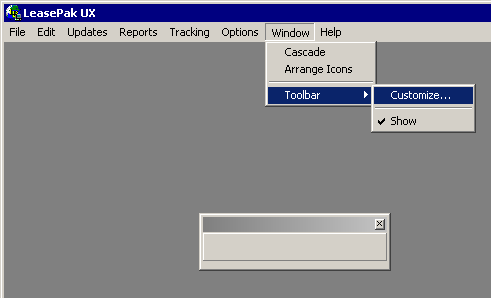
Select Toolbar from the Windows menu again, then select Customize option. This allows the user to define the toolbar. Once the toolbar has been defined, the user must select the Show option to view the toolbar.
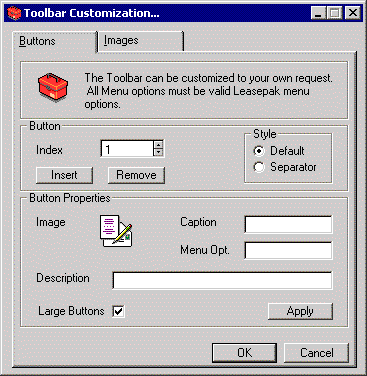
The Buttons tab allows the user to define the properties of each button. Select Insert to begin.
- INDEX
This field displays the order of each button being defined. Each number index is the order in which the button appears on the toolbar (Index 1 is the first button, Index 2 is the second button, etc.,) Use the arrows to select the button index desired. The is accessible once the Insert button has been selected.
- INSERT
Select this option when a defining a new button, the index number will display the button to be defined.
- REMOVE
This option removes defined buttons. Use the arrows of the index field to select the button to be removed.
- DEFAULT
This option defaults the style for each button index being defined.
- SEPARATOR
This option adds a separator for the index number being defined.
- IMAGE
The image for the button is displayed. Select the desired image for the button being defined from the Image tab, the selected image will be defaulted.
- CAPTION
Enter the desired caption for the button being defined. The number of characters entered in the caption define the size of the toolbar and the button.
- MENU OPT
Enter a valid LeasePak menu option.
- DESCRIPTION
Enter the long name description for the button being defined.
- LARGE BUTTONS
Select this option for large buttons to be displayed on the toolbar. This option determines the size of the toolbar.
- APPLY
Select this option to apply the button properties to the toolbar.
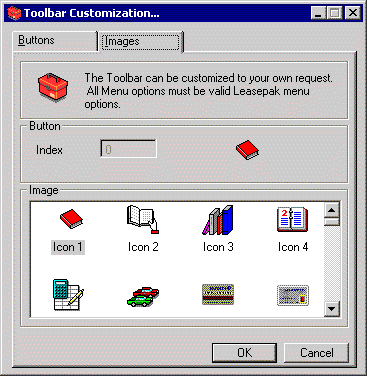
This screen allows the user to select the desired image icon for the button being defined. Select the desired image for the button index displayed. The image should be selected prior to selecting the Apply option, in order to avoid duplicate images on the toolbar.
Once the image icon and button properties
have been defined and applied, click OK from the Buttons tab.
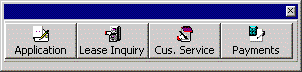
The toolbar is displayed.
To show, hide, add, change or modify the toolbar the user may right click on the toolbar. The Show option will hide the toolbar. Customize will allow the toolbar to be modified.
Printing Screens
It's possible to capture a graphic image of a LeasePak screen. Press the Alt key and the Print Screen key at the same time. That stores a picture of the entire PC screen on the clipboard. From there it may be pasted into another file, such as Word. It can edited using a graphics editor program such as Adobe Photoshop.
Sections of reports may be selected and copied to the Clipboard, then pasted into other Windows files. They can be edited as part of the new file. Select the portion of the screen to be copied by clicking on the first line, holding down the Shift key, and clicking on the final line. The selected data will be highlighted. Choose copy and it will be stored on the clipboard.
Using the Keyboard and Mouse
|
Function |
Shortcut |
| Pull down menu | Click on menu item or Alt key + underlined letter of menu item |
| Choose item from menu | Click on item or underlined letter of menu item |
|
Move to next field | Tab key |
| Move to previous field | Shift + Tab |
| Fast menu | F2 |
| Notebook | F3 |
| Report Profile | F4 |
| Lease Summary (if Cust. Service Tracking purchased) |
F5 |
| Refresh (lists of valid) Codes | F6 |
| Exit screen, no save | Esc key or click Cancel |
| Exit screen, save | Enter key or click on Save or OK |
|
Select field(s) | Click on it |
| Erase data from field | Click on field + delete key or back space |
|
Scroll thru report or list | Page Up/Down keys or scroll bar |
|
Go to end of report or list | Drag button to bottom of scroll bar |
|
Correct data entry in field | Arrow back, retype. Insert key changes data entry back & forth between insert mode and typeover mode. |
| Help for list of valid values | Click on arrow next to field |
|
Select item from help | Click to highlight from list in Help |
|
Client search | Click on (...) button next to field |
Entering Data
Note that letters keyed into LeasePak fields are not uniform in width. For example, a W takes up more of the field than an I. This occurs in all Windows applications, and results in some data entry extending beyond the visible boundaries of a field on the screen. Usually LeasePak can display all the entry in a field, but when that is not possible, text moves off to the left as more is entered. Using the arrow keys will scroll text right or left so it can be read.
Data keyed into a field can be copied (or cut) and pasted into other fields, either on the same screen or different screens. Use the Edit option on the Main Menu to copy and paste.
Entry of dates is unusual in several ways:
Hitting the space bar and Tab key at the same time when the cursor is in a date field automatically enters the date for the first of the following month.
A graphic calendar is available from many LeasePak updates. When the cursor is in a date field (e.g., in-service date, payoff effective date), click with the alternative side of your mouse (or, in some cases, double click) to display a calendar.
Calendar
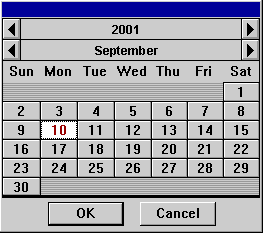
Today's date is initially highlighted. Use the arrows to scroll backward or forward in time. Click on the desired date and it will automatically fill in LeasePak's date field.
Should it later be necessary to change or delete that date, in some cases the back arrow or backspace cannot be used; delete the date by holding down Shift key and hitting Delete key.
Regional Settings
A special setting on each user's PC is required for use of dates in the Applications module. From your computer, select Control Panel, and Regional Settings
 .
.
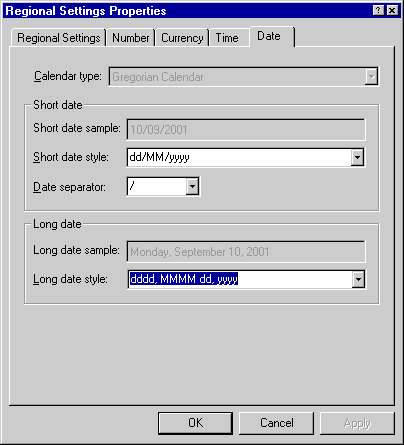
This Windows parameter screen should appear. Click Change in the Date Format area.
 .
.
This screen is set properly for use of the Applications module. The Century box is activated so that Windows will read dates with 4-digit years. Without this setting, Applications will read dates entered as MMDDYY incorrectly.
Some fields must be entered before moving on to the next screen. If a required field is left blank and Return is pressed, LeasePak displays the message "Input required" and moves the cursor to the field which has not been entered.
Running Reports
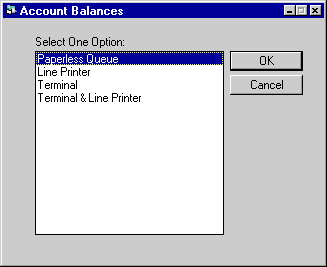
Report Destination
In LeasePak, any report may be printed, or viewed on the PC screen, or both. The screen below appears when a report is selected from the Reports menu. It also appears for several updates which generate a standard audit report (e.g., New Lease [U0101]). It is used to enter the output device desired
 .
.
TERMINAL is always an option offered on this menu. Other options are established on the Device and Printer Customizations option of the Custom General update. Some examples are:
BLACKHOLE
This option sends the report
to a queue which never prints.
LINE
PRINTER
This option
sends the report to the laser printer to which the user's PC is connected. This
destination is defined in the User Report Profile (see below) as the output device.
TERMINAL
This
option displays the report on the PC screen. It does not create hard copy on paper.
TERMINAL & LINE
PRINTER
This option
both displays the report on the PC screen and then prints it on the user's laser
printer.
Viewing
Reports on Screen
When viewing a report on the screen, the following keys may be used:
| Function |
Option |
| To scan the report by line: | |
| Forward one line | Click on line of report, then press DOWN ARROW |
|
Backward one line | Click on line of report. then press UP ARROW |
|
To scan report by screen: | |
| Forward one screen | Click on line of report, then press Page Down key |
|
Forward multiple screens | Drag button on Scroll bar |
| Backward one screen | Click on line of report, then press Page Up key |
|
Backward multiple screens | Drag button on Scroll bar |
| To go to the top of report | Control + Home keys |
| To go to the bottom of report | Control + End keys |
| To finish reading current report | Press RETURN or click Done |
If the user selects a report that prints out more than one version, pressing Return or clicking Done while viewing one report causes the succeeding version of the report to appear. For example, pressing Return when the
R0911A report is displayed brings up the R0911B. This is a LeasePak standard.
With LeasePak it is possible to specify that a report should appear on your terminal, launch its generation, and then proceed with other LeasePak updates or reports while the requested report generates. Once it is complete, the report appears on the screen, overlaying (but not canceling) other update or report screens.
Report Profile
Each user has one set of defaults for all reports. Whenever a report is to be printed using the default values saved in the user's Report Profile, the only selection necessary is the report destination.
The user is able to change this Report Profile at any time through the use of the <F4> function key (or by selecting Report Profile from the Options menu). The user may then save these changes permanently or use them only for the next generated report. The User Report Profile screen is also displayed in the Security Update [U0706].
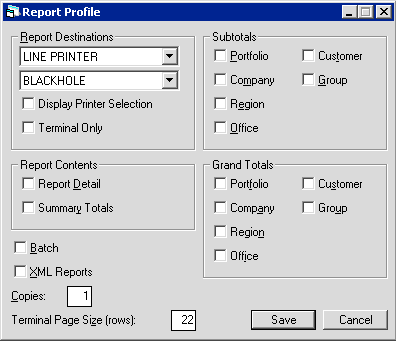
The user's default report parameters are displayed and may be changed.
- REPORT OUTPUT DESTINATION
Select the device that is to appear on the output device menu. Device symbols are established through the Device and Printer Customizations option of the Custom General update [U0712]. Use Help for a list of valid device symbols. On the screen, the symbol is translated into its corresponding text.
- REPORT
OUTPUT DESTINATION
Select the alternate device that is to appear on the output device menu. Device symbols are established through the Device and Printer Customizations option of the Custom General update [U0712]. Use Help for a list of valid device symbols. On the screen, the symbol is translated into its corresponding text.
- DISPLAY PRINTER SELECTION
Applies to all LeasePak reports. Turn this on (set to Y or check) if you want LeasePak to display the Report Destination screen before continuing onto the report's selection criteria screen. Turn the field off (set to N or uncheck) if you want LeasePak to proceed directoy to the report's selection criteria screen. After running, the report will display on the terminal (on screen).
- TERMINAL ONLY
Turn this on (set to Y or check) if you want LeasePak to proceed directoy to the report's selection criteria screen. After running, the report will display on the terminal (on screen).Turning Display Printer Selection off causes LeasePak to display the report on screen, regardless of the setting of Terminal Only, but this may change in the future, so turn Terminal Only on if you want reports to display on screen.
- REPORT DETAIL (Y/N)
Click to select and allow the user to see detail lines of a report. Enter N to produce only the summary. REPORT DETAIL and SUMMARY TOTALS may not both be left blank.
- SUMMARY
TOTALS (Y/N)
Click to select and allow the user to see the summary totals of a report. Enter N to produce only detail lines. REPORT DETAIL and SUMMARY TOTALS may not both be N. - XML REPORTS
Turn this on to generate XML-format reports and view them in an HTML format. Turn the field off to generate and display reports in the traditional text style.
- SUBTOTALS (Y/N)
Click to select and produce subtotals whenever the region, company, portfolio or customer changes in the report. These subtotals are displayed on a separate page of the report and summarize all offices of that region, company and portfolio or groups of that customer. These subtotals are most useful if the report is intended to be physically separated by region, company, portfolio or customer.These subtotals are not to be confused with office or group totals that appear on the same page as the last detail line of the office or group. Office and group totals at the end of the detail information always appear, regardless of the setting of this switch. Subtotals, as set by this switch, are a totaling option which re-summarizes the totals at selected break points. Enter N to avoid printing these additional subtotal pages. This field cannot be Y when all the related subtotal switches are N.
- PORTFOLIO
(Y/N)
Click to select Y and produce a page of subtotals summarizing the portfolio when the portfolio changes. Deselect for N.
- COMPANY
(Y/N)
Click to select Y and produce a page of subtotals summarizing the company when the company changes, and to list the company subtotals on the portfolio subtotal summary. Deselect for N.
- REGION
(Y/N)
Click to select Y and produce a page of subtotals summarizing the region when the region changes, and to list the region subtotals on the portfolio and company subtotal summaries. Deselect for N.
- OFFICE
(Y/N)
Click to select Y and to list the office subtotals on the portfolio, company and region subtotal summaries. Deselect for N.
- CUSTOMER
(Y/N)
Click to select Y and to produce a page of subtotals summarizing the customer when the customer changes. Deselect for N.
- GROUP
(Y/N)
Click to select Y and to list group subtotals on the customer subtotal summaries. Deselect for N.
- GRAND
TOTALS (Y/N)
Click to select Y to produce grand totals at the end of the report. These totals summarize all offices, regions, companies, portfolios, groups and customers of the entire report. Deselect for N to avoid producing these grand totals. This field cannot be Y when all related grand total switches are N.
- PORTFOLIO
(Y/N)
Click to select Y to list portfolio totals on the grand totals page. Deselect for N.
- COMPANY (Y/N)
Click to select Y to list company totals on the grand totals page. Deselect for N.
- REGION
(Y/N)
Click to select Y to list region totals on the grand totals page. Deselect for N.
- OFFICE
(Y/N)
Click to select Y to list office totals on the grand totals page. Deselect for N.
- CUSTOMER (Y/N)
Click to select Y to list customer totals on the grand totals page .Deselect for N.
- GROUP (Y/N)
Click to select Y to list group totals on the grand totals page. Deselect for N.
- FORM
TYPE
Select the paper type of the form that is to be used.
- COPIES
Enter the number of copies to print.
- LSTOTALS
Select the Lstotal in megabytes to be used. Five megabytes is the default.
- TERMINAL PAGE SIZE
Enter the number of lines that can be viewed at once on the screen of the terminal. Any value between 16 and 99 may be entered. Reports which are selected to display only on the terminal are formatted for this page size. Normally, 22 lines per page is the default. However, a user may wish to set this value equal to the page size of their printer. If this is done, the resulting report is shorter due to the fact that fewer lines are consumed by report headings. The report is also properly formatted for a printer if the user should later select this version to print on a printer.Reports initially selected to print on both the terminal and a printer are formatted for the printer's page size and are not affected by this parameter.
- REGULAR
USERS
The total number of licenses remaining for regular users will be displayed.
- REPORT ONLY USERS
The total number of licenses remaining for report only users will be displayed.
Notebook
LeasePak's Notebook is used to create new notes and to select existing notes for viewing or modification. These notes may serve as a reminder of future action that must be taken, or act as an historical record of actions, problems, and concerns for an application, lease, asset, or client. For example, if a documentation clerk contacts an applicant who says, "The certificate of acceptance is in the mail," the clerk may create a follow-up note to check for receipt of the C of A. Once that note is processed, it becomes an historical note of the action taken. If the user wishes to record a note when no follow-up action is necessary, a note may be created with a "processed" status.
In tracking modules, unprocessed notes appear on a work schedule or list of items scheduled for processing. The oldest unprocessed note for a lease/ application/asset will appear on the work schedule of the person to whom the lease/application/asset is assigned. In the previous example, the work schedule will remind the documentation clerk to check for receipt of the C of A. When the C of A is received, the note may be marked as processed, and the entry will no longer appear on the clerk's work schedule.
Both permanent and temporary notes may be created. Permanent notes remain on file for the life of the lease, application, asset, or client. Temporary notes are deleted, when an external command via SQL is used. Temporary notes are created by associating the notes with the pre-defined temporary note type. Refer to Custom General update [U0712] for more information on defining temporary note type and the effective period for the notes.
Notes may be created for yourself or another member of your team. Since the work schedule is a dynamically changing list which displays all outstanding notes, a user will see new notes when he or she regenerates or reviews the work schedule.
The user may press <F3> anywhere in LeasePak, to create notes.
The Notebook report [R0922] lists all existing notes for an application, lease, client, or asset.
Refer to the Security update [U0706] for more information on sorting in the Notebook update and Notebook report [R0922] by note entry date (newest to oldest or oldest to newest entry date).
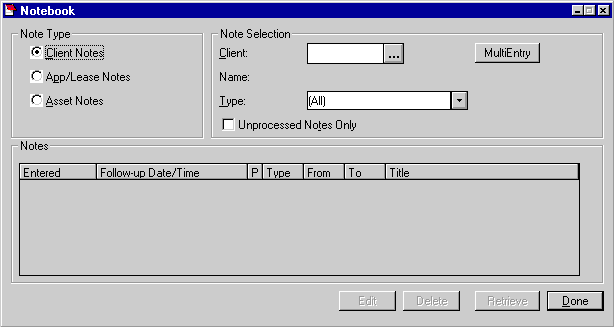
This screen is displayed after <F3> is pressed on any LeasePak screen (or Notebook is selected from the Options menu). This screen is used to enter selection criteria for existing notes to be read or deleted.
LeasePak automatically refreshes the Notebook work schedule once a Note has been selected and viewed/edited. If the users Security [U0706] profile is modified to allow their work schedule to not auto-refresh, the cursor in the work schedule will automatically default to the last note viewed/edited. This option works in conjunction with the Auto Refresh Notebook Work Schedule switch turned off. LeasePak's default behavior automatically refreshes the work schedule. This will allow for easier access to the note if an error has been made.
LeasePak generate notes by one of the following keys:
Client
number
Lease number
Application number (if the Application Tracking module
is purchased)
Asset number
- TYPE
Click on the note type to be selected. Client type notes (Cxxx) are created for delinquent leases or lessees. The oldest unprocessed note for a client appears on the collection work schedule if the Collection module is purchased.Lease type notes (Mxxx) are for maturing leases. The oldest unprocessed note for a lease appears on the Maturing Lease work schedule if the Maturing Lease module is purchased. Lease type notes (Sxxx) also appear on the Customer Service work schedule if they are identified as customer service type notes under Note Selection Type.
Application notes (Axxx) are only valid if the Application module is purchased. The oldest unprocessed note appears on the application work schedule.
Asset type notes (Kxxx) are created for assets without ownership certificates or UCC filings. The old unprocessed note for an asset appears on the collateral work schedule if the Collateral module is purchased.
Customer service notes (Sxxx) appear on work schedules if the Customer Service module is purchased.
Refer to Custom Code update [U0722] for more information on note type code. Other types of notes may be created, but they will not appear on work schedules.
- CLIENT
/ APP / LEASE / ASSET NUMBER
Enter the number associated with the notes desired. Use Client/Application Search (...) to identify the valid number.
- MULTI-ENTRY
Select this option to apply the note to multiple non-associated leases. By selecting this option, the Enhanced Notebook screen will be displayed.
- NAME
/ DESC
The name of the client or description of the application, lease or asset is displayed if it is available.
- UNPROCESSED
NOTES ONLY
Click to select notes that are unprocessed. Leave blank to select all notes. Click Retrieve and a list of all notes that meet the selection criteria appears. The notes displayed are sorted by entry date according to the sort criteria defined in the Security update [U0706]. Use Scroll bar to see more notes.For a processed note, action has been taken and the note is no longer active. For example, a note is created when a salesperson calls a client and is told the client will call back on a certain date. If the client calls back, the salesperson re-codes the note to indicate that this follow-up action has occurred and the note is no longer necessary. If the client does not't call back, the salesman may decide to change the date of the existing note to a later date.
- ENTERED
The date the note was initially created is displayed.
- FOLLOW-UP/TIME
The follow-up date and time of the note is displayed.
- PR
The priority of the note is displayed.
- TYPE
The code indicating the type of note is displayed.
- FROM
The initials of the user who created the note are displayed.
- TO
The initials of the user to follow up on this note are displayed.
- TITLE
The title of the note is displayed.
To read and edit the full text of a note, select it from the list by highlighting it and pressing Enter, or click the Edit button, or double click the highlighted entry.
To delete a note, select it from the list and click on Delete. A user may be given security to delete any note, delete only their own note or delete no notes at all. Refer to the Security update [U0706] for more information on the security to modify or delete an existing note.
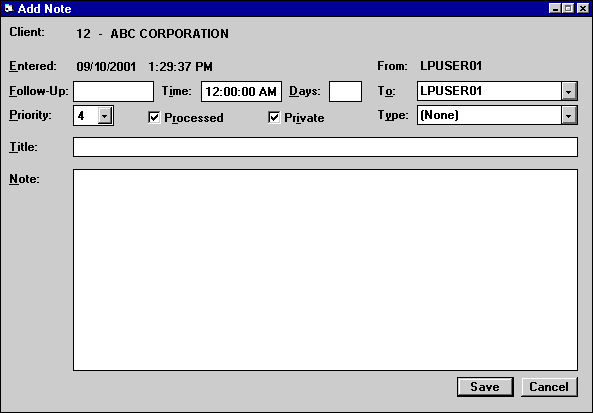
The note selected appears. This screen also appears ready for data entry if selection criteria were entered and Add was clicked. Enter a new note on this screen.
- ENTERED
The date the note was created is displayed and may not be changed. When adding a note, ENTERED is set to the current date.
- FOLLOW-UP
When adding a new note, enter the follow-up date in MM/DD/YY format. Use the on-line calendar for convenience. If modifying a note, change the follow-up date, if desired.
- TIME
When adding a new note, enter the Follow-Up Time. If modifying a note change the Follow-Up Time, if desired. This field will default to 12am if no Follow-UpTime has been entered. The result of the Time field is to track the Follow-Up of the new note that was entered.
- DAYS
As an alternative to entering a date, enter the number of days on which a defaulted follow-up date will be calculated. The calculation is done by adding the number to the current date, excluding holidays and weekends. The result of the calculation is defaulted to the follow-up date field.
- PRIORITY
Enter the priority for this note. Priority must be a number between 1 and 4. Priority 1 is the highest priority and 4 the lowest. When adding a new note, this field is defaulted with the value 4 and may be changed, if desired. This field is required only for unprocessed notes.
- PROCESSED
Click to X the box if the note is now processed and no further follow-up is required. Processed notes remain on the Note file for informational purposes until one of the following events occurs:- The note is deleted through Notebook
- The application is removed (For Application type notes)
- The lessee is deleted (For Collection type notes)
- The asset is deleted (For Collateral type notes)
- The lease is closed (For Maturing Lease type notes and Client Service type notes)
An unprocessed Application note can be entered for any application. An unprocessed Customer Service note can be entered for any lease. An unprocessed Collection note is only allowed in client notebook. An unprocessed Collateral note is only allowed in asset notebook. An unprocessed Maturing Lease type note can only be entered for a lease which exists in the Maturing Lease work schedule.
- PRIVATE
This switch appears when a user has a security access level assigned with the ABILITY TO ACCESS PRIVATE NOTE ON NOTEBOOK in the Security update [U0706]. When adding a new note, the user that has a security level of 2 and above can create a PRIVATE note.
- FROM
The username of the user who created the note is displayed.
- TO
Enter the username of the user to follow-up on the note. Use Help for a list of valid usernames. When adding a new note, this field is defaulted with the user entering the note and may be changed, if desired. This field is required.The FROM user always remains the same even if TO is changed to a new person. Thus, the FROM username is that of the original creator - not necessarily those of who re-assigned the note.
- TYPE
Default note type, if set up through Security Update [U0706], is displayed and can be changed by entering the code for the type of note desired. Modifying the note type of an existing unprocessed note is allowed.Note type codes may be established through the Custom Code update [U0722]. This code may be used to describe the type of people interested in viewing the note. For example, the notes for sales may have a code of ASAL, indicating an application type note for sales. The Notebook report [R0922] can be selected to print the notes with a type code of ASAL. Press HELP for a list of valid note types.
- TITLE
Enter, or change, if desired, the title of the note.
- NOTE
Enter, or change, if desired, the text of the note. An unlimited number of lines is available for text entry. Use Scroll bars to move back and forth. Do not click Save or press Enter until the text entry is complete.
Enhanced Notebook
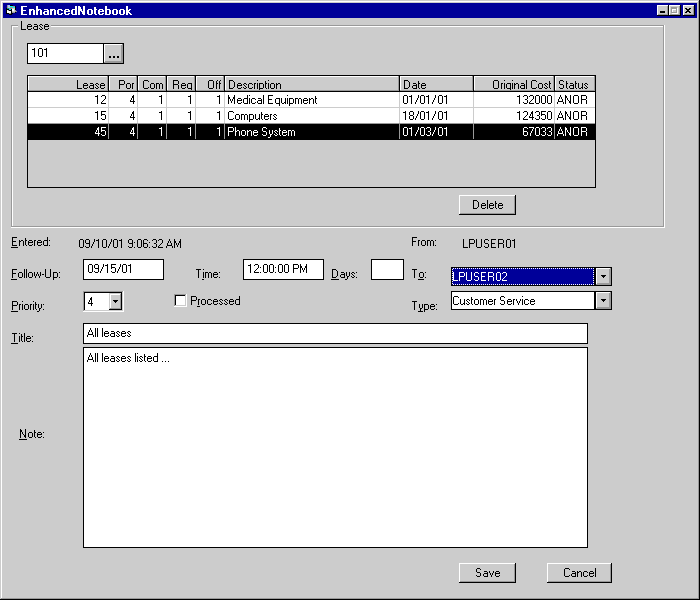
This screen is displayed when the Multi-Entry is selected. It is used to tie multiple leases to one single note entry.
- LEASE
Enter the lease number that is to be associated with the note. The lease number, PCRO, description, date, original cost and status of the lease selected will be displayed.
- DELETE
Click on the lease that is to be deleted or disassociated with the note and select the delete button.
- ENTERED
The date the note was created is displayed and may not be changed. When adding a note, ENTERED is set to the current date.
- FOLLOW-UP
When adding a new note, enter the follow-up date in MM/DD/YY format. Use the on-line calendar for convenience. If modifying a note, change the follow-up date, if desired.
- TIME
When adding a new note, enter the Follow-Up Time. If modifying a note change the Follow-Up Time, if desired. This field will default to 12am if no Follow- UpTime has been entered. The result of the Time field is to track the Follow-Up of the new note that was entered.
- DAYS
As an alternative to entering a date, enter the number of days on which a defaulted follow-up date will be calculated. The calculation is done by adding the number to the current date, excluding holidays and weekends. The result of the calculation is defaulted to the follow-up date field.
- PRIORITY
Enter the priority for this note. Priority must be a number between 1 and 4. Priority 1 is the highest priority and 4 the lowest. When adding a new note, this field is defaulted with the value 4 and may be changed, if desired. This field is required only for unprocessed notes.
- PROCESSED
Click to X the box if the note is now processed and no further follow-up is required. Processed notes remain on the Note file for informational purposes until one of the following events occurs:
- The note is deleted through Notebook
- The application is removed (For Application type notes)
- The lessee is deleted (For Collection type notes)
- The asset is deleted (For Collateral type notes)
- The
lease is closed (For Maturing Lease type notes and Client Service type notes)
An unprocessed Application note can be entered for any application. An unprocessed Customer Service note can be entered for any lease. An unprocessed Collection note can only be entered for a lessee which exists in the Collection work schedule. An unprocessed Collateral type note can only be entered for an asset which exists in the Collateral work schedule. An unprocessed Maturing Lease type note can only be entered for a lease which exists in the Maturing Lease work schedule.
- FROM
The username of the user who created the note is displayed.
- TO
Enter the username of the user to follow-up on the note. Use Help for a list of valid usernames. When adding a new note, this field is defaulted with the user entering the note and may be changed, if desired. This field is required.The FROM user always remains the same even if TO is changed to a new person. Thus, the FROM username is that of the original creator - not necessarily those of who re-assigned the note.
- TYPE
Default note type, if set up through Security Update [U0706], is displayed and can be changed by entering the code for the type of note desired. Modifying the note type of an existing unprocessed note is allowed.Note type codes may be established through the Custom Code update [U0722]. This code may be used to describe the type of people interested in viewing the note. For example, the notes for sales may have a code of ASAL, indicating an application type note for sales. The Notebook report [R0922] can be selected to print the notes with a type code of ASAL. Press HELP for a list of valid note types.
- TITLE
Enter, or change, if desired, the title of the note.
- NOTE
Enter, or change, if desired, the text of the note. An unlimited number of lines is available for text entry. Use Scroll bars to move back and forth. Do not click Save or press Enter until the text entry is complete.
LeasePak Documentation Suite
©
by NetSol Technologies Inc. All rights reserved.
The information contained in this document is the property of NetSol Technologies Inc. Use of the information contained herein is restricted. Conditions of use are subject to change without notice. NetSol Technologies Inc. assumes no liability for any inaccuracy that may appear in this document; the contents of this document do not constitute a promise or warranty. The software described in this document is furnished under license and may be used or copied only in accordance with the terms of said license. Unauthorized use, alteration, or reproduction of this document without the written consent of NetSol Technologies Inc. is prohibited.