Application Setup: User Profile [U0831]
LeasePak menu: Updates, Tracking Setup, Application Setup [U08]
Corresponding End of Period process: None
Describes the Application Tracking [U08] setup update for adding, changing, or deleting application user profiles.
 This is part of the optional LeasePak module
Application Tracking. For
information on individual Application functions, refer to
Application Tracking [U08].
Use the User Profile to add, change, or delete Application Tracking users. LeasePak users may or may not also be Application users, but all Application users must be LeasePak users. Within User Profile, you can set which of the Application Tracking menu items the user has access to, approval limits, status flow, field security by status, work schedule sort order, and other parameters.
 Edit user profiles when users are not in
Application Tracking or other parts of Application Setup.
Adding an Application User Profile
You can only add a valid, active LeasePak user as an Application user.
From the main LeasePak menu select Updates, Tracking Setup, Application Setup [U08], User Profile [U0831].
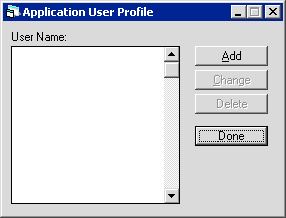
LeasePak provides no predefined user profiles. To add a user profile, click Add. To instead exit the update, click Done.
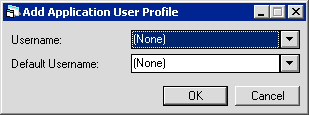
Field Descriptions
 Username
- Click
 and select from the list of valid, active
LeasePak users.
 Username
 and select from the list of valid, active
LeasePak users.
 Default Username
- If you want to default from an existing user profile, click
 and select the user profile from the list.
You can make changes to the defaulted information in the tabs on the next screen.
 Default Username
 and select the user profile from the list.
You can make changes to the defaulted information in the tabs on the next screen.
Click OK to proceed or Cancel to return to the user profile list window without making any changes. Proceed to Application User Profile Tabs and Fields below for descriptions of the setup fields.
Changing an Application User Profile
From the main LeasePak menu select Updates, Tracking Setup, Application Setup [U08], User Profile [U0831].
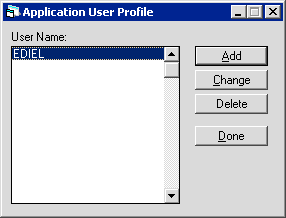
Click to highlight the user profile you wish to change, then click Change. To instead exit the update, click Done. Proceed to Application User Profile Tabs and Fields below for descriptions of the setup fields.
Application User Profile Tabs and Fields
Work Sched Misc Letters/Doc Tolerance Security StatusLeasePak displays the following two fields at the top of each tab.
Field Descriptions
 Application User Name
- LeasePak displays the account name of the Application user. This is the same as the user's LeasePak account name.
 Application User Name
 Application User Initials
- LeasePak displays the account initials of the Application user. This is the same as the user's LeasePak account initials.
 Application User Initials
Work Schedule - Tab 1
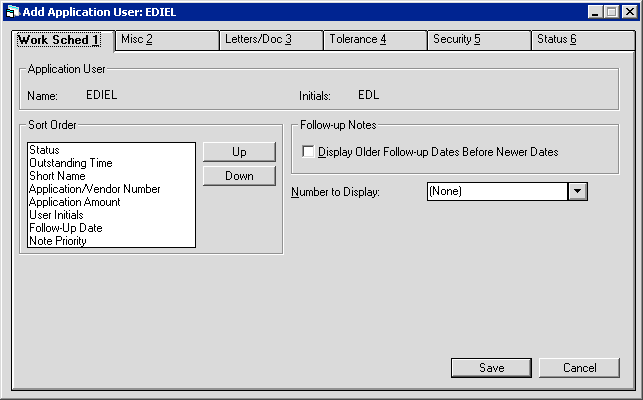
Field Descriptions
 Sort Order
- Define the sorting criteria for how items should appear in the user's work schedule. Click one of the criteria to highlight it, then
click Up or Down to move it up or down in sort priority. LeasePak sorts the work schedule first by the criteria at the top
of the list. The criteria are:
- Status - sorts alphabetically by the 4-character application status code
- Outstanding Time - lists applications having the longest elapsed time since entry first
- Short Name - sorts alphabetically by Lessee Short Name
- Application/Vendor Number - sorts alphanumerically by either the application or Vendor number, depending on the
Number to Display field setting
- Application Amount - lists applications by largest acquisition cost first
- User Initials - sorts alphabetically by the account initials of the user assigned to follow up on the oldest unprocessed
note
- Follow-up Date - sorts by unprocessed note follow-up dates, either newest to oldest or oldest to newest depending on the
Display Older Follow-up Dates Before Newer Dates field
setting
- Note Priority - lists applications in ascending order by the priority number assigned to the oldest unprocessed note
Refer to the Application Tracking menu item Work Schedule for
more information on work schedules.
 Sort Order
- Status - sorts alphabetically by the 4-character application status code
- Outstanding Time - lists applications having the longest elapsed time since entry first
- Short Name - sorts alphabetically by Lessee Short Name
- Application/Vendor Number - sorts alphanumerically by either the application or Vendor number, depending on the Number to Display field setting
- Application Amount - lists applications by largest acquisition cost first
- User Initials - sorts alphabetically by the account initials of the user assigned to follow up on the oldest unprocessed note
- Follow-up Date - sorts by unprocessed note follow-up dates, either newest to oldest or oldest to newest depending on the Display Older Follow-up Dates Before Newer Dates field setting
- Note Priority - lists applications in ascending order by the priority number assigned to the oldest unprocessed note
Refer to the Application Tracking menu item Work Schedule for more information on work schedules.
 Display Older Follow-up Dates Before Newer Dates
- Check the box to have the Follow-up date sort criteria (with the priority determined by the Sort Order
field setting) list applications in order of oldest unprocessed note follow-up date first. Clear the box to have the criteria sort in
order of newest unprocessed note follow-up date first.
Refer to the Application Tracking menu item Work Schedule for
more information on work schedules.
 Display Older Follow-up Dates Before Newer Dates
Refer to the Application Tracking menu item Work Schedule for more information on work schedules.
 Number to Display
- Click
 and select either 'Application' to display the
application number in the work schedule or 'Vendor' to display the Vendor number associated with the application. This also affects
whether the sort criteria 'Application/Vendor Number' in Sort Order sorts by application or Vendor number.
Refer to the Application Tracking menu item Work Schedule for
more information on work schedules.
 Number to Display
 and select either 'Application' to display the
application number in the work schedule or 'Vendor' to display the Vendor number associated with the application. This also affects
whether the sort criteria 'Application/Vendor Number' in Sort Order sorts by application or Vendor number.
Refer to the Application Tracking menu item Work Schedule for more information on work schedules.
Click on another tab to edit more settings, click Save to add or change the user profile and return to the user profile list window, or click Cancel to return to the list window without making any changes. Once you are finished editing user profiles, from the user profile list window click Done to exit the update.
The Application user must log off LeasePak and back on before profile changes take effect.
Miscellaneous - Tab 2
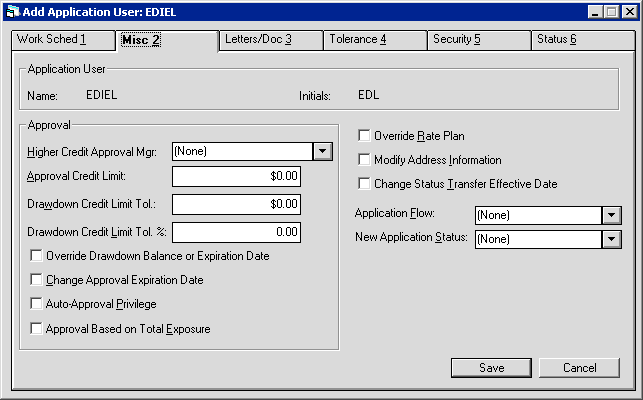
Field Descriptions
Listed in alphabetical order by displayed field name. To find a field description, look up its name (as displayed in the above screen shot) alphabetically in the list below.
 Application Flow
- Click
 and select the application flow that applies
to the user. Use flows to define the ways in which an application may proceed from one status to the next. For example, a
particular flow may permit a status transfer from Entry to Approved (bypassing Investigation), but forbid a transfer from Rejected to
Approved. You can create as many flows as needed.
Refer to Flow [U0812] for more information.
 Application Flow
 and select the application flow that applies
to the user. Use flows to define the ways in which an application may proceed from one status to the next. For example, a
particular flow may permit a status transfer from Entry to Approved (bypassing Investigation), but forbid a transfer from Rejected to
Approved. You can create as many flows as needed.
Refer to Flow [U0812] for more information.
 Approval Based on Total Exposure
- If you are using the
Unix Drawdown
(Drawdown Tracking) module, check the box to base Approval Credit Limit on the application's
acquisition cost plus the current total exposure of the Lessee. Clear the box to base Approval Credit Limit on the application's
acquisition cost only.
Refer to Drawdown Tracking for more information on drawdown tracking and
drawdown revolving credit.
 Approval Based on Total Exposure
Refer to Drawdown Tracking for more information on drawdown tracking and drawdown revolving credit.
 Approval Credit Limit
- Type the maximum acquisition cost (or, for drawdown applications, alternatively the Lessee's total exposure, depending on the
Approval Based on Total Exposure field setting) of an application that the user can
transfer to an approved ('A') status. If the user attempts to approve an application over this limit, the user must transfer to
application (without going to an approved status) to another user who has a sufficient limit. Set to zero to allow the user to approve
applications of any amount (no limit).
 Approval Credit Limit
 Auto-Approval Privilege
- If you are using the
Unix Drawdown
(Drawdown Tracking) module, check the box to allow the user to auto-approve sub applications. Clear the box to deny the user
auto-approval privileges.
Refer to Drawdown Tracking for more information on drawdown tracking and
drawdown revolving credit.
 Auto-Approval Privilege
Refer to Drawdown Tracking for more information on drawdown tracking and drawdown revolving credit.
 Change Approval Expiration Date
- Check the box to allow the user to change the
Approval Expiration date in
Application Tracking [U08]: Status Transfer. Clear the box to prevent the user from changing the date. LeasePak initially calculates
the Approval Expiration date when the application is transferred to an approved status using the
Approval Expiration Days field setting in Portfolio [U0822].
 Change Approval Expiration Date
 Change Status Transfer Effective Date
- Check the box to allow the user to change the
Effective Date and
Effective Time fields in
Application Tracking [U08]: Status Transfer. Clear the box to prevent the user from changing the fields. LeasePak initially
populates Effective Date and Effective Time with the system date and time of the status transfer.
 Change Status Transfer Effective Date
 Drawdown Credit Limit Tol.
- If you are using the
Unix Drawdown
(Drawdown Tracking) module, set either this field or Drawdown Credit Limit Tol. %,
not both. Type the dollar amount by which the user can increase the credit line of a master application. Set to zero to allow
the user to increase the credit line by any amount (no limit).
Refer to Drawdown Tracking for more information on drawdown tracking and
drawdown revolving credit.
 Drawdown Credit Limit Tol.
Refer to Drawdown Tracking for more information on drawdown tracking and drawdown revolving credit.
 Drawdown Credit Limit Tol. %
- If you are using the
Unix Drawdown
(Drawdown Tracking) module, set either this field or Drawdown Credit Limit Tol.,
not both. Type the percentage of the current amount by which the user can increase the credit line of a master application. Format
as a percentage, not a decimal amount--for example, if the limit is 15%, type 15.00, not 0.15. Set to zero to allow the user to
increase the credit line by any percentage (no limit).
Refer to Drawdown Tracking for more information on drawdown tracking and
drawdown revolving credit.
 Drawdown Credit Limit Tol. %
Refer to Drawdown Tracking for more information on drawdown tracking and drawdown revolving credit.
 Higher Credit Approval Mgr
- If applicable, click
 and select an Application user
from the list who has a higher approval credit limit than the user you are setting up. If the user you are setting up attempts to
transfer an application to an approved status where the acquisition cost (or, for drawdown applications, alternatively the Lessee's total
exposure, depending on the Approval Based on Total Exposure field setting)
is higher than the Approval Credit Limit field setting, LeasePak displays a warning message
and defaults the user name of the Higher Credit Approval Mgr into the
New Owner field of
Application Tracking [U08]: Status Transfer.
 Higher Credit Approval Mgr
 and select an Application user
from the list who has a higher approval credit limit than the user you are setting up. If the user you are setting up attempts to
transfer an application to an approved status where the acquisition cost (or, for drawdown applications, alternatively the Lessee's total
exposure, depending on the Approval Based on Total Exposure field setting)
is higher than the Approval Credit Limit field setting, LeasePak displays a warning message
and defaults the user name of the Higher Credit Approval Mgr into the
New Owner field of
Application Tracking [U08]: Status Transfer.
 Modify Address Information
- LeasePak does not currently use this field.
 Modify Address Information
 New Application Status
- Click
 and select the status that a new application
will start in when the user adds it. This must be either an entry ('E') or investigation ('I') status.
Refer to Status [U0811] for more information.
 New Application Status
 and select the status that a new application
will start in when the user adds it. This must be either an entry ('E') or investigation ('I') status.
Refer to Status [U0811] for more information.
 Override Drawdown Balance or Expiration Date
- If you are using the
Unix Drawdown
(Drawdown Tracking) module, check the box to allow the user to override the fields
Drawdown Balance
and Drawdown Exp Date on a master application.
Refer to Drawdown Tracking for more information on drawdown tracking and
drawdown revolving credit.
 Override Drawdown Balance or Expiration Date
Refer to Drawdown Tracking for more information on drawdown tracking and drawdown revolving credit.
 Override Rate Plan
- LeasePak does not currently use this field.
 Override Rate Plan
Click on another tab to edit more settings, click Save to add or change the user profile and return to the user profile list window, or click Cancel to return to the list window without making any changes. Once you are finished editing user profiles, from the user profile list window click Done to exit the update.
The Application user must log off LeasePak and back on before profile changes take effect.
Letters and Documents - Tab 3
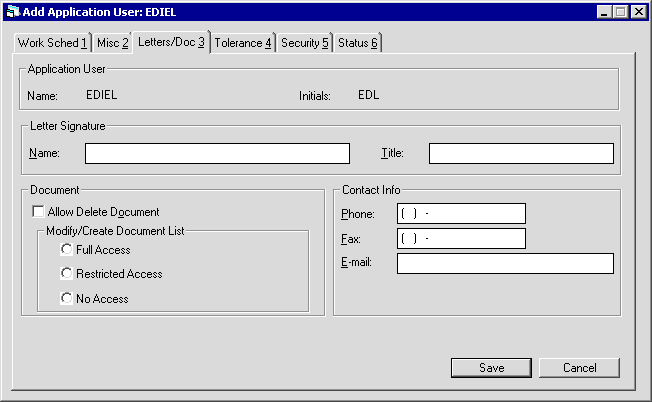
Field Descriptions
 Letter Signature Name
- If needed, type the user's name (up to 36 characters) as it should appear on letters and documents. You can customize
Document Generation (DocGen) templates to include this information, or you can
access and use this information through processes outside of LeasePak. Contact your NetSol representative for more information.
 Letter Signature Name
 Letter Signature Title
- If needed, type the user's title (up to 25 characters) as it should appear on letters and documents. You can customize
Document Generation (DocGen) templates to include this information, or you can
access and use this information through processes outside of LeasePak. Contact your NetSol representative for more information.
 Letter Signature Title
 Allow Delete Document
- If you are using the
Automated Lease Document Generation,
check the box to allow the user to delete documents from the
Document Location as specified in Portfolio [U0822]. Clear the box
to prevent the user from deleting documents.
 Allow Delete Document
 Modify/Create Document List
- If you are using the
Automated Lease Document Generation,
select one of the following options that specify what the user can do with a list of documents once it is defaulted to an application
through the Application Tracking menu item Documents and Tasks:
- Full Access - user can add, change, or delete and documents listed for the individual application (this does not affect
the original list as defined in Document List.
- Restricted Access - user can change, or delete documents that the user has added to the list, but not change or
delete documents defaulted from the original list.
- No Access - user cannot modify the defaulted list, only generate documents and mark as sent, received, etc.
 Modify/Create Document List
- Full Access - user can add, change, or delete and documents listed for the individual application (this does not affect the original list as defined in Document List.
- Restricted Access - user can change, or delete documents that the user has added to the list, but not change or delete documents defaulted from the original list.
- No Access - user cannot modify the defaulted list, only generate documents and mark as sent, received, etc.
 Phone
Phone- If needed, type a phone number for the user. You can use this information when generating letters or other documents.
If the user has a profile in more than one tracking module, this information does not populate the corresponding fields in other tracking
modules and the user may have a different phone number for each tracking module user profile.
 Phone
Phone
 Fax
Fax- If needed, type a fax (facsimile) number for the user. You can use this information when generating letters or other documents.
If the user has a profile in more than one tracking module, this information does not populate the corresponding fields in other tracking
modules and the user may have a different fax number for each tracking module user profile.
 Fax
Fax
 E-mail
- If needed, type an e-mail address for the user. You can use this information when generating letters or other documents.
If the user has a profile in more than one tracking module, this information does not populate the corresponding fields in other tracking
modules and the user may have a different e-mail address for each tracking module user profile.
 E-mail
Click on another tab to edit more settings, click Save to add or change the user profile and return to the user profile list window, or click Cancel to return to the list window without making any changes. Once you are finished editing user profiles, from the user profile list window click Done to exit the update.
The Application user must log off LeasePak and back on before profile changes take effect.
Tolerance - Tab 4
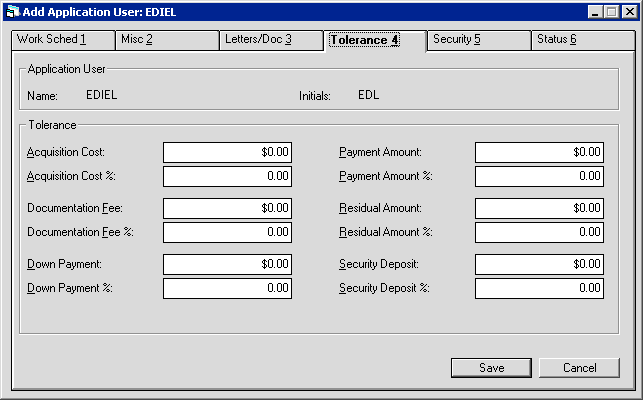
Field Descriptions
Listed in alphabetical order by displayed field name. To find a field description, look up its name (as displayed in the above screen shot) alphabetically in the list below.
 Acquisition Cost
- Set either this field or Acquisition Cost %, not both. Type the amount by
which the user can increase or decrease the
Acquisition Cost cost of an application.
Set to zero to allow the user to modify the
acquisition cost by any amount (no limit).
 Acquisition Cost
 Acquisition Cost %
- Set either this field or Acquisition Cost, not both. Type the percentage of the original
amount by which the user can increase or decrease the
Acquisition Cost of an application. Type a percentage,
not a decimal amount--for example, for 15%, type 15.00, not 0.15. Set to zero to allow the user to modify the acquisition cost
by any percentage (no limit).
 Acquisition Cost %
 Documentation Fee
- Set either this field or Documentation Fee %, not both. Type the amount by
which the user can increase or decrease the
Documentation Fee of an application. Set to zero to allow the
user to modify the documentation fee by any amount (no limit).
 Documentation Fee
 Documentation Fee %
- Set either this field or Documentation Fee, not both. Type the percentage of the original
amount by which the user can increase or decrease the
Documentation Fee of an application. Type a percentage,
not a decimal amount--for example, for 15%, type 15.00, not 0.15. Set to zero to allow the user to modify the documentation fee
by any percentage (no limit).
 Documentation Fee %
 Down Payment
- Set either this field or Down Payment %, not both. Type the amount by
which the user can increase or decrease the
Down Payment of an application. Set to zero to allow the user to
modify the down payment by any amount (no limit).
 Down Payment
 Down Payment %
- Set either this field or Down Payment, not both. Type the percentage of the original
amount by which the user can increase or decrease the
Down Payment of an application. Type a percentage,
not a decimal amount--for example, for 15%, type 15.00, not 0.15. Set to zero to allow the user to modify the down payment
by any percentage (no limit).
 Down Payment %
 Payment Amount
- Set either this field or Payment Amount %, not both. Type the amount by
which the user can increase or decrease the regular
Payment Amount of an application. Set to zero to allow the user
to modify the payment by any amount (no limit).
 Payment Amount
 Payment Amount %
- Set either this field or Payment Amount, not both. Type the percentage of the original
amount by which the user can increase or decrease the regular
Payment Amount of an application. Type a percentage,
not a decimal amount--for example, for 15%, type 15.00, not 0.15. Set to zero to allow the user to modify the payment
by any percentage (no limit).
 Payment Amount %
 Residual Amount
- Set either this field or Residual Amount %, not both. Type the amount by
which the user can increase or decrease the
Residual Amount of an application. Set to zero to allow
the user to modify the residual by any amount (no limit).
 Residual Amount
 Residual Amount %
- Set either this field or Residual Amount, not both. Type the percentage of the original
amount by which the user can increase or decrease the
Residual Amount of an application. Type a percentage,
not a decimal amount--for example, for 15%, type 15.00, not 0.15. Set to zero to allow the user to modify the residual amount
by any percentage (no limit).
 Residual Amount %
 Security Deposit
- Set either this field or Security Deposit %, not both. Type the amount by
which the user can increase or decrease the
Security Deposit of an application. Set to zero to allow the
user to modify the security deposit by any amount (no limit).
 Security Deposit
 Security Deposit %
- Set either this field or Security Deposit, not both. Type the percentage of the original
amount by which the user can increase or decrease the
Security Deposit of an application. Type a percentage,
not a decimal amount--for example, for 15%, type 15.00, not 0.15. Set to zero to allow the user to modify the security deposit
by any percentage (no limit).
 Security Deposit %
Click on another tab to edit more settings, click Save to add or change the user profile and return to the user profile list window, or click Cancel to return to the list window without making any changes. Once you are finished editing user profiles, from the user profile list window click Done to exit the update.
The Application user must log off LeasePak and back on before profile changes take effect.
Application Tracking Menu Security - Tab 5
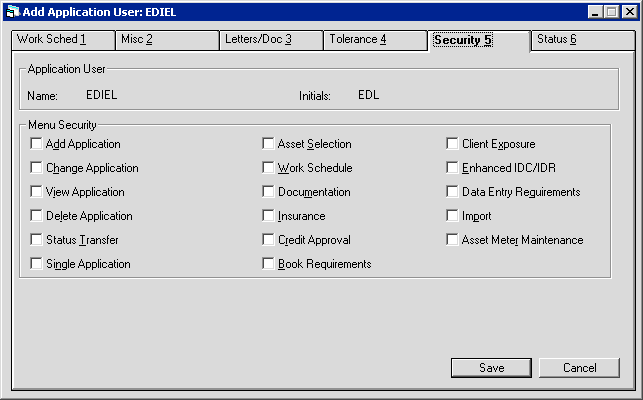
Field Descriptions
Listed in alphabetical order by displayed field name. To find a field description, look up its name (as displayed in the above screen shot) alphabetically in the list below.
 Add Application
- Check the box to give the user access to the Application Tracking menu item
New, which allows the user to add new applications (within the limits
of other applicable user profile settings). Clear the box to prevent the user from having access to this menu item.
 Add Application
 Asset Meter Maintenance
- If you are using the
Cost Per Use module, check the box to
give the user access to the Application Tracking menu item
Asset Meter Maintenance, which allows the user to access
Asset Meter Maintenance [U0231] for pending assets attached to an existing application.
Clear the box to prevent the user from having access to this menu item.
 Asset Meter Maintenance
 Asset Selection
- Check the box to give the user access to the Application Tracking menu item
Assets, which allows the user to add, change, or delete assets
attached to an existing application (within the limits of other profile settings). Clear the box to prevent the user from having
access to this menu item.
 Asset Selection
 Book Requirements
- Check the box to give the user access to the Application Tracking menu item
Book Requirements, which allows the user to delete existing applications.
Clear the box to prevent the user from having access to this menu item.
 Book Requirements
 Change Application
- Check the box to give the user access to the Application Tracking menu item
Change, which allows the user to change existing applications
(within the limits of other applicable user profile settings). Clear the box to prevent the user from having access to this menu item.
 Change Application
 Client Exposure
- Check the box to give the user access to the Application Tracking menu item
Client Exposure, which allows the user to calculate the
financial exposure for all clients who have a connection to an existing application, including the Lessee, Co-Lessee(s), Guarantor(s)
and Customer(s). Clear the box to prevent the user from having access to this menu item.
 Client Exposure
 Credit Approval
- If you are using the
Credit Scoring - Microbilt
module, check the box to give the user access to the Application Tracking menu item
Credit Bureau, which allows the user to access LeasePak's
Microbilt interface. Refer to Credit Scoring Interface for more
information. Clear the box to prevent the user from having access to this menu item.
 Credit Approval
 Data Entry Requirements
- If you are using the
Data Entry Requirements
module, check the box to give the user access to the Application Tracking menu item
Data Entry Requirements, which allows the user to
perform status-based validations on an existing application by means of a SQL stored procedure that can be customized according to the
user's business requirements. Clear the box to prevent the user from having access to this menu item.
 Data Entry Requirements
 Delete Application
- Check the box to give the user access to the Application Tracking menu item
Delete, which allows the user to delete an existing application.
Clear the box to prevent the user from having access to this menu item.
 Delete Application
 Documentation
- Check the box to give the user access to the Application Tracking menu item
Documents and Tasks, which allows the user to generate
documents and monitor the receipt of documents for an application (depending on other profile settings). Refer to
Document List [U0815] for more information. Clear the box to prevent the user from
having access to this menu item.
 Documentation
 Enhanced IDC/IDR
- If you are using the
Vehicle Finance module, check the
box to give the user access to the Application Tracking menu item
Enhanced IDC/IDR, which allows the user to specify initial
direct cost (IDC) and initial direct revenue (IDR) information for an existing application. Clear the box to prevent the user from
having access to this menu item.
 Enhanced IDC/IDR
 Import
- If you are using the
XML Pricing/SuperTRUMP
module, check the box to give the user access to the Application Tracking menu item
Import, which allows the user to import pricing information from
third-party applications such as Ivory Consulting Corporation's SuperTRUMP. Clear the box to prevent the user from having access
to this menu item.
 Import
 Single Application
- Check the box to give the user access to the Application Tracking menu item
Single, which allows the user to select a single existing
application for viewing, change, or deletion (depending on other menu security settings). Clear the box to prevent the user from
having access to this menu item.
Users who work with existing applications must either have access to this item or to
Work Schedule to be able to select applications to work with.
 Single Application
Users who work with existing applications must either have access to this item or to Work Schedule to be able to select applications to work with.
 Status Transfer
- Check the box to give the user access to the Application Tracking menu item
Status Transfer, which allows the user to transfer an existing
application from one application status to another (within the limits of the user's assigned flow). Refer to
Status [U0811] and Flow [U0812] for more
information. Clear the box to prevent the user from having access to this menu item.
 Status Transfer
 View Application
- Check the box to give the user access to the Application Tracking menu item
View, which allows the user to view existing applications but not
make any changes. Clear the box to prevent the user from having access to this menu item.
 View Application
 Work Schedule
- Check the box to give the user access to the Application Tracking menu item
Work Schedule, which allows the user to access a list of
applications for which the user is the current status owner or there are unprocessed notes assigned to the user for follow-up. The user
can then work on applications from the list (within the limits of other profile and security settings). Clear the box to prevent the
user from having access to this menu item.
Users who work with existing applications must either have access to this item or to
Single Application to be able to select applications to work with.
 Work Schedule
Users who work with existing applications must either have access to this item or to Single Application to be able to select applications to work with.
Click on another tab to edit more settings, click Save to add or change the user profile and return to the user profile list window, or click Cancel to return to the list window without making any changes. Once you are finished editing user profiles, from the user profile list window click Done to exit the update.
The Application user must log off LeasePak and back on before profile changes take effect.
Status Transfer and Field Security - Tab 6
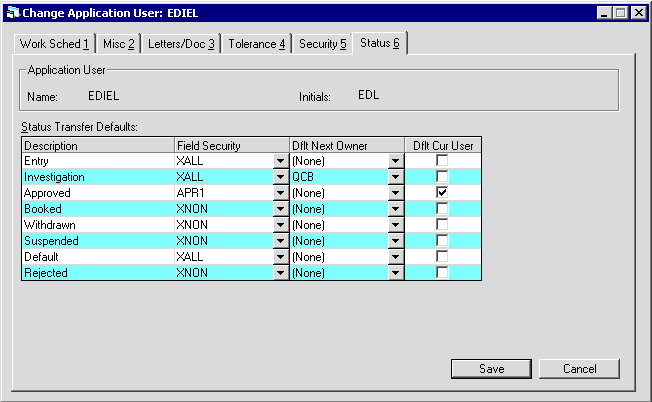
Field Descriptions
 Description
- LeasePak displays all application statuses set up in Status [U0811], sorted first by
status category (E, I, A, B, W, S, D, R), then alphabetically.
 Description
 Field Security
- For each status, click
 and select a field security
profile from the list. Depending on your needs and what types of profiles you have set up in
Field Security [U0814], you can assign the same field security profile to each status
for the user, a different field security profile to each status, or a combination of the two.
 Field Security
 and select a field security
profile from the list. Depending on your needs and what types of profiles you have set up in
Field Security [U0814], you can assign the same field security profile to each status
for the user, a different field security profile to each status, or a combination of the two.
 Dflt Next Owner
- For each status, if needed, click
 and select a
different application user for LeasePak to default into the
Status Transfer field New Owner when the current user transfers the
application to the status.
 Dflt Next Owner
 and select a
different application user for LeasePak to default into the
Status Transfer field New Owner when the current user transfers the
application to the status.
 Dflt Curr User
- (Optional)
Indicates whether the current user is the default status owner for the application when transferred to that status.
Select this check box against a status if the current user needs to be set as its default owner. If both: the Dflt Next Owner and Dflt Curr User options are specified for a status, Dflt Curr User will take precedence and any application having transferred to this status will show the name of the user set as Dflt Curr User to be its owner.
 Dflt Curr User
Indicates whether the current user is the default status owner for the application when transferred to that status.
Select this check box against a status if the current user needs to be set as its default owner. If both: the Dflt Next Owner and Dflt Curr User options are specified for a status, Dflt Curr User will take precedence and any application having transferred to this status will show the name of the user set as Dflt Curr User to be its owner.
Click on another tab to edit more settings, click Save to add or change the user profile and return to the user profile list window, or click Cancel to return to the list window without making any changes. Once you are finished editing user profiles, from the user profile list window click Done to exit the update.
The Application user must log off LeasePak and back on before profile changes take effect.
Deleting an Application User Profile
From the main LeasePak menu select Updates, Tracking Setup, Application Setup [U08], User Profile [U0831].

Click to highlight the user profile you wish to delete, then click Delete. To instead exit the update, click Done.
You cannot delete a user profile if the user is currently assigned to an application.
If LeasePak allows the deletion, it will prompt for confirmation.
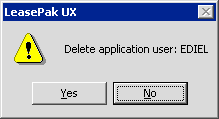
Click Yes to delete the user profile or No to return to the user profile list window without making any changes.
Once you are finished editing user profiles, from the user profile list window click Done to exit the update.
LeasePak Documentation Suite
©
by NetSol Technologies Inc. All rights reserved.
The information contained in this document is the property of NetSol Technologies Inc. Use of the information contained herein is restricted. Conditions of use are subject to change without notice. NetSol Technologies Inc. assumes no liability for any inaccuracy that may appear in this document; the contents of this document do not constitute a promise or warranty. The software described in this document is furnished under license and may be used or copied only in accordance with the terms of said license. Unauthorized use, alteration, or reproduction of this document without the written consent of NetSol Technologies Inc. is prohibited.