LeasePak Utilities »
 101 Encrypt Username and Password used to Access mPower »
108 Add User Security Record »
109 Dump contents of linked-in maps »
110 Encrypt username and password of proxy database »
111 Copy the batch payment and PAP files into LeasePak »
112 Unix and SQL Server password translation »
113 Batch General Ledger Adjustment »
114 Batch Sale of Asset »
115 Batch Sale of Asset Reversal »
200 Lock/unlock updates »
201 Account Payment History Report »
202 Lease Inquiry Report »
203 IBL Inquiry Report »
207 DAS updates »
212 Change Key Utility »
213 Initialize multi-process lease ranges »
214 Print EOP file dependencies »
217 Auditing Extract update »
218 Batch Applications »
219 Transfer data from scratch files into RBS table for BA »
220 Historical RTX Clean-up »
222 PTMS Export »
223 Credit Bureau Export Files »
224 Cost Per Use Import File »
225 OFSA Forecasting »
227 Create 'catch up' version of invoice scratch file »
228 Cycle invoices »
229 Batch payments »
230 Batch payment reversal »
231 Transfer data from GL_HIST scratch files to ASCII files »
232 Master G/L Reconciliation report »
233 Booked Applications Post-Processor »
234 Custom Payoff Quotes update »
235 AFM – Create asset level payment schedules »
236 Batch IDC Adjustment Utility »
237 Create Check Disbursal File »
238 Forescasting Report Lease Detail »
239 Lease Accrual Reversals »
240 Lease Accruals »
241 UCC Filing »
242 VIN/Serial Number Extract »
243 Credit Exposure Extract »
244 Lease & Asset Information Extract »
245 Maturing Leases Extract »
246 UCC Filing Import »
247 FDI Asset Extracts »
248 Vendor Extract »
249 Dealer Bonus Disbursal »
250 Vertex O Conversion Update »
251 Third Party Payable »
253 Import AcquireIT File »
254 Word to PDF »
101 Encrypt Username and Password used to Access mPower »
108 Add User Security Record »
109 Dump contents of linked-in maps »
110 Encrypt username and password of proxy database »
111 Copy the batch payment and PAP files into LeasePak »
112 Unix and SQL Server password translation »
113 Batch General Ledger Adjustment »
114 Batch Sale of Asset »
115 Batch Sale of Asset Reversal »
200 Lock/unlock updates »
201 Account Payment History Report »
202 Lease Inquiry Report »
203 IBL Inquiry Report »
207 DAS updates »
212 Change Key Utility »
213 Initialize multi-process lease ranges »
214 Print EOP file dependencies »
217 Auditing Extract update »
218 Batch Applications »
219 Transfer data from scratch files into RBS table for BA »
220 Historical RTX Clean-up »
222 PTMS Export »
223 Credit Bureau Export Files »
224 Cost Per Use Import File »
225 OFSA Forecasting »
227 Create 'catch up' version of invoice scratch file »
228 Cycle invoices »
229 Batch payments »
230 Batch payment reversal »
231 Transfer data from GL_HIST scratch files to ASCII files »
232 Master G/L Reconciliation report »
233 Booked Applications Post-Processor »
234 Custom Payoff Quotes update »
235 AFM – Create asset level payment schedules »
236 Batch IDC Adjustment Utility »
237 Create Check Disbursal File »
238 Forescasting Report Lease Detail »
239 Lease Accrual Reversals »
240 Lease Accruals »
241 UCC Filing »
242 VIN/Serial Number Extract »
243 Credit Exposure Extract »
244 Lease & Asset Information Extract »
245 Maturing Leases Extract »
246 UCC Filing Import »
247 FDI Asset Extracts »
248 Vendor Extract »
249 Dealer Bonus Disbursal »
250 Vertex O Conversion Update »
251 Third Party Payable »
253 Import AcquireIT File »
254 Word to PDF »
LeasePak Utilities
253 Import AcquireIT File
- Import AcquireIT File is a LeasePak client utility. It is designed for a non-technical person to be able to use Excel file to put together all of the information from an acquired contract that is needed to import that contract into LeasePak. The user is not required to know how to create an XML file or make an API call. The Import AcquireIT File utility will do that part for them. All information related to contract is loaded into spreadsheet in Excel workbook. This could be done by using data from the acquisition that may already be in spreadsheet. The data is the appropriate column header names to match the fields that LeasePak will accept the data into. These fields are the same fields the APIs msiAppOriginator use and they are listed in the Supported Fields list. Once the user has all of the necessary data in Excel workbook, they save it on their computer or a network drive they have access to in .xlsx form. The user then logs into LeasePak and access the Import AcquireIT File utility to import data via Tools->Utilities sub menu option.
Setup Requirements
Users must add following parameter in Miscellaneous section of LEASEPAK.INI file to use Import AcquireIT File utility.
[Miscellaneous]
mPowerURL=https://localhost:8080/mpower-vNNa-env/
Where vNNa is version number. For example: v74a.
How to Import and Process AcquireIT File
This section explains how to import Excel file of contracts by using Import AcquireIT File utility. Following are the steps to import a file and process it by AcquireIT utility:- Create Excel spreadsheet with required columns. Users can have multiple records in the sheet. The AcquireIT File utility spreadsheet template should include all supported fields for the API that have data to be processed by this utility. The order of the columns doesn’t actually matter, but for the spreadsheet they should be in the order as they are listed in supported fields and that should be the order they appear in the database column. To create Excel spreadsheet template users must consider the following File Format.
- The file format of excel spreadsheet includes the following:
- Tabs: Tab names must match the supported field’s section name and it is not case sensitive. For example: for LESSEE_RECORD, a tab needs to be created that must be named lessee or LESSEE or Lessee, etc. The process will not generate any error for the misspelled tab names. They will simply be ignored. Import AcquireIT File utility will ignore the tabs with no data and will be omitted. The utility will process the tabs in the order they are found in the excel workbook so the order of tabs is important. If a new lessee is being created that will be on the application that you are creating also, the lessee tab must be before the application tab. No tab needs to exist if there is no data to be processed.
- Columns: The columns name must be the same as API field in the supported fields list and it is not case sensitive. The utility will not generate errors for misspelled or non-supported column names. They will be ignored; the order of the columns does not matter. Column that are not required can be left blank or omitted entirely. Once a blank column is found with no header, nothing past that is processed. Fields that have an array of values will have multiple columns with the same name plus an “_” and number starting with 0. For example: payment_Amount_0 and payment_Amount_1. The template will have the first one ending in _0 only, but additional columns can be added with the rest of the array. Refer to the supported fields list to know how large the array can be. The column headers will be color coded as follows:
Key – These key fields are required fields when doing an update. Required – These required fields cannot be left blank when creating a new record. Conditional – These conditional fields can be required when certain conditions are met but are not always required when creating a new record. Optional – These optional fields are not required to create/update a record. - localAddOnly: The localAddOnly is a special column used to indicate if the record should only be added and not processed if it already exists when set to true or not entered. If set to false, the process will add if the record doesn’t exist and update if it does.
When localAddOnly = false and the intention is only to update, the only required columns are localAddOnly, the update key indicated in orange, and the fields that are being updated. For example, Application must have appNumber, localAddOnly, and the field to be updated when updating something on the application.
Sending an item that already exists in LeasePak looks at the value of localAddOnly and updates the existing item only if set to false. If set to true or left blank no update will be made and the Message in the return data says, “No processing done!” for that item, but processing continues because that is not considered an error.
When adding a new record to LeasePak, use localAddOnly = true and leave the update key column blank when you want LeasePak to auto assign the next available number. For example, appNumber on application tab. - Formatting: Any formatting on the spreadsheet such as color, font, borders, etc. is ignored when the workbook is processed. The blank cells are ignored when updating an existing record. Dates must be sent as a text field in the format MMDDYY. For example, 022813 for February 28, 2013. There can be no empty or blank rows or columns on the spreadsheet or anything after that blank row or column will be ignored. Currently only Excel 97-2003 files are supported.
- Save the file with .xlsx form on your PC. Click here for sample file. The sample file can be found in “Downloads” directory of your PC.
- Logon to LeasePak client and select Tools->Utilities->Import AcquireIT File. The following screen will be displayed:
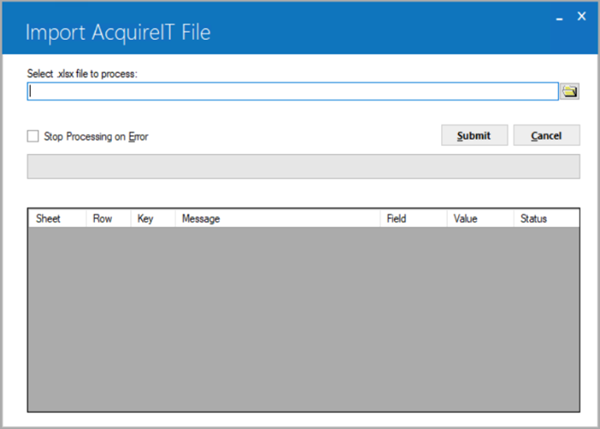
Select .xlsx file to process: Select for .xlsx file path.
Stop Processing on Error: Select this checkbox to stop processing xlsx file on finding any error while processing records.
Submit: Click on this button to submit the .xlsx file and start processing records of excel file.
Cancel: This button helps users to stop processing file.
AcquireIT Sheet Records Grid
Sheet: This column shows the sheet name from the AcquireIT Excel workbook.
Row: This column shows the row number of records and will be populated from the AcquireIT Excel workbook.
Key: This column will be populated from AcquireIT Excel workbook. Its value will be from clientNumber, appNumber, assetNumber, appLeaseNumber, udfkey or udtKey column against each record respectively.
Message: This column represents the error message. In case of successful processing, this field will be blank.
Filed: The exact field name from excel workbook will be displayed on which error appears. In case of successful processing this field will be blank.
Value: This column represents exact 'Field' name in case of error and will be populated from AcquireIT Excel workbook.
Status: There are three statuses: Pending, Submitted, and Error.
The 'Field' and 'Value' columns will be populated only in case of Lessee, Customer, Vendor and Guarantor records.
- Processing: AcquireIT utility will upload the Excel workbook indicated and parse the data into the necessary XML to be used by the msiAppOriginator API. Once the XML is generated, the API call will be made using the method createAppRetMsg and passing in the XML data. The user name and password used to log into the LeasePak client are used when making the API call.
The API will process the XML data until it hits an error or completes depending upon the selection of “Stop Processing on Error” checkbox. When processing stops, the API will return any messages generated as a csv file called processingMsgs.csv that can be opened in Excel. The data successfully processed can now be found in LeasePak as an application and its assets or as one of various clients such as lessee. The application and its assets will still need to be approved and booked.
AquireIT utility stops processing further, if there is an error. The AcquireIT utility will display the error message when the user clicks on the submit button if the file does not end in .xlsx. Processing is done in the order the tabs appear in the workbook and from top to bottom of the data in each spreadsheet.
© 2026 NETSOL Technologies. All rights reserved.
The information contained in this document is the sole property of NETSOL Technologies, Inc. Use of the information contained herein is restricted. Conditions of use are subject to change without notice. NETSOL Technologies, Inc. assumes no liability for any inaccuracy that may appear in this document nor does it have the obligation to update any of the information contained herein; the contents of this document do not constitute a promise or warranty. The software described in this document is furnished under license and may be used or copied only in accordance with the terms of said license. Unauthorized use, alteration, or reproduction of this document without the written consent of NETSOL Technologies, Inc. is prohibited.
The information contained in this document is the sole property of NETSOL Technologies, Inc. Use of the information contained herein is restricted. Conditions of use are subject to change without notice. NETSOL Technologies, Inc. assumes no liability for any inaccuracy that may appear in this document nor does it have the obligation to update any of the information contained herein; the contents of this document do not constitute a promise or warranty. The software described in this document is furnished under license and may be used or copied only in accordance with the terms of said license. Unauthorized use, alteration, or reproduction of this document without the written consent of NETSOL Technologies, Inc. is prohibited.