Security – Role [U0706B]
Users must own Security Role module to access U0706B functionality.
Security [U0706]
Contents
Introduction
U0706B allows the user to create and maintain user Roles. The update U0706B is use to add, change, and delete user Role. Where, a single role can be assigned to a number of individuals. This update allows the user to specify an assigned role for any individual security record. One user role can have multiple individuals associated. This update modifies user security records assigned to a role when a change is made to the Role by updating only the values that were changed on Role. User must purchase Security Role module to access the functionality of Security – Role [U0706B].
The following items are covered by this update:- Update and report menu security
- Portfolio, company, region, office, vendor security
- Report profile defaults
- Notebook switches
- Miscellaneous user switches
All users must have a security record before they can log on to LeasePak. The Security update [U0706b] is also used to set portfolio security for the individual user associted to a role of LeasePak, i.e., the portfolio, company, region, office (P/C/R/O) and vendor that may be accessed. An individual with the specific role security settings receives access to all P/C/R/Os and vendors in the LeasePak system, or restricts the associated individuals to a specific P/C/R/O or vendor. If the Multi Portfolio Security module has been purchased, a user may be given access to a selected subset or group of portfolios.
This update is also used to set the default parameters which are used in defining the User Report Profile. The User Report Profile allows each user to save the following report parameters as defaults:
- Report Destination 1
- Report Destination 2
- Report Detail (Y/N)
- Summary Totals (Y/N)
- Batch (Y/N)
- # Copies
- Subtotal Switches
- Grand Total Switches
- Plain Paper Form Type
- Terminal Page Size
Each role has a set of defaults for all reports. Whenever a report is to be printed using the default values saved in the User Report Profile, the only selection necessary is the output device to which the report will be printed. For example, to view the Trial Balance report [R0901] on the terminal PC, the user enters R0901 at the main fast menu and T highlights Terminal at the output device selection screen.
The Trial Balance report [R0901] is then printed to the screen using the default parameters in the User Report Profile.
Users can change this User Report Profile at any time or location in LeasePak for scurity role through the use of a function key. Refer to Getting Around in LeasePak for more information on changing the User Report Profile through the function key.
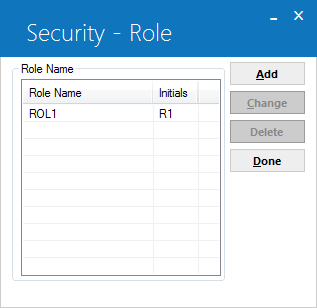
This screen is used to Add, Change and Delete the Security – Role.
- SELECT
ONE OPTION
- ADD
This option is used to add a role to the Security (RSC) file and assign the portfolio security and the modules that may be accessed by the individual users of a role. A user must be on the Security (RSC) file in order to log on to LeasePak.
- CHANGE
This option is use to change the portfolio security and module access defined for a LeasePak Security – Role. (Users).
- DELETE
This option is use to remove Security – Role record. Deletion of the security role prevents the role users from logging on to LeasePak.
- ADD
Add/Change Security Role
Add New Security Record
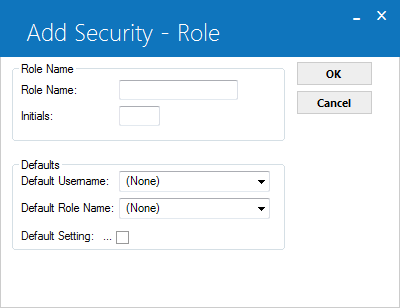
This above screen is use to define the role name for the users whose security record is being added. The Add option displays, a DEFAULT SECURITY ROLE NAME and DEFAULT SECURITY SETTING, for cloning security settings.
- ROLE NAME
The role name should be a unique name. It should not match with the user name, individual name and or any other role name.
- INITIALS
The role initials must be of three characters in length. Enter initials when the Add option is selected. The initials entered must not exist on any current security record. When the Change option is selected, the user initials will be displayed and may not be modified.
- DEFAULT USERNAME
If a default username is entered, security record values for the default user will be copied for the user being added. Leave blank if default values are not desired. This field will only appear when user selects the Add option. The default user name will only show individual user profiles. Default user name must be unique; it should not be similar to role name.
- DEFAULT ROLE NAME
The default role name will have a list of all roles available to use as a default when adding a new user or role, which is similar to the current behavior of selecting a Default User Name. Role names must be unique; it cannot be same as any other role or individual user name. - DEFAULT SECURITY SETTING (Y/N)
The value entered will be the default for the security role (record) being added. For example, if Y is entered, the default value for all modules is set to Y (i.e., access is granted to all modules), and may be overridden with N for any modules to which the user will not have access. This field only appears if the Add option is selected. Entry is required if a DEFAULT USERNAME was not entered. However, entry is not allowed if the DEFAULT USERNAME was entered. DEFAULT USERNAME takes precedence over the DEFAULT SECURITY SETTING.
Defaults section fields are additional options when adding a security role. Users must select one option and input value from the following fields.
Adding user roles will have no effect on the available seats because, leasepak does not allow the user to login using a role. While adding a new role, the number of available seats on the client's LeasePak license will not decrease.
Portfolio Security Tab

The above screen will appear to add or change portfolio security. It also sets the security to the different modules for which security role can be added and modified.
- NAME
The name of logged in user will be displayed.
- INITIALS
The user initials will be displayed.
- SECURITY ACCESS TO ALL PORTFOLIO
This filed allows the user to access all portfolios, companies, regions, offices, and vendors in the LeasePak. If user selects this filed, the following role security fields will not be accessible by the user:
- Portfolio security access
- Company
- Region, and
- Office.
- PORTFOLIO ACCESS
Select the Portfolio accessible to the role user by clicking on the Access switch, a check mark will display for accessible portfolios. Deselect the Access switch when access is denied.

If the Multi Portfolio module is not purchased, the screen will display the Company, Region, Office fields that must be defined for the user's security.
For grating portfolio access users must select the Portfolio switch by clicking on the Access switch, the switch will display a check mark for accessible portfolios. To deny access users must deselect the Access switch.
- COMPANY
This field allows the security role to enter or change the company to which access is granted. If users have selected “security access to all portfolio” leasepak will disable this field and will not be accessible..
- REGION
This field allows the security role to enter or change the region to which access is granted. If users have selected “security access to all portfolio” leasepak will disable this field and will not be accessible.
- OFFICE
- This field allows the security role user to enter or change the office to which access is granted. If users have selected “security access to all portfolio” leasepak will disable this field and will not be accessible.
- VENDOR
This field allows the security role user to enter or change the vendor to which access is granted. Users can clone for vendor by clicking on the button.
Note: Vendor security is not imposed in the following updates and reports:
Note: Dealer Bonus and Dealer Reserve security is not imposed in the following updates and reports:
- Vendor update [U0201]
- Notes Payable Inquiry [R1201]
- Lender Booking Rates Inquiry [R1202]
- Notes Transaction Journal Inquiry [R1205]
- Notebook Inquiry [R0922] - Vendor Security is only imposed if the vendor does not have any other relationships.
-
DISABLED ACCOUNT STATUS
This option disables the user's security for the role users and not allows the user to access LeasePak without deleting the role security record.
Note: Once a user is disabled, it cannot be re-enabled. LeasePak will display a warning message prior to saving the users security when this option is selected.
- REGULAR USER
Select this if role user(s) is a regular user or deselect if the role user(s) is not a regular LeasePak This option allows a regular account security status. A role user with regular user status can fully access all updates and reports of LeasePak. These regular users can also be assigned a limited access with LeasePak when allowing and defining access in Menu Security tab.
- REPORT USER
Select this option if a role user is a report user or deselects this option if the role user does not belongs to this group. The report user option allows a role user to report only account security status. Report User status allows the role user access to view all reports only in LeasePak. On the basis of report users status only limited report can be accessed by the report user defined and selected in the Menu Security tab of the adding a role.
- PARTIAL UPDATE USER
This status of the role users allows the role a partial update security status. Select if the role is a partial update user or deselect if the role user is not a partial update user. The partial role user is granted access to the Lessee [U0203], Customer [U0205] and Guarantor [U0217] updates only. Access to reports is granted, and may be limited when defined in the Menu Security tab.
- LeasePak Licenses Remaining

The above panel of portfolio security tab will display the LeasePak remaining licenses. The total remaining LeasePak licenses for Regular, Report Only and Partial Update user's are displayed. The counters are based on the total number of LeasePak licenses purchased and the user's security account statuses. The LeasePak Licenses Remaining counters will be displayed in all the Security tabs.
Menu Security Tab
Menu Security is a directory of different folders. The main option is Menu Option. (R)Reports, (S) Special Functions and (U)Updates are the main three "folders" under Menu Security option. Menu option contains report and update categories (for example: R0XXX, UXXXX), and then finally the individual reports and updates (for example: RXXXX, UXXXX).
To expand a "folder", click on the + to the left on any one of them.
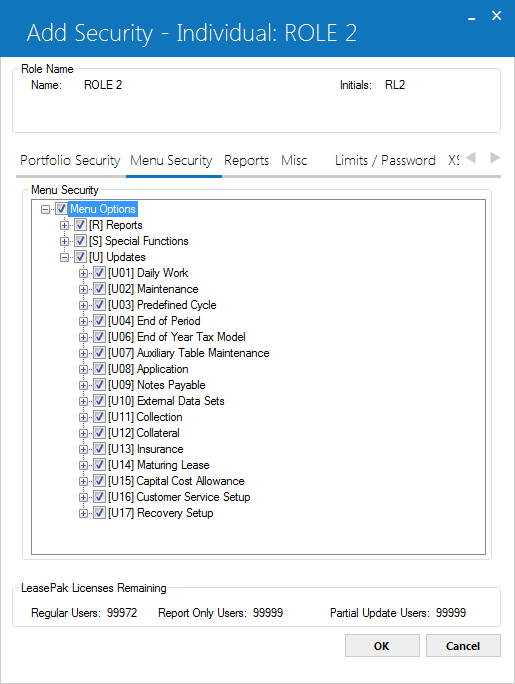
Once one of the Menu Security option has been expanded, it will display the entire available list of options below the selected expanded option. When users selects one of the options from reports or updates the following switch will be selected to grant access to that specific update or report.

Checking this box gives the user access to that item and anything it contains. For example, if the item is U02 Portfolio, checking the box gives the user access to all updates beginning with U02. If on the other hand, the item is U0212 Asset Maintenance, checking the box gives the user access to just U0210.
Note: Two updates are linked for security. A user's access to Split Asset [U0214] determines his or her access to Split/Merge Qty Asset [U0112], since the two updates function very much alike.
 For Vertex O users only: Users much purchase Vertex O tax series Interface module to access U0307 Vertex O Disbursal and U0308 Vertex O Journal Update.
Reports Tab
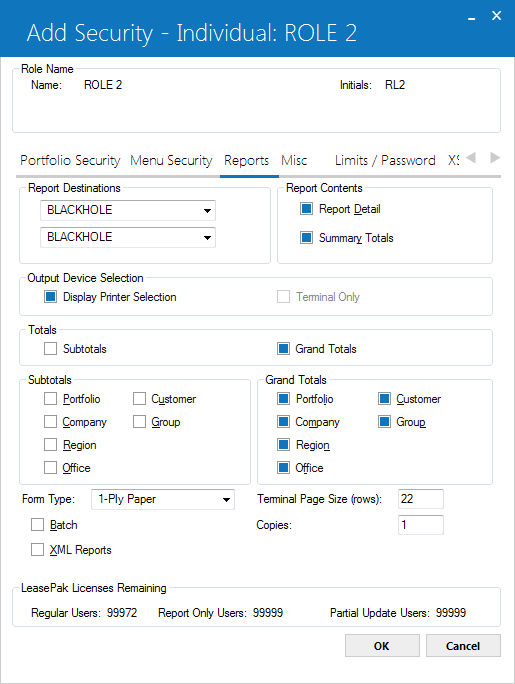
The above screen of role security records is use to enter the default parameters for role user report profile. When adding a new role, these fields will be defaulted by LeasePak and may be changed. These parameters are directed by the way reports are generated for the role users.
A version of this screen is also displayed by pressing
- REPORT DESTINATIONS
Click for both Report Destinations to select the two printers that will appear in the Report Destinations screen. LeasePak displays this screen when Display Printer Selection is turned on (set to Y or checked). Set up available printers that will appear in the lists using Custom General [U0712]
Device and Printer Customizations.
for both Report Destinations to select the two printers that will appear in the Report Destinations screen. LeasePak displays this screen when Display Printer Selection is turned on (set to Y or checked). Set up available printers that will appear in the lists using Custom General [U0712]
Device and Printer Customizations.
- REPORT DETAIL (Y/N)
Role ser can have detail lines of report by clicking or selecting this option. Enter N to produce only the summary. You have to select at least one of them. REPORT DETAIL and SUMMARY TOTALS may not both be left blank.
- SUMMARY TOTALS (Y/N)
By clicking on these options the summary totals of a report will be displayed for LeasePak role users. Enter N to produce only detail lines. Select at least one of them. REPORT DETAIL and SUMMARY TOTALS may not both be N.
- DISPLAY PRINTER SELECTION
Selecting this option applies to all the reports of LeasePak. Selecting this option sets it to Y, if user wants LeasePak to display the Report Destination screen before continuing onto the report's selection criteria screen. Deselecting this option sets it to N (off), if security role user wants LeasePak to precede to the report's selection criteria screen. After running, the report will display on terminal.
- TERMINAL ONLY
- This option will be turned on if a role selects this option and wants LeasePak to proceed to the report's selection criteria screen. After running, the report will display on the terminal.
- SUBTOTALS
Click to select and produce subtotals whenever the region, company, portfolio, or customer changes in the report. These subtotals will be displayed on a separate page of the report and summarize all offices of that region, company and portfolio or groups of that customer. These subtotals are most useful if the report is intended to be physically separated by region, company, portfolio, or customer.
- PORTFOLIO (Y/N)
Click to select Y and produce a page of subtotals summarizing the portfolio when the portfolio changes. Deselect for N.
- COMPANY (Y/N)
Click to select Y and produce a page of subtotals summarizing the company when the company changes, and to list the company subtotals on the portfolio subtotal summary. Deselect for N.
- REGION (Y/N)
Click to select Y and produce a page of subtotals summarizing the region when the region changes, and to list the region subtotals on the portfolio and company subtotal summaries. Deselect for N.
- OFFICE (Y/N)
- Click to select Y and to list the office subtotals on the portfolio, company, and region subtotal summaries. Deselect for N.
- CUSTOMER (Y/N)
Click to select Y and to produce a page of subtotals summarizing the customer when the customer changes. Deselect for N.
- GROUP (Y/N)
Click to select Y and to list group subtotals on the customer subtotal summaries. Deselect for N.
- GRAND TOTALS (Y/N)
Click to select Y to produce grand totals at the end of the report. These totals summarize all offices, regions, companies, portfolios, groups and customers of the entire report. Deselect N to avoid producing these grand totals. This field cannot be Y when all related grand total switches are N.
- PORTFOLIO (Y/N)
Click to select Y to list portfolio totals on the grand totals page. Deselect for N.
- COMPANY (Y/N)
Click to select Y to list company totals on the grand totals page. Deselect for N.
- REGION (Y/N)
Click to select Y to list region totals on the grand totals page. Deselect for N.
- OFFICE (Y/N)
Click to select Y to list office totals on the grand totals page. Deselect for N.
- CUSTOMER (Y/N)
Click to select Y to list customer totals on the grand totals page. Deselect for N.
Turning Display Printer Selection off causes LeasePak to display the report on screen, regardless of the setting of Terminal Only, but this may change in the future, so turn Terminal Only on if you want reports to display on screen.
- GROUP (Y/N)
Click to select Y to list group totals on the grand totals page. Deselect for N.
- FORM TYPE
Select the paper type of the form that is to be used.
- COPIES
Enter the number of copies to print.
- BATCH
Select or deselect the batch option.
- LSTOTAL SIZE
Select the Lstotal in megabytes to be used. Five megabytes is the default.
- XML REPORTS
Selecting this option sets it to Y to generate XML-format reports and view them in an HTML format. Deselecting this option turns the field off to generate and display reports in the traditional text style. ‘
- TERMINAL PAGE SIZE
Enter the number of lines that are visible at once on the screen of the terminal. Any value between 16 and 99 may be entered. Reports, which are selected to display only on the terminal, are formatted for this page size. Normally, 22 lines per page is the default for VT220/VT100 screens. However, a user may wish to set this value equal to the page size of their printer. If this is done, the resulting report is shorter because fewer lines are consumed by report headings. The report is also properly formatted for a printer if the user should later select this version to print on a printer.
Miscellaneous Tab
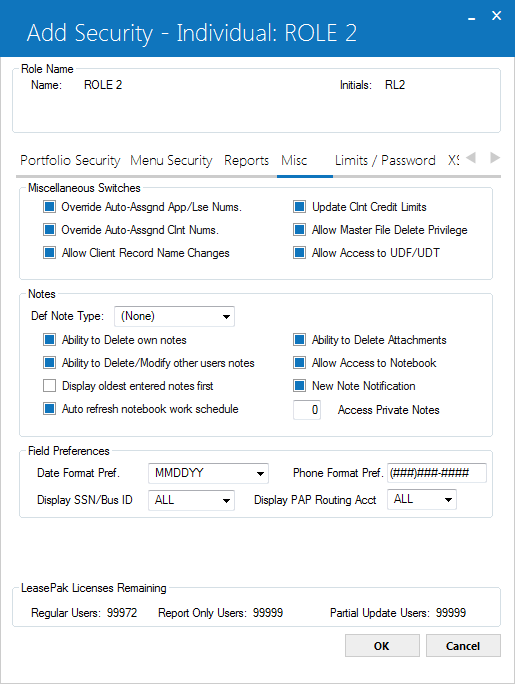
The above screen is use to define the LeasePak's additional functions security. When adding a new role, all values on this screen will be defaulted to the DEFAULT SECURITY SETTING.
- USERNAME & INITIALS
The role name and initials for the role whose security record is being added or modified will be displayed.
- OVERRIDE
AUTO-ASSGND APP/LSE NUMS (Y/N)
Click to select Y to allow the user to change an application/lease number by default assigned by LeasePak. Deselect sets to N to disallow the user to use this privilege.
- OVERRIDE
AUTO-ASSGND CLNT NUMS (Y/N)
Click to select Y to allow the user to change a client number by default assigned by LeasePak. Deselect set to N to disallow the user to use this privilege.
- ALLOW CLIENT RECORD NAME CHANGES
Select sets to Y. This option allows the user to change existing client information. Deselect sets to N. If this option is deselected than, the user will not be able to restrict the user from changing the client record information for the following fields: Long and Short Name, DBA, and the Social Security/Bus. LeasePak will default the above fields as display only in the following updates: Vendor [U0201], Lessee [U0203], Customer [U0205], Investor [U0216], Guarantor [U0217], Broker [U0219], and Lender [U0220].
- UPDATE
CLNT CREDIT LIMITS (Y/N)
Click to select Y if user is allowed to update all client credit limits. Refer to the Credit tab of the Lessee Update [U0203] and the Credit/Miscellaneous tab of the Customer Update [U0205] for fields pertaining to client credit limits.
- ALLOW MASTER FILE DELETE PRIVILEGE
Click to select Y, to give the role user the ability to delete a loan on Loan [U0211].
- ALLOW ACCESS TO UDF/UDT
Click to select Y, to allow the role user to define user-defined fields and tables. This affects access to user-defined fields and tables in the Vendor [U0201], Master Financial [U0202], Lessee [U0203], Customer [U0205], Asset [U0210], and UDF/UDT Maintenance [U0235]. Deselect to set to N to deny the role user's access to user-defined fields and tables in the above updates.
- DEFAULT NOTE TYPE
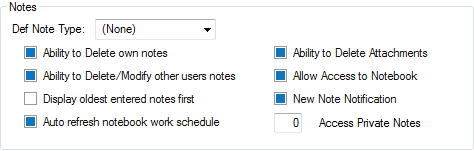
The above drop down provides a list of default note type options. Select, the default note type, if required. The selected option will be used as default when new notes are created by the user. This default value will be available on reports also. Use Help for a list of valid note types. For more information on setting up note types, refer to the Custom Codes update [U0722].
- ABILITY TO DELETE OWN NOTES
(Y/N)
Click to select Y to give the user the ability to delete notes which were sent to the user or were created by the user. Deselect for N to deny the user this privilege.
- ABILITY TO MODIFY/DELETE OTHER
USER'S NOTES (Y/N)
This filed will be checked by default when user creates a role. Click to select Y to allow the user to delete notes, sent to the user or were created by the user. Deselect sets to N to disallow the user to use this privilege.
- DISPLAY
OLDEST ENTERED NOTES FIRST (Y/N)
This filed will be checked by default when user creates a role. Click to select Y to sort notes in the Notebook update and Notebook report [R0922] by oldest date entered first. Deselect sets to N to sort notes by newest date entered first.
- AUTO
REFRESH NOTEBOOK WORK SCHEDULE
This filed will be checked by default when user creates a role. This option allows the Notebook to automatically refresh the work schedule after the note has been viewed and/or edited. Deselecting this option will allow the user to view and/or edit the notes on the work schedule without auto-refresh and place the cursor back to the note when complete. This will allow for easier access to the note if an error has been made.
- ABILITY TO DELETE ATTACHMENTS
Select this option to allow the user the ability to delete external file attachments from the Lease Summary screen.
- ALLOW ACCESS TO NOTEBOOK (Y/N)
Click to select Y if user is allowed to access Notebook.
- NEW NOTE NOTIFICATION (Y/N)
Select sets to 'Y' if the role user is to receive a mail message when a new note is assigned to him by another user. The mail message will contain all the information from the note including the comment text and the name of the creator of the note. Refer to the Notebook section of the Application update [U0801] for more information. Deselect sets to N, since mail messages are not available with LeasePak.
- ABILITY
TO ACCESS PRIVATE NOTE ON NOTEBOOK
For details see U0706A Security - Individual
- DATE
FORMAT PREFERENCE
Select the date format preference for the role user. When DD/MM/YY date format is selected, the time format will be HH:MM:SS (24 hour clock) throughout LeasePak updates. This field works in conjunction with the Regional Settings of the Windows Control Panel. Verify that the date and time formats coincide.
- PHONE FORMAT PREFERENCE
Enter or change the phone number format for the user role. This field allows the role user to enter a custom phone format mask for the country or location. For example: (##) ## ####. The default value is: (###) ###-####.
The format entered will display and/or allow the entering of phone numbers in various LeasePak updates, as well as any reports that include the phone number output.You can enter a total of 16 characters, of which up to 10 can be numeric. Remember to include parentheses, spaces, hyphens, and any other punctuation in the total number.
- DISPLAY SSN/BUS ID?
Select the display format of the SSN/Bus ID information for the role user. This field governs how the user sees the Social Security/Business ID number where it appears in LeasePak updates and reports. The default setting is 'ALL' (display all characters, allow updates).
For details, see U0706A Security - Individual - DISPLAY PAP ROUTING, ACCT?
Select the display format of the PAP Routing, Account information for the role user. This field governs how the user sees the PAP Inst ID, the PAP Account, the ACH Transit ID, and the ACH Account numbers where they appear in LeasePak updates and reports. The default setting is 'ALL' (display all characters, allow updates).
For details, see U0706A Security - Individual
Limits/Password Tab
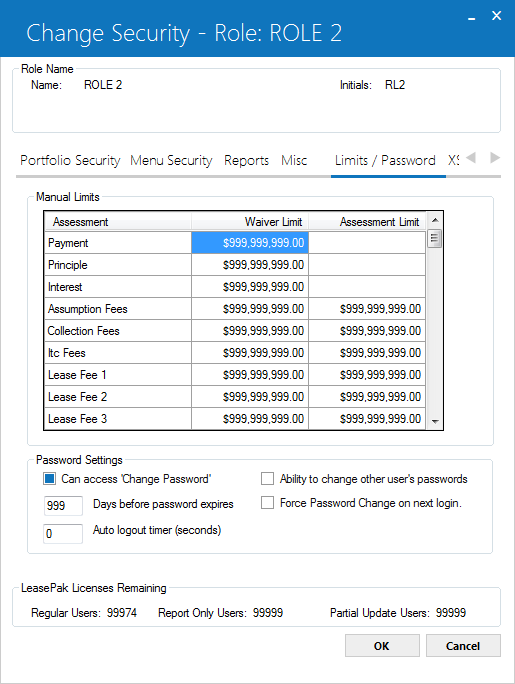
The above screen is use to assess the role user assessments wavier limits, assessment limits and user's password settings.
Field Descriptions
 Assessment
- This column of grid will display the assessment for which role users can set waiver and assessment limits.
Assessment
-
Waiver Limit
- In this, filed role users can set the limits manually for a particular assessment. If role user enters amount 0.00 users will not be able to waive any amount for that assessment. If the entered amount is limited to 999,999,999.00, which is the default value, than role user can manually, waive any amount for the particular assessment.
Waiver Limit
-
Assessment Limit
- In this, filed role can limit the particular assessment charge type in the grid excluding payment, principal, and interest. If role user enters amount 0.00 users will not be able to waive any amount for that assessment. If the entered amount is limited to 999,999,999.00, which is the default value, than role user can manually, waive any amount for the particular assessment.
Assessment Limit
-
Can access 'Change Password'
- Click the check box to set it to Y that allows the role user to
Change Password function on the LeasePak Options menu. Unchecked box will be set to N and turns it off that denies users to change password function.
Can access 'Change Password'
-
Ability to change other users' passwords
- Click on the checkbox to set it to Y that allows the role user to to change other user's password by using the
Change Password function option. Unchecked check box will set it to N and deny the role user access to the Change Password option of LeasePak to change other user's password.
Ability to change other users' passwords
-
Days before password expires
- This filed sets the number of days of user password activation. After the number of days defined in this filed role user's password will no longer be valid and users will not be able to log on to LeasePak. By default number for days to define is ‘999'. Set it to ‘999' if you want users password to never expire.
You must set this field to some other value than '999' if you wish to force a password change at the user's next logon (see
Force Password Change on next login).
Days before password expiresYou must set this field to some other value than '999' if you wish to force a password change at the user's next logon (see Force Password Change on next login).
-
Auto logout timer
- For details, see Secuirty - Individual U0706A -> Auto logout timer
Auto logout timer
XSL Files/Dealer Alerts Tab
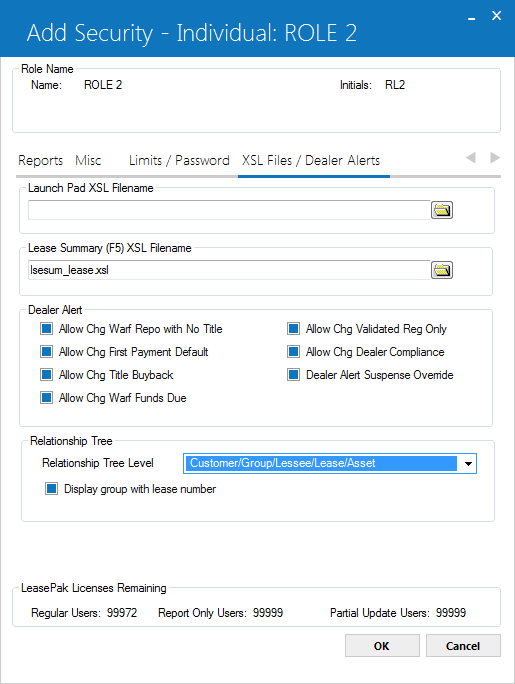
This tab of security role is use to set the Dealer Alert permissions, XSL Filenames for different reports, and Relationship Tree Level for the user.
Launch Pad XSL Filename
Enter the name and path of the XSLT file that will be used to display Launch Pad information.
Lease Summary (F5) XSL Filename
Enter the name and path of the XSLT file that will be used to display the Lease Summary screen.
Dealer Alerts
Each Dealer Alert switch works in conjunction with the tab in the Vendor [U0201] update.
- ALLOW CHG WARF REPO WITH NO TITLE (Y/N)
Click this check box to set it to Y, it will allow the role to change the Dealer Alert switch, Warf Repo With No Title, in the Vendor [U0201] update. Otherwise, set the option to N.
- ALLOW
CHG FIRST PAYMENT DEFAULT (Y/N)
Click this check box to set it to Y, it will allow the role to change the Dealer Alert switch, First Payment Default, in the Vendor [U0201] update. Otherwise, set the option to N.
- ALLOW
CHG TITLE BUYBACK (Y/N)
Click this check box to set it to Y, it will allow the role user to change the Dealer Alert switch, Title Buyback, in the Vendor [U0201] update. Otherwise, set tit to N.
- ALLOW
CHG WARF FUNDS DUE (Y/N)
Click this check box to set it to Y, it will allow the role user to change the Dealer Alert switch, Warf funds Due, in the Vendor [U0201] update. Otherwise, set it to N.
- ALLOW
CHG VALIDATED REG ONLY (Y/N)
Click this check box to set it to Y, it will allow the role user to change the Dealer Alert switch, Validated Registration Only, in the Vendor [U0201] update. Otherwise, set it to N.
- ALLOW
CHG DEALER COMPLIANCE (Y/N)
Click this check box to set it to Y, it will allow the role the ability to change the Dealer Alert switch, Dealer Compliance, in the Vendor [U0201] update. Otherwise, set it to N.
- DEALER
ALERT SUSPENSE OVERRIDE (Y/N)
Click this check box to set tit to Y, and allow the role user to disburse suspended Dealer checks through Cashier's Check Disbursal [U0117]. If this option is selected, the role rights overrides privileged regardless of which Dealer Alert switches are set. Otherwise, set it to N.
Relationship Tree
Allows the user to set up the relationship tree for role user. The setting will be applicable to the use of the Relationship Tree across all portfolios.
The relationship tree fields on this screen will appear inactive to the role users who does not own the Relationship Tree module.
The relationship tree fields on this screen will appear inactive to the role users who does not own the Relationship Tree module.
The relationship tree fields are also cloned when the role user's security is cloned.
- Relationship Tree Level
Click to select the level for the relationship tree from the following choices or leave the default selected option.
- Customer/Group/Lessee/Asset
- Customer/lessee/group/Lease/Asset
- Customer/Lessee/Lease/Asset
- Lessee/Lease/Asset
- Vendor/Lease/Asset
In the option "Vendor/Lease/Asset", the vendor is referring to the vendor on the lease not the vendor on the asset.
If the user selects an option that includes "Group", lessees, leases, and assets that belong to a customer but not any group will be displayed in the tree with a blank (' ') group heading.
- Display group with lease number
Check the box if you want to display the appropriate Group number next to Lease items in the tree items.The field is applicable to the first three levels that you will select in the Relationship Tree Level field. If you select any one of the last two options in the Relationship Tree Level field, the program will unselect (uncheck) this field if currently selected and make it inactive.
Users can change the settings to the fields on this screen while the Relationship Tree is actually open. If you attempt to do so, the program will display the following warning message:

Security Change - Role Confirmation
The following screen will appears when user attempts to update a Role. This screen confirms the individual, which are applicable for that particular role update and which are not.
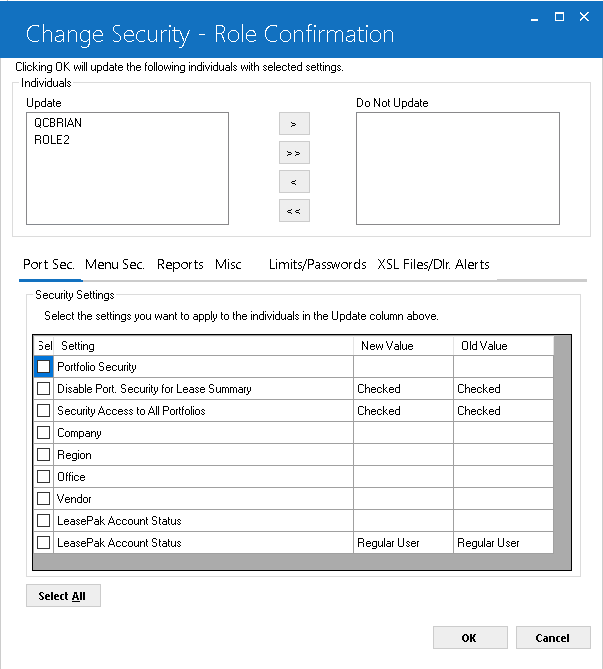
Individual
- UPDATE
- DO NOT UPDATE
This list box displays the entire individual user IDs assigned to this specific role. This option allows the users to move the Individual users to ‘Do Not Update' list, if the individual user is not required for the role update security settings. To move individual user's from Individual list to Do Not Update list, click the individual user and select > button to move the individual user to Do Not Update list. Clicking on the >> Button will move all listed individual user into the DO Not Update list and deny role security updated settings for the associated individual user to the assigned role.
You can move back the added individual user(s) to Individual User Update list box by clicking on the < and << buttons listed in Do Not Update List box.
Security Settings
Security settings of Change Security – Role Confirmation will display the same tabs breakdowns used to Add a Role or to Update a Role security settings screen. Each tab contains a gird that corresponds to the settings that have been updated on the screens while updating a role. Every tab grid is divided into the following four columns.
- Sel: Allow the user to select the check box & select the by default settings that have been updated for the role security.
- Setting: Will list all the options to set the security settings. All options, check boxes appears on the security update tabs will appear.
- New Value: New selected value/option status will be displayed.
- Old Value: Role security setting before update.
These above mentioned columns on each tab grouped by sections corresponding to the different areas of the original tabs of the update role security settings.
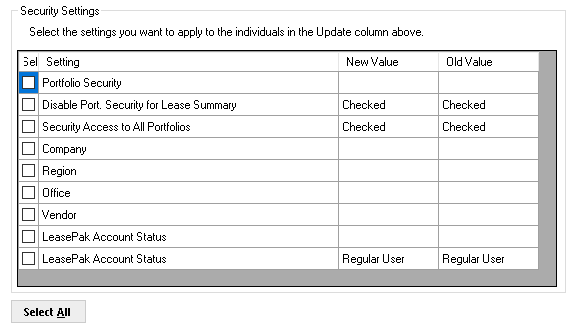
The above screen show the difference between the updated values and the older vales set by the user to update a Role.
- Select All
- OK
- Cancel
This option selects all the check box listed in the Sel column on the grid to be changed. Once this option is selected, the button will appear as Unselect All. If clicked again will revert it to the Select All and the set all the listed Sel check boxes to unchecked. This select button will appears and works separately for each tab to set the update the role security settings.
This ok button confirms update and saves the settings of Role Update for the associated selected Individual user(s) from the Update list box. If no individual, user(s) selected and no settings updated, than the role will save without any individual profile changes. Setting will be saved for the Update List box individual users and will not set to the list of Do Not Update listed Individual user.
The Cancel button reverse the control back to security role update. User can make other updates if required. It will not save any update.
Delete Role
Select the username of the user whose security record is to be deleted. The security record must already exist on the Security (RSC) file. This option allows the user to delete a role. LeasePak first checks that the role has individual users assigned to it. If there are users assigned, LeasePak will display the following warning message:

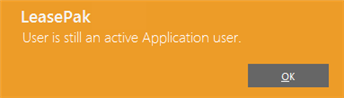
A role security record may not be deleted if the role user is defined as an Application user through the Application User Profile update [U0831], as a Collection user through the Collection User Profile update [U1131], as a Collateral user through the Collateral User Profile update [U1231], or as a Maturing Lease user through the Maturing Lease User Profile update [U1431]. A role user security record may also not be deleted if the user is defined as a team member through the Team update [U0724].
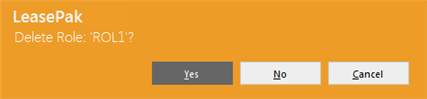
This above message appears to confirm or cancel the deletion.
LeasePak Documentation Suite
©
by NetSol Technologies Inc. All rights reserved.
The information contained in this document is the property of NetSol Technologies Inc. Use of the information contained herein is restricted. Conditions of use are subject to change without notice. NetSol Technologies Inc. assumes no liability for any inaccuracy that may appear in this document; the contents of this document do not constitute a promise or warranty. The software described in this document is furnished under license and may be used or copied only in accordance with the terms of said license. Unauthorized use, alteration, or reproduction of this document without the written consent of NetSol Technologies Inc. is prohibited.