LeasePak Basics
 Sections previously found in this document (F3 Notebook, F4 Report Profile, F7 Change Password) are now separate documents under Options Menu.
Contents
- LeasePak Setup
- Signing on to LeasePak
- Exiting LeasePak
- Navigating LeasePak
- Using the Keyboard and Mouse
- Entering Data
- Running Reports
LeasePak Setup
The Setup option is used to select and control various aspects of LeasePak's functionality. The initial set up of these tabs occurs during the initial environment set up performed by the LeasePak Administrator. For more detailed explanation regarding these controls, please refer to the LeasePak Systems Administration Guide pertaining to your current release. This control panel can be selected prior to signing on to LeasePak, by selecting the File option on the main menu bar.
Setup tab
The setup screen allows the user and/or administrator to set up the database and server parameters for LeasePak. If the Credit Dial-up module is purchased, additional fields will be displayed.
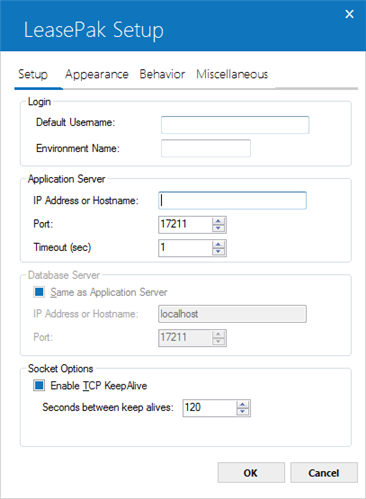
Login
- DEFAULT USERNAME
The default name on launching the LeasePak client. This is an optional field and can be entered at log-in
- ENVIRONMENT NAME
The LeasePak client will connect to the database environment displayed. The environment name is defined by the administrator during initial environment creation.
Application Server
- IP ADDRESS or NAME
The IP hostname or IP address of the Unix Server is displayed. The IP Address or Name is defined by the administrator during initial environment creation.
- PORT
The server port assigned to the LeasePak daemon is displayed. The server port is defined by the administrator during initial environment creation.
Database Server
- Same as Application Server(Y/N)
This filed will be set to Y by default. Selection of this field will set the following two fields of "IP Address or Name" & "Port" fields same as mentioned above in the Application Server. If user set it to N and uncheck this field option, than user will have to enter data in the below fields of Port and IP Address or name fields.
- IP ADDRESS or NAME
The IP hostname or IP address of the Unix Server is displayed. The IP Address or Name is defined by the administrator during initial environment creation.
- PORT
The server port assigned to the LeasePak daemon is displayed. The server port is defined by the administrator during initial environment creation.
Socket Options
- Enable TCP Keep Alive (Y/N)
Documentation coming soon...
- Seconds between keep alive
Documentation coming soon...
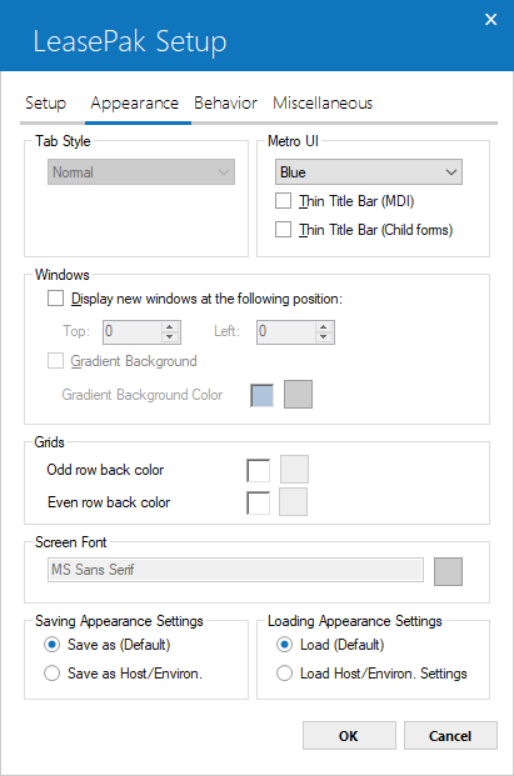
Apperance tab
The Apperance screen allows the user and/or administrator to set the searching capabilities and appearance of LeasePak.
Field Descriptions
Select from the different available styles:
- Property Pages – Standard Microsoft Windows tabbed look and feel, where the tabs of the LeasePak update appear on the top of the screen.
- Traditional – The tabs of the LeasePak update appear on the top of the screen, but will have rounded corners.
- Notched – Square-edged tabs will appear across the top of LeasePak update screens, and the currently used tab will display a notched corner.
- Notecards – Round-edged tabs of different colors will appear across the top of the screen.
- Worksheet – Slanted-edged tabs will appear across the bottom of the LeasePak update screens.
- Microsoft Outlook Look and Feel – Duplicates the Microsoft Outlook look and feel, where the tabs of the LeasePak update appear as icons in a frame on the left side of the screen.
Select from the different available UI colors:
- Thin Title Bar (MDI) – This is the title bar of LeasePak window. If this checkbox is selected the selected color will have a thin title bar on the top of the window.
- Thin Title Bar (Child forms – This is the same as appearance as of Thin Title Bar (MDI) for child forms.
Windows
- Display new windows at the following position
You may specify the horizontal and vertical placement from which new windows will open within LeasePak client software by using these settings.
Grids
- Odd row back color
- Even row back color
- Screen Font
Click  to select a background color for odd grid rows.
Click to select a background color for even grid rows.
You may change the default screen font that LeasePak will attempt to use for most entry screens.
Saving Appearance Settings
- Save As (Default)
- Save As Host/Environ.
Allows a user to save the value of Metro UI field as default.
When this option is selected, user will be able to save the Merto UI field settings for this particular Host/ Enviorn.
Loading Appearance Settings
- Load (Default)
- Load As Host/Environ. Settings
Defaults to selected color scheme/appearance.
When this option is selected, LeasePak will use the color scheme/appearance settings based on the host/environment used.
Behavior Tab
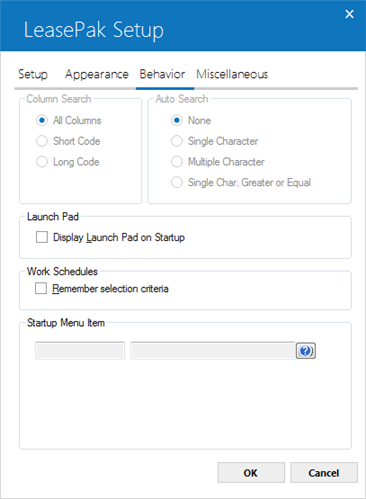
Field Descriptions
- Column Search
- Auto Search
- None – LeasePak default value. This option will search based on the characters entered.
- Single Character – This option requires a single character to be entered and will display all entries listed within that character.
- Multiple Characters – This option allows multiple characters to be entered and will display all entries listed within those characters.
- Single Character Greater or Equal – This option displays the entries listed for the single character entered plus characters of equal or greater value.
This option allows the user or administrator to set the column search capabilities for all drop-down combo box menus. Each entry contains a long code name and short code name. LeasePak will sort and search based on the selection in this field. The LeasePak default value is All Columns.
This option allows the user or administrator to set the auto search capabilities within LeasePak. The default value is None.
Launch Pad
- Display Launchpad on Startup
Display the LeasePak Launchpad on Startup of LeasePak.
Work Schedules
- Remember Selection Criteria
- Startup Menu Item
Remember selection criteria while performing actions from the work schedule of one of the tracking modules.
Default menu item that will start when LeasePak is launched.
Miscellaneous
The Miscellaneous tab allows the user and/or administrator to set the [F1] Reference Guide Configuration.

Field Descriptions
Reference Guide Config
This field allows for the user and/or administrator to configure the LeasePak
Reference Guide location from the (users) network. The configuration entered
for the Reference Guide will be stored in the LeasePak INI file.
Enter the network path where the Reference Guide is located, use the search
button (...) to browse for the file location. The location specified should
point to the \\...\refguide\index.html
file where( \\...) is the users
network connection path. The index.html
file is the "homepage" or Table of Contents of the LeasePak Reference
Guide.
Once the location has been configured, the user can select the Help [F1] button
from any update or report within LeasePak. The default browser (Microsoft®
IE is recommended) will launch the LeasePak Reference Guide and open the file
for the current active window. This function allows access to the first and
second level of all LeasePak updates and reports within the Reference Guide.
For example, if the users
active window is New Lease [U0101] from the Daily Works [U01] menu, the browser
will launch the main page of the New Lease [U0101] chapter of the LeasePak
Reference Guide. If the users active window is Book Lease [U0101] within the
New Lease update, the browser will launch the Book Lease [U0101] section of
the Daily Works, New Lease [U0101] chapter.
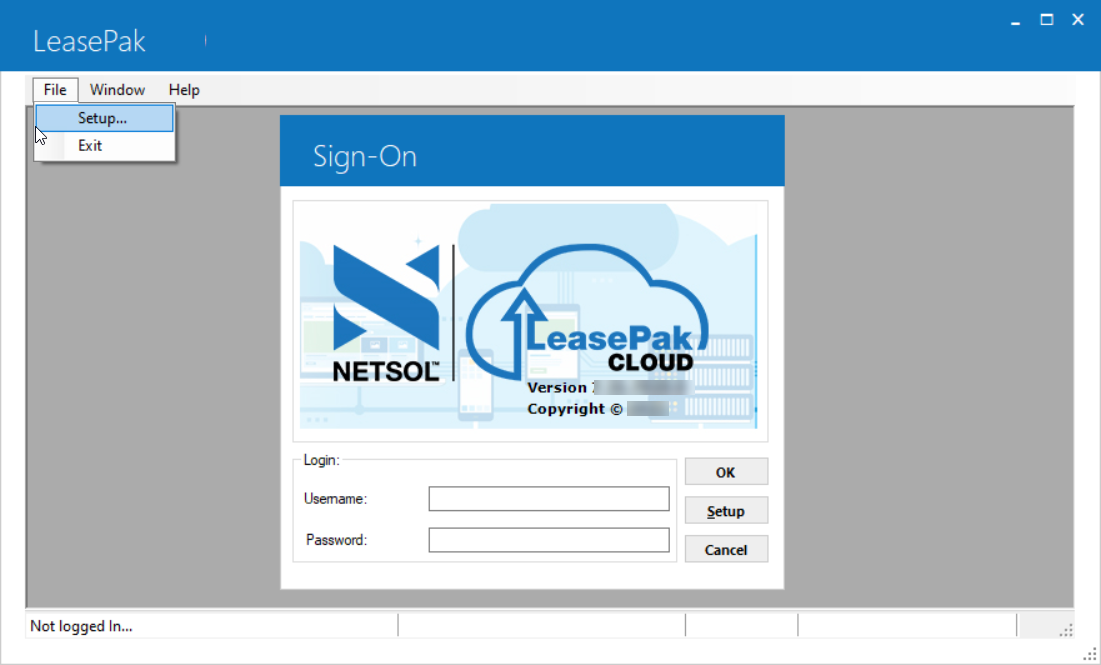
Signing on to LeasePak
LeasePak provides 3 different modes to sign-on and to use LeasePak functionalities. Following are the three modes explained with their description.
Dedicated User Sign-in
 If the user's password has been set in U0706 Security to expire within a number of days, and that expiration has passed, the following will appear when the user attempts to sign in:
“Your password has expired. You will not be allowed into LeasePak until you change it.”
Clicking OK will take the user to F7 Change Password where they will need to change their password before signing on to LeasePak.
LeasePak runs in a Microsoft Windows environment. Most of the conventions used for all Windows applications, such as icons and pull-down menus, are used in LeasePak. The instructions in this document of the Reference Guide assume the user has some familiarity with Windows and its terminology.
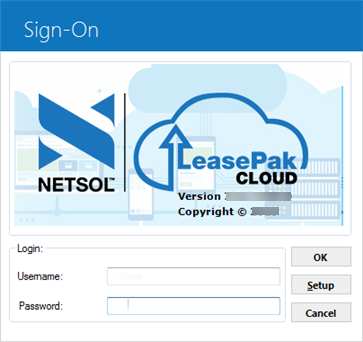
During initial installation of LeasePak at your office, users were identified and assigned USERNAMEs linked to each user's PC. To sign in to LeasePak from a PC, first double click on the LeasePak icon on your desktop or from the Windows Start menu.
When a user selects LeasePak to run, a Sign On box appears with the USERNAME defaulted.
Users are not allowed to login LeasePak by using Role name. When user logins, LeasePak license-checking program checks the number of allowed license seats, LeasePak will not add the security role records.
Defaults assigned to your USERNAME can be reviewed by pulling down the File menu from the Main Menu and selecting Setup.
To sign in from a PC not your own, override the defaulted USERNAME with yours.
Type your password. Asterisks appear for each letter typed, but the password cannot be read from the screen.
Note that USERNAME and PASSWORD are case sensitive, that is, LeasePak will not recognize a password typed in capital letters if it was established in lower case letters, or vice versa. If this message appears:
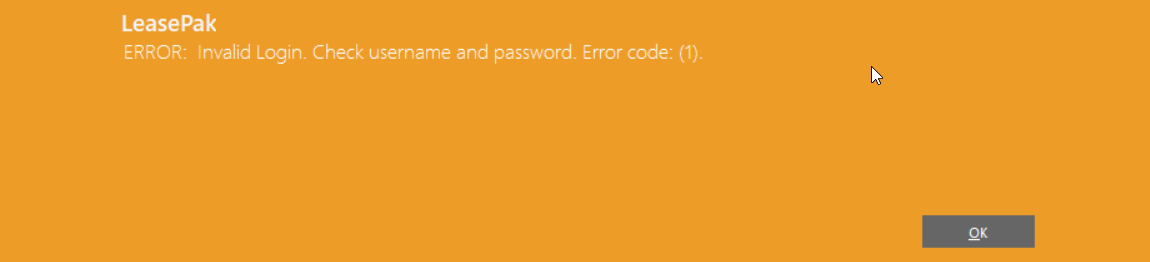
check to see whether the Caps Lock key on your PC is activated. Turn off Caps Lock and re-enter the password.
Once USERNAME and PASSWORD are correctly entered, the Windows busy cursor appears while your PC is being connected to the server driver and database. The hourglass changes to an arrow when LeasePak is ready for data entry.
Shared User Sign-in
When signing in as a shared user, LeasePak will convert the password entered to the encrypted security record password and check it
against the password saved on the security record (rsc). If it matches, LeasePak will continue signing in by retrieving the proxy database
user’s username and password from the .netsol_proxy file and logs into the database using that username and password.
When signing in as a dedicated user, LeasePak will convert the password entered to the server and database passwords. LeasePak then
uses those passwords to login to the server and database.
Shared user login only looks at the security record password and dedicated user login only looks at the server and DBMS passwords.
For detailed description of a Shared User and how to create them, see Shared User overview document.
ADFS User Sign-in
Requires ADFS Authentication module. ADFS is Active Directory Federation Services (ADF) as a Single Sign-On (SSO) solution to log-in to LeasePak. When using this service, users will need to pass ADFS Token number
and LeasePak username as a command line parameter instead of providing password for different interfaces of LeasePak. The user account should be in shared user mode when using
ADFS mode to sign-in to LeasePak. For details of user modes and how to create a shared user, see Shared User
overview document.
Setup Requirements
To access LeasePak in ADFS mode, users must setup the following:
- ADFS Server – An ADFS server must be available for LeasePak environments to access ADFS mode.
- Token – A valid LeasePak ADFS token to login to different interfaces of LeasePak (e.g; LeasePak Client Application, API Web Service, or Utilities) along with username. Token confirms the login to ADFS interface environment.The value of environment variable LEASEPAK_ADFS_TOKEN is an encrypted and base-64'd token string.
- Shell Script – Bash script placed in the shared user's home directory (/home/lpshared). Name the script
.netsol_adfs.sh.
Limitation
In ADFS mode the "Change Password" option will be disabled.
How to sign-in in ADFS mode
There are four different processes of LeasePak that assist users to login and access those functionalities in ADFS authentication mode. The four different functionalities are as follows:
- LeasePak Client Application
- API Web Services
- LeasePak Utilities
- mPower EOP
For steps on how to log-in to LeasePak ADFS mode, see How to run LeasePak in ADFS Authentication mode overview document.
Exiting LeasePak
Signing out of LeasePak is accomplished simply by selecting Exit from the main window File Menu. Another method is to double click on the button in the upper corner of the screen. Be sure to complete and close LeasePak updates prior to exiting to prevent losing unsaved data.
Navigating LeasePak
- Menu Cross Referencing
- Edit Menu
- Updates/Reports Menus
- Tracking Menu
- Options Menu
- Window Menu
- Printing Screens
LeasePak offers a graphical user interface (GUI), which means screens and fields can have such features as "tabs" which have the appearance of file folders, and "buttons" which look 3-dimensional.
Multiple windows may be on the PC screen at the same time, so long as your PC has adequate memory. For example, it's possible to run a report and, while it is being generated, select and work on another report or update. It's even possible to open the same update or report more than once, e.g., to compare data for several leases.
If overlapping windows are hard to read, click in the title bar at the top of an update or report and drag the window to a better location on the screen. Also experiment with the options (cascade, tile) in Window on the Main menu.
It's also possible to minimize an update or report to an icon at the bottom of the screen without closing it. Click on the minimizing button in the upper right corner of the window. That's useful for a report which requires a long time to run.
LeasePak's Main Menu appears at the top of the LeasePak window.
Menu Cross Referencing
LeasePak menus are designed to allow quick processing and ease of use. This includes a fast menu access feature, where the experienced user has the ability to enter specific functions by code without stepping through menu lists. This "expert mode" may be used for any menu within LeasePak. Alternately, the user may access the required menus step by step to arrive at the desired function.
For example, in order to arrive at the Book Lease option of the New Lease update [U0101], the user may click on Updates at the Main menu, then click on the Daily Work Update menu, then click on the New Lease update. The experienced user may press <F2> to bring up the fast menu and type "U0101" to arrive at the printer selection screen and select the line printer as output device for the New Lease Audit report.
Similarly, the experienced user may press <F2> and type R0905 at the New Lease update menu to view the Lease Inquiry report [R0905] on the screen after completing the New Lease update. The user may alternatively press Escape to return to the Main menu, then select the Report menu, then select the Operational Reports menu, then select the Lease Inquiry report, and then select the terminal as the output device.
Thus, selection options (digits or letters) of successive LeasePak menus may be strung together in the sequence of their appearance in order to bypass the menus. In addition, a report profile is kept for each user containing the parameters governing report generation, such as which totals to print, which devices are defined as output devices, whether to run the report as a batch job or interactive, etc. These parameters may be changed anywhere within LeasePak by pressing a function key.
Edit Menu
The copy function in the Edit option of the Main Menu allows users to copy data from a LeasePak screen to the PC clipboard, from which it may be pasted into other Windows files. Select the portion of the screen to be copied by clicking on the first line, holding down the Shift key, and clicking on the final line. The selected data will be highlighted. Choose copy from the Edit menu (or key Control and C) and the selected portion will be stored on the clipboard.
Updates/Reports Menus
Click to select updates or reports and pull-down menus appear. If a secondary menu of options is available for a particular update, an arrow appears to the right of that update's name on the pull-down menu. Click on the update's name to reveal the secondary menu.
An alternative way to make selections from menus relies on the keyboard only and does not require use of a mouse. Refer to "Using the Keyboard and Mouse" below.
Tracking Menu
If any of LeasePak's tracking modules has been purchased (e.g., Applications, Collections), a Tracking option appears on the Main Menu. Use it to access your work schedule. As mentioned above, the Application Tracking module is accessed through separate icons. The Application work schedule can be accessed by opening the Leaseapp.exe icon.
Only one tracking module may be active at one time. A check mark on the menu indicates a module is active. To exit a tracking module, click on it again in the Tracking pull-down menu. The check mark disappears, and another module may be activated if the user has the required security.
The Customer Service tracking module offers the F5 Lease Summary screen which may be accessed even if another tracking module is active. Use the F5 key or select Lease Summary from the Options Menu.
Options Menu
Also see the individual documents under Options Menu.
Options on the Main Menu accesses several features which allow quick navigation within LeasePak. Each of these features can also be accessed with a function key at the top of the keyboard.
The Fast Menu option displays a box in which the 5-character designation for a LeasePak update or report (e.g., R0905, U0101) may be entered.
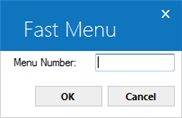
Using the fast menu bypasses main and secondary pull down menus. The 5- character codes for each update (beginning with U) and report (beginning with R) appear on pull down menus and in the Menu Structure appendix to the Reference Guide.
The Refresh Codes option is related to pull-down help available on many LeasePak fields. Selecting this option or using the <F6> hot key brings all newly added values into the pull-down help lists.
Window Menu
The Window menu includes several options to allow the user to update the look of LeasePak.
Cascade updates the LeasePak desktop when multiple updates and/or reports are open and displays a cascading effect.
Relationship Tree enables or disables the directory-like side bar to view the relationships between LeasePak clients, leases, and assets based on a particular customer.
Toolbar option is described in detail below.
User Defined Toolbar
The User Defined Toolbar option allows the user the ability to define and customize a toolbar with quick access buttons for commonly used updates and/or reports in LeasePak.
Defining the Toolbar
Select Toolbar from the Window menu. Then select Show. A blank toolbar will be displayed.
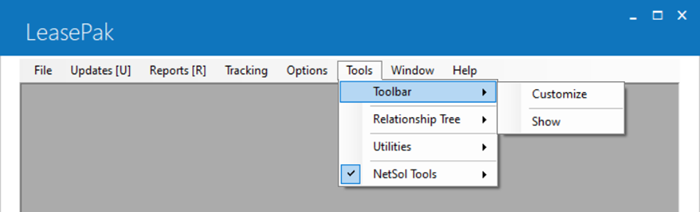
Select Toolbar from the Windows menu again, then select Customize option. This allows the user to define the toolbar. Once the toolbar has been defined, the user must select the Show option to view the toolbar.
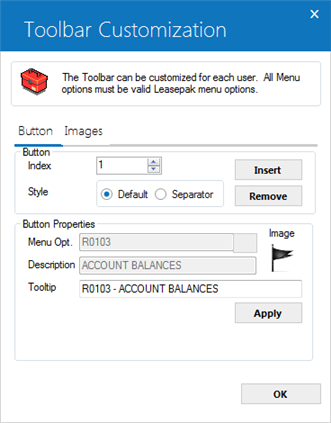
The Buttons tab allows the user to define the properties of each button. Select Insert to begin.
- INDEX
This field displays the order of each button being defined. Each number index is the order in which the button appears on the toolbar (Index 1 is the first button, Index 2 is the second button, etc.,) Use the arrows to select the button index desired. The is accessible once the Insert button has been selected.
- INSERT
Select this option when defining a new button, the index number will display the button to be defined.
- REMOVE
This option removes defined buttons. Use the arrows of the index field to select the button to be removed.
- DEFAULT
This option defaults the style for each button index being defined. Select default to create a normal button.
- SEPARATOR
This option adds a separator for the index number being defined. Select this option to create a separating space between buttons. Users must select these options before clicking Insert button.
- IMAGE
The image for the button is displayed. Select the desired image for the button being defined from the Image tab, the selected image will be defaulted.
- MENU OPT
Select the LeasePak menu option you wish to assign to the button. Click on for the list of valid options that includes most reports and updates with 5-character R or U menu numbers.
The selection of menu option is mandatory once an index has been insterted for default style. LeasePak limits inserting index with blank menu option and prompts the follwoing warning message once user clicks on OK button without selecting menu option for default style:
- DESCRIPTION
The description of the selected menu option will display accordingly. This field is read-only. Users cannot update or change the selected menu option description.
- Tooltip
This field will display the combined description of the selected menu-option code and it's description. Users can modify the selected menu option and it's description according to their owm reqirement. The maxmimum character limit for tooltip is 120 characters. This is the text that will appear when you hover the mouse pointer on the toolbar button.
- APPLY
Select this option to apply the button properties to the toolbar. When you are done, click OK to save any changes since the last Apply and exit the customization screen.
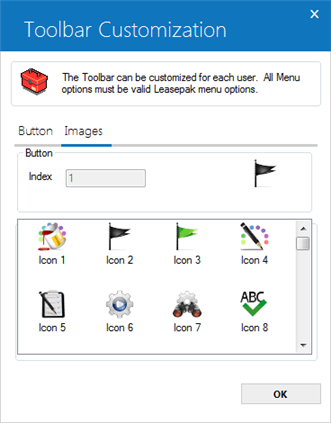
This screen allows the user to select the desired image icon for the button being defined. Select the desired image for the button index displayed. The image should be selected prior to selecting the Apply option, in order to avoid duplicate images on the toolbar.
Once the image icon and button properties have been defined and applied, click OK from the Buttons tab.
Printing Screens
It's possible to capture a graphic image of a LeasePak screen. Press the Alt key and the Print Screen key at the same time. That stores a picture of the entire PC screen on the clipboard. From there it may be pasted into another file, such as Word. It can edited using a graphics editor program such as Adobe Photoshop.
Sections of reports may be selected and copied to the Clipboard, then pasted into other Windows files. They can be edited as part of the new file. Select the portion of the screen to be copied by clicking on the first line, holding down the Shift key, and clicking on the final line. The selected data will be highlighted. Choose copy and it will be stored on the clipboard.
Using the Keyboard and Mouse
|
Function |
Shortcut |
| Pull down menu | Click on menu item or Alt key + underlined letter of menu item |
| Choose item from menu | Click on item or underlined letter of menu item |
|
Move to next field | Tab key |
| Move to previous field | Shift + Tab |
| Fast menu | F2 |
| Notebook | F3 |
| Report Profile | F4 |
| Lease Summary (if Cust. Service Tracking purchased) |
F5 |
| Refresh (lists of valid) Codes | F6 |
| Exit screen, no save | Esc key or click Cancel |
| Exit screen, save | Enter key or click on Save or OK |
|
Select field(s) | Click on it |
| Erase data from field | Click on field + delete key or back space |
|
Scroll thru report or list | Page Up/Down keys or scroll bar |
|
Go to end of report or list | Drag button to bottom of scroll bar |
|
Correct data entry in field | Arrow back, retype. Insert key changes data entry back & forth between insert mode and typeover mode. |
| Help for list of valid values | ALT + Up/Down arrow key |
|
Select item from help | ALT + Up/Down arrow key |
|
Client search | Click on (...) button next to field |
Entering Data
Note that letters keyed into LeasePak fields are not uniform in width. For example, a W takes up more of the field than an I. This occurs in all Windows applications, and results in some data entry extending beyond the visible boundaries of a field on the screen. Usually LeasePak can display all the entry in a field, but when that is not possible, text moves off to the left as more is entered. Using the arrow keys will scroll text right or left so it can be read.
Data keyed into a field can be copied (or cut) and pasted into other fields, either on the same screen or different screens. Use the Edit option on the Main Menu to copy and paste.
Entry of dates is unusual in several ways:
Hitting the space bar and Tab key at the same time when the cursor is in a date field automatically enters the date for the first of the following month.
A graphic calendar is available from many LeasePak updates. When the cursor is in a date field (e.g., in-service date, payoff effective date), click with the alternative side of your mouse (or, in some cases, double click) to display a calendar.
Calendar
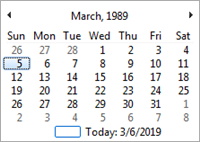
Today's date is initially highlighted. Use the arrows to scroll backward or forward in time. Click on the desired date and it will automatically fill in LeasePak's date field.
Should it later be necessary to change or delete that date, in some cases the back arrow or backspace cannot be used; delete the date by holding down Shift key and hitting Delete key.
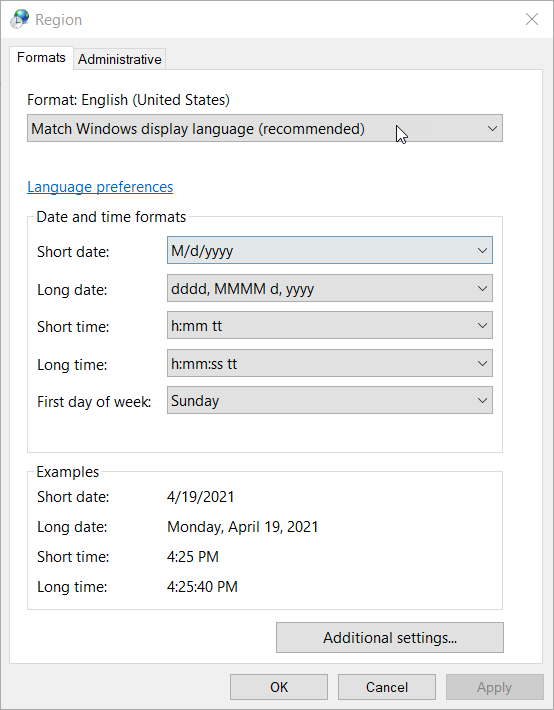
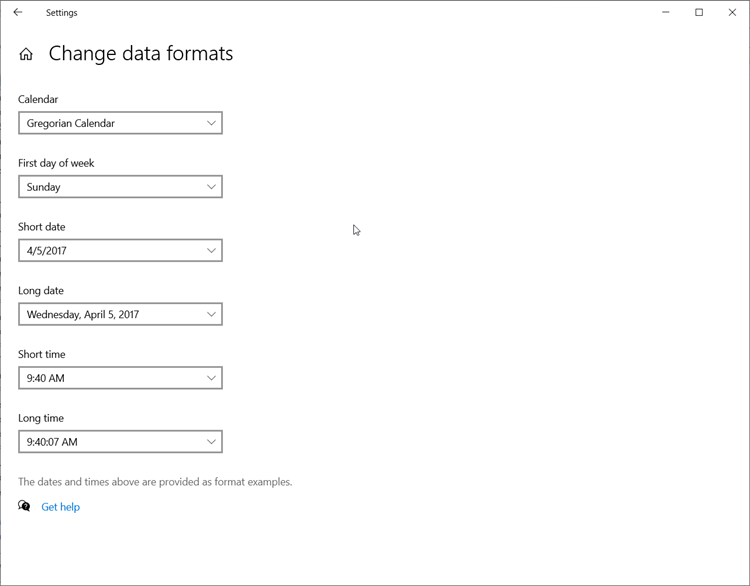
Regional Settings
A special setting on each user's PC is required for use of dates in the Application Tracking modules. From your computer, select Control Panel, and Regional Settings
 .
.
This Windows parameter screen should appear. Click Change in the Date Format area.
 .
.
This screen is set properly for use of the Application Tracking modules. The Century box is activated so that Windows will read dates with 4-digit years. Without this setting, Applications will read dates entered as MMDDYY incorrectly.
Some fields must be entered before moving on to the next screen. If a required field is left blank and Return is pressed, LeasePak displays the message "Input required" and moves the cursor to the field which has not been entered.
Running Reports
Report Destination
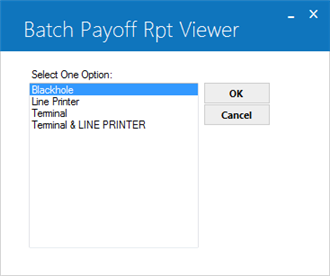
In LeasePak, any report may be printed, or viewed on the PC screen, or both. The screen below appears when a report is selected from the Reports menu. It also appears for several updates which generate a standard audit report (e.g., New Lease [U0101]). It is used to enter the output device desired
 .
.
TERMINAL is always an option offered on this menu. Other options are established on the Device and Printer Customizations option of the Custom General update. Some examples are:
BLACKHOLE
This option sends the report
to a queue which never prints.
LINE
PRINTER
This option
sends the report to the laser printer to which the user's PC is connected. This
destination is defined in the F4 Report Profile as the output device.
TERMINAL
This
option displays the report on the PC screen. It does not create hard copy on paper.
TERMINAL & LINE
PRINTER
This option
both displays the report on the PC screen and then prints it on the user's laser
printer.
Viewing
Reports on Screen
When viewing a report on the screen, the following keys may be used:
| Function |
Option |
| To scan the report by line: | |
| Forward one line | Click on line of report, then press DOWN ARROW |
|
Backward one line | Click on line of report. then press UP ARROW |
|
To scan report by screen: | |
| Forward one screen | Click on line of report, then press Page Down key |
|
Forward multiple screens | Drag button on Scroll bar |
| Backward one screen | Click on line of report, then press Page Up key |
|
Backward multiple screens | Drag button on Scroll bar |
| To go to the top of report | Control + Home keys |
| To go to the bottom of report | Control + End keys |
| To finish reading current report | Press RETURN or click Done |
If the user selects a report that prints out more than one version, pressing Return or clicking Done while viewing one report causes the succeeding version of the report to appear. For example, pressing Return when the
R0911A report is displayed brings up the R0911B. This is a LeasePak standard.
With LeasePak it is possible to specify that a report should appear on your terminal, launch its generation, and then proceed with other LeasePak updates or reports while the requested report generates. Once it is complete, the report appears on the screen, overlaying (but not canceling) other update or report screens.
LeasePak Documentation Suite
©
by NetSol Technologies Inc. All rights reserved.
The information contained in this document is the property of NetSol Technologies Inc. Use of the information contained herein is restricted. Conditions of use are subject to change without notice. NetSol Technologies Inc. assumes no liability for any inaccuracy that may appear in this document; the contents of this document do not constitute a promise or warranty. The software described in this document is furnished under license and may be used or copied only in accordance with the terms of said license. Unauthorized use, alteration, or reproduction of this document without the written consent of NetSol Technologies Inc. is prohibited.