U0212 Portfolio »
 Assessment Customizations »
Auto-Pay Customizations »
Calculation Customizations »
End of Period Customizations »
Field Customizations »
IDC/IDR Customizations »
Miscellaneous Customizations »
Modules Customizations »
New Lease Customizations »
PAP/ACH Control File »
Payoff Customizations »
Predefined Cycles Customizations »
User Defined Fields/Tables »
Assessment Customizations »
Auto-Pay Customizations »
Calculation Customizations »
End of Period Customizations »
Field Customizations »
IDC/IDR Customizations »
Miscellaneous Customizations »
Modules Customizations »
New Lease Customizations »
PAP/ACH Control File »
Payoff Customizations »
Predefined Cycles Customizations »
User Defined Fields/Tables »
Return to U02 Maintenance
U0212 Portfolio
End of Period Customizations
 This is one of the topics available under U0212 Portfolio.
- End of Period Portfolio Setup
- Submit State 'A': Time Formats
- Report Subtotals and Grand Totals
- End of Period Modules and Reports
End of Period Portfolio Setup
Use this screen to specify when and how End of Period runs for the portfolio.
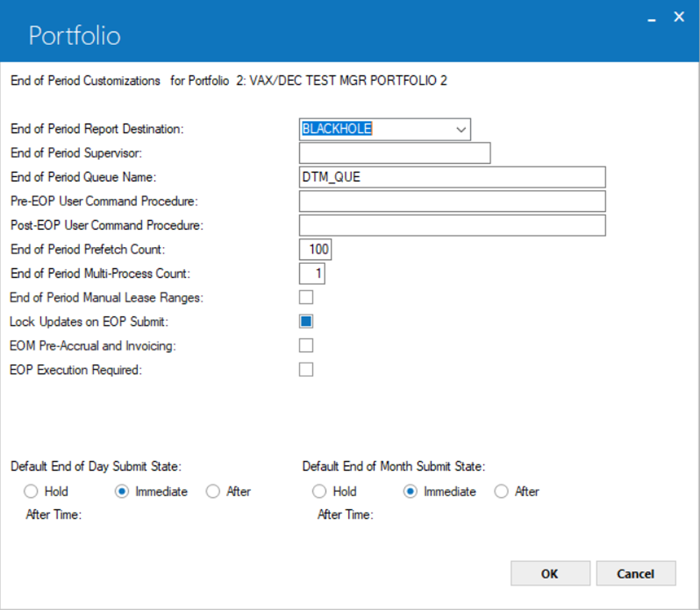
 End of Period Report Destination
- Name of the output device for End of Period reports. Type a valid Destination Code or
click
 to select from the list.
Set up output devices using
Custom General [U0712]: Device and Printer Customizations.
to select from the list.
Set up output devices using
Custom General [U0712]: Device and Printer Customizations.
End of Period Report Destination
- End of Period Supervisor
- Legacy only, no longer in use. Do not put anything in this field unless NetSol directs you to do so.
End of Period Supervisor
- End of Period Queue Name
- Logical name of the batch queue to use for the portfolio's End of Period processes. NetSol strongly recommends that each portfolio have its own End of Period batch queue set up on the server, separate from the
default system batch queue
SYS$BATCH. Otherwise, submission of batch jobs during End of Period can
easily exceed the 200 jobs-per-queue limit. Refer to the document Server Configuration and Maintenance
in the System Administration Guide for more information. This update does not verify the validity of the
batch queue name; obtain the correct queue name from your system administrator before typing it here.
End of Period Queue NameSYS$BATCH. Otherwise, submission of batch jobs during End of Period can
easily exceed the 200 jobs-per-queue limit. Refer to the document Server Configuration and Maintenance
in the System Administration Guide for more information. This update does not verify the validity of the
batch queue name; obtain the correct queue name from your system administrator before typing it here.
- Pre-EOP User Command Procedure
-
Specify a script or job to run before EOP starts. The instruction must include a full Unix-qualified path to the script or job file. For example:
- dcl /opt/msi/v65a/log/job.com
- /opt/msi/v62a/log/job.sh
 LeasePak no longer supports the @ symbol in procedure instructions.
Contact your NetSol representative for more information.
Pre-EOP User Command Procedure- dcl /opt/msi/v65a/log/job.com
- /opt/msi/v62a/log/job.sh
LeasePak no longer supports the @ symbol in procedure instructions.
Contact your NetSol representative for more information.
- Post-EOP User Command Procedure
-
Specify a script or job to run after EOP ends. The instruction must include a full Unix-qualified path to the script or job file. For example:
- dcl /opt/msi/v65a/log/job.com
- /opt/msi/v62a/log/job.sh
LeasePak no longer supports the @ symbol in procedure instructions.
Contact your NetSol representative for more information.
Post-EOP User Command Procedure- dcl /opt/msi/v65a/log/job.com
- /opt/msi/v62a/log/job.sh
LeasePak no longer supports the @ symbol in procedure instructions.
Contact your NetSol representative for more information.
- End of Period Prefetch Count
- Number of records to fetch from the database in advance of processing.
This field is applicable only if your DBMS is Sybase. Take the
default value if your DBMS is Oracle.
This is a tuning parameter affecting End of Period processing speed,
and the optimal value depends on the average number of assets per
lease in the portfolio.
If there is one asset per lease, set the End of Period Prefetch Count
(hereafter referred to as the Prefetch Count) to an initial value of 50
and adjust it downward from there. It is generally unnecessary to set
the Prefetch Count to a number greater than 50.
If there are multiple assets per lease, set the Prefetch Count to an
initial value of 10 and adjust it upward from there. Do not set the
Prefetch Count to a number less than 10.
Guidelines for tuning and adjusting the Prefetch Count:
- Set the Prefetch Count to an initial value as described above.
- Run End of Period for the portfolio.
- After EOP completes, run U0403 to get an End of Period Status Listing.
- Determine the runtime of Sequential Updates by subtracting the End Time
of the Sequential Updates Post-Merge module from the Start time of the
Sequential Updates 1 module.
- If the initial Prefetch Count was 10, increase it by 5.
If the initial Prefetch Count was 50, decrease it by 5.
- Re-execute steps 2, 3, and 4.
- Compare the Sequential Updates runtimes of EOP run #1 and EOP run #2.
- Continue modifying the Prefetch Count and re-executing the preceding steps
until there are no further improvements in the Sequential Updates runtime.
Large values for the Prefetch Count consume excessive system resources
and can cause End of Period to run slower. Therefore, set the Prefetch Count
to the smallest value (but not less than 10) which produces the best performance.
For example, if in your testing Sequential Updates completes in 30 minutes with
a Prefetch Count of 10, 15, and 20, then set the Prefetch Count in production
to 10, not 15 or 20.
If the average number of assets per lease in the portfolio changes over time,
re-adjust the Prefetch Count as necessary.
Contact your NetSol representative for more information.
End of Period Prefetch CountThis is a tuning parameter affecting End of Period processing speed, and the optimal value depends on the average number of assets per lease in the portfolio.
If there is one asset per lease, set the End of Period Prefetch Count (hereafter referred to as the Prefetch Count) to an initial value of 50 and adjust it downward from there. It is generally unnecessary to set the Prefetch Count to a number greater than 50.
If there are multiple assets per lease, set the Prefetch Count to an initial value of 10 and adjust it upward from there. Do not set the Prefetch Count to a number less than 10.
Guidelines for tuning and adjusting the Prefetch Count:
- Set the Prefetch Count to an initial value as described above.
- Run End of Period for the portfolio.
- After EOP completes, run U0403 to get an End of Period Status Listing.
- Determine the runtime of Sequential Updates by subtracting the End Time of the Sequential Updates Post-Merge module from the Start time of the Sequential Updates 1 module.
- If the initial Prefetch Count was 10, increase it by 5. If the initial Prefetch Count was 50, decrease it by 5.
- Re-execute steps 2, 3, and 4.
- Compare the Sequential Updates runtimes of EOP run #1 and EOP run #2.
- Continue modifying the Prefetch Count and re-executing the preceding steps until there are no further improvements in the Sequential Updates runtime.
Large values for the Prefetch Count consume excessive system resources and can cause End of Period to run slower. Therefore, set the Prefetch Count to the smallest value (but not less than 10) which produces the best performance. For example, if in your testing Sequential Updates completes in 30 minutes with a Prefetch Count of 10, 15, and 20, then set the Prefetch Count in production to 10, not 15 or 20.
If the average number of assets per lease in the portfolio changes over time, re-adjust the Prefetch Count as necessary.Contact your NetSol representative for more information.
- End of Period Multi-Process Count
- Number of processing segments to run in parallel for the Sequential Updates [U0411] module.
The minimum multi-process count is 1 and the maximum is 10. Always set to '1' unless your
server contains more than one CPU. If you set the multi-process count to a value greater than 1,
ensure that the Job Limit of your End of Period queues is large enough to run all of the U0411
parallel processing segments simultaneously.
If the value entered is greater than 10, LeasePak will displays an error message which indicates that the maximum multi-process count is 10.
Contact your NetSol representative for more information.
-
End of Period Multi-Process Count
- End of Period Manual Lease Range
-
Check the box to allow a user to enter EOP lease ranges manually.
By default, LeasePak automatically calculates the EOP lease ranges based on the number of leases.
That is, each lease range will contain about the same number of leases. This works well only if
the number of assets in all of the ranges is approximately equal. When one or more ranges have an
asset count significantly different from the other ranges, the runtimes of the Sequential Updates
multi-processes can become unbalanced, where some ranges finish in a few minutes and others take hours.
In such cases, it may be beneficial to manually set the lease ranges in U0212EP based on the number of
assets per range rather than the number of leases. Stored procedure cp_ranges_by_asset is
provided as a tool to calculate and display the ranges according to the number of assets. Contact your
NetSol representative for more information.
If End of period Multi Process Count is 1, then LeasePak prompts the following message:

Users can only proceed if the End of Period Multi Lease Ranges is checked and End of Period
Multi-Process Count is greater than 1. Click on Ok to continue. If end of period multi lease range
is 1 than user should not select end of period manual lease ranges to proceed.
End of Period Manual Lease RangeBy default, LeasePak automatically calculates the EOP lease ranges based on the number of leases. That is, each lease range will contain about the same number of leases. This works well only if the number of assets in all of the ranges is approximately equal. When one or more ranges have an asset count significantly different from the other ranges, the runtimes of the Sequential Updates multi-processes can become unbalanced, where some ranges finish in a few minutes and others take hours. In such cases, it may be beneficial to manually set the lease ranges in U0212EP based on the number of assets per range rather than the number of leases. Stored procedure
cp_ranges_by_asset is
provided as a tool to calculate and display the ranges according to the number of assets. Contact your
NetSol representative for more information.
If End of period Multi Process Count is 1, then LeasePak prompts the following message:
Users can only proceed if the End of Period Multi Lease Ranges is checked and End of Period Multi-Process Count is greater than 1. Click on Ok to continue. If end of period multi lease range is 1 than user should not select end of period manual lease ranges to proceed.
- Lock Updates on EOP Submit
- Check the box to prevent users from making updates in LeasePak once End of Period is submitted, as well as
while it is processing. Uncheck (clear) the box to allow users to make updates up until the time End of Period
actually starts processing, regardless of when it is submitted.
Lock Updates on EOP Submit
- EOM Pre-Accrual and Invoicing
- Check the box to allow a user to submit End of Month up to 5 days before the actual month end and still have
LeasePak accrue and invoice for the full month's period. Uncheck (clear) the box to have LeasePak accrue and invoice
only up to the date End of Month was submitted.
EOM Pre-Accrual and Invoicing
- Default End of Day Submit State
- Default for when End of Day actually begins processing after submission. You can override this default while
submitting End of Period in the Submit [U0401] update. Submit state settings
for End of Month take precedence over those for End of Day when End of Month and End of Day are submitted
together. Options are:
- Hold - hold the beginning of processing (in a batch queue on the server) until manually released.
If the system administrator is to release the job after a specific event (for example, backups finish running),
refer to the System Administration Guide document LeasePak Server Configuration and Maintenance,
in the section on Housekeeping, for the server procedure to release batch queue jobs so they can begin executing. If you
accidentally submit End of Period with a 'Hold' state, refer to
Submit [U0401] in
End of Period [U04]: Interactive Updates for the procedure to restart End of Period for normal execution.
- Immediate - begin End of Day processing immediately upon submission.
- After - begin End of Day processing at the time specified in After Time (see below).
Default End of Day Submit State- Hold - hold the beginning of processing (in a batch queue on the server) until manually released. If the system administrator is to release the job after a specific event (for example, backups finish running), refer to the System Administration Guide document LeasePak Server Configuration and Maintenance, in the section on Housekeeping, for the server procedure to release batch queue jobs so they can begin executing. If you accidentally submit End of Period with a 'Hold' state, refer to Submit [U0401] in End of Period [U04]: Interactive Updates for the procedure to restart End of Period for normal execution.
- Immediate - begin End of Day processing immediately upon submission.
- After - begin End of Day processing at the time specified in After Time (see below).
- Default End of Day Submit State After Time
- The time to begin processing End of Day when the Default End of Day Submit State is set to 'A'
(see above). Refer to the section below, Submit State 'A': Time Formats, for more information.
Default End of Day Submit State After Time
- Default End of Month Submit State
- Default for when End of Month actually begins processing after submission. You can override this default while
submitting End of Period in the Submit [U0401] update. Submit state settings
for End of Month take precedence over those for End of Day when End of Month and End of Day are submitted
together. Options are:
- Hold - hold the beginning of processing until manually released.
If the system administrator is to release the job after a specific event (for example, backups finish running),
refer to the System Administration Guide document LeasePak Server Configuration and Maintenance,
in the section on Housekeeping, for the server procedure to release batch queue jobs so they can begin executing. If you
accidentally submit End of Period with a 'Hold' state, refer to
Submit [U0401] in
End of Period [U04]: Interactive Updates for the procedure to restart End of Period for normal execution.
- Immediate - begin End of Day processing immediately upon submission.
- After - begin End of Day processing at the time specified in After Time (see below).
Default End of Month Submit State- Hold - hold the beginning of processing until manually released. If the system administrator is to release the job after a specific event (for example, backups finish running), refer to the System Administration Guide document LeasePak Server Configuration and Maintenance, in the section on Housekeeping, for the server procedure to release batch queue jobs so they can begin executing. If you accidentally submit End of Period with a 'Hold' state, refer to Submit [U0401] in End of Period [U04]: Interactive Updates for the procedure to restart End of Period for normal execution.
- Immediate - begin End of Day processing immediately upon submission.
- After - begin End of Day processing at the time specified in After Time (see below).
- Default End of Month Submit State After Time
- The time to begin processing End of Month when the Default End of Month Submit State is set to 'A'
(see above). Refer to the section below, Submit State 'A': Time Formats, for more information.
Default End of Month Submit State After Time
Submit State 'A': Time Formats
Valid time formats fall into two categories:
- Absolute - specifies an actual date and/or time. Setting an absolute time is like setting an alarm clock.
The format for absolute time isdd-mmm-yyyy hh:mm:ss.cc, where dd is the two-digit day of the month, mmm is the three-letter month name, yyyy is the four-digit year, hh is the two-digit hour (use 24-hour format), mm is the two-digit minute, ss is the two-digit second, and cc is the two-digit hundredth second. - Delta - specifies an amount of time to add to the current dates and time. Setting a delta time is like
setting an egg timer.
The format for delta time isdddd hh:mm:ss.cc, where dddd is the number of days in the future (up to 9999), hh is the number of hours in the future, mm is the number of minutes in the future, ss is the number of seconds in the future, and cc is the number of hundredth seconds in the future.
| Absolute: | -- 23:00 | Execute at 11:00 pm of the current day |
| -- 00:01 | Execute at 12:01 am on the day following the current day (LeasePak performs an automatic day adjustment) | |
| -- 09:00 | Execute at 9:00 am of the current day | |
| Delta: | 0 00:15 | Execute in 15 minutes from the current time of submission |
| 0 04:00 | Execute in 4 hours from the current time of submission | |
| 1 00:01 | Execute in 1 day and 1 minute from the current time of submission |
The above absolute time samples do not specify a date (for example, 01-Jan-1995). Since End of Day and End of Month processes are submitted on an ongoing basis, specifying an actual date is inappropriate. Notice, however, that you must still include the hyphens which normally separate day, month, and year.
After making changes as needed, click OK to store and continue to the next screen, or click Cancel to exit the update without making any changes.
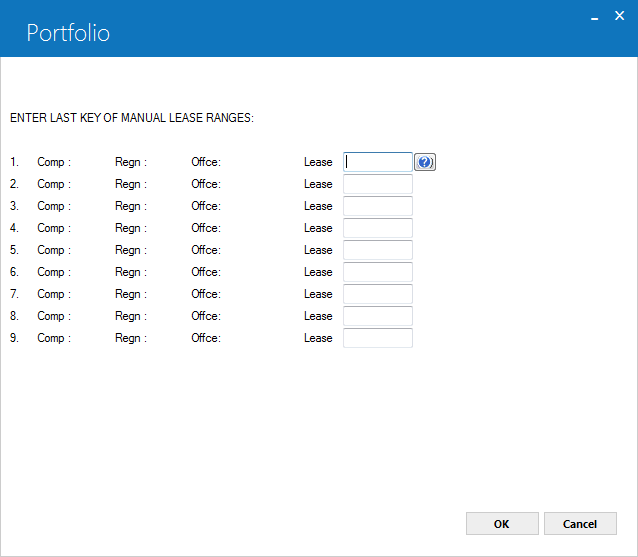
The above screen appears if "End of Period Multi-Process Count" is greater than "1" and "End of Period Manual Lease Range" is checked.
- Company
- Enter the company number for the lease. Company number must be a valid company number.
Company
- Region
- Enter the region number for the lease. Region number must be a valid region number.
Region
- Office
- Enter the office number for the lease. Office number must be a valid office number.
Office
- Lease
- Enter the lease number. A lease number must be a valid lease number.
In the above example where the end of period multi-process count is equal to 7, the information entered will be stored in the ras EOP Accrual System table.
The first 2 positions of these fields will be populated with the portfolio number. Please note that the final lease range will not be displayed and will store
zzzzzzzzzzzzzzzzzzz in the ras table.
LeasePak will perform an edit check to ensure each company, region, office, and lease number will be greater than the previous.
For example: A lease range of 1 1 3 20 is considered greater than a previous lease range of 1 1 1 50.
If the lease range entered is not greater than the previous, the following message will be displayed requesting the user to re-enter the lease range.

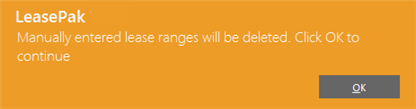
If user un-selects the End of Period Manual Lease Ranges field and clicks the Ok button, the following warning message is, displayed notifying to the user
the lease ranges will be deleted.
LeaseIn the above example where the end of period multi-process count is equal to 7, the information entered will be stored in the ras EOP Accrual System table. The first 2 positions of these fields will be populated with the portfolio number. Please note that the final lease range will not be displayed and will store zzzzzzzzzzzzzzzzzzz in the ras table.
LeasePak will perform an edit check to ensure each company, region, office, and lease number will be greater than the previous. For example: A lease range of 1 1 3 20 is considered greater than a previous lease range of 1 1 1 50.
If the lease range entered is not greater than the previous, the following message will be displayed requesting the user to re-enter the lease range.
If user un-selects the End of Period Manual Lease Ranges field and clicks the Ok button, the following warning message is, displayed notifying to the user the lease ranges will be deleted.
Report Subtotals and Grand Totals
Use this screen to specify the levels of subtotals and grand totals to include in End of Period reports for the portfolio. Checking the boxes for Subtotals or Grand Totals also checks all of the corresponding boxes below each, respectively. If you uncheck (clear) all the boxes below Subtotals or Grand Totals, these two boxes are cleared as well.
Subtotals report on totals after each company/region/office or Customer/group section within the report, according to what the user selects in the subordinate categories. Grand totals report on totals at the end of the report, broken down by what the user selects in the subordinate categories.
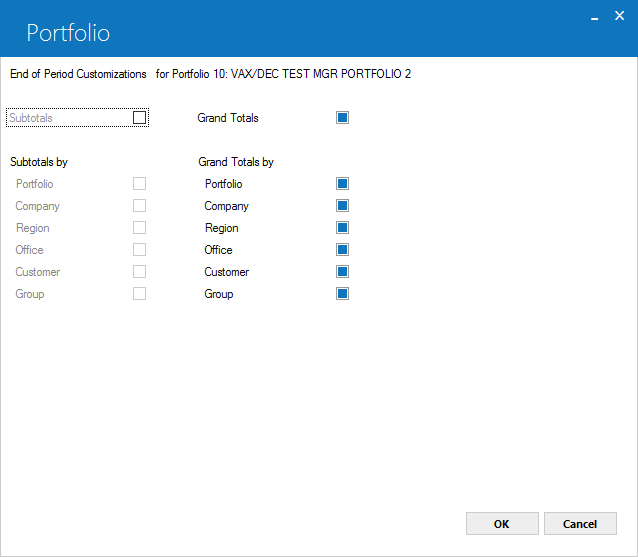
- Subtotals
- Check this box to activate the subordinate categories for subtotal (end of section) reporting.
Subtotals
- Subtotals by Portfolio
- Check this box to include subtotal reporting at the end of each portfolio section.
Subtotals by Portfolio
- Subtotals by Company
- Check this box to include subtotal reporting at the end of each company section.
Subtotals by Company
- Subtotals by Region
- Check this box to include subtotal reporting at the end of each region section.
Subtotals by Region
- Subtotals by Office
- Check this box to include subtotal reporting at the end of each office section.
Subtotals by Office
- Subtotals by Customer
- Check this box to include subtotal reporting at the end of each Customer section.
Subtotals by Customer
- Subtotals by Group
- Check this box to include subtotal reporting at the end of each group section.
Subtotals by Group
- Grand Totals
- Check this box to activate the subordinate categories for grand total (end of report) reporting.
Grand Totals
- Grand Totals by Portfolio
- Check this box to include a breakdown total for each portfolio at the end of the report.
Grand Totals by Portfolio
- Grand Totals by Company
- Check this box to include a breakdown total for each company at the end of the report.
Grand Totals by Company
- Grand Totals by Region
- Check this box to include a breakdown total for each region at the end of the report.
Grand Totals by Region
- Grand Totals by Office
- Check this box to include a breakdown total for each office at the end of the report.
Grand Totals by Office
- Grand Totals by Customer
- Check this box to include a breakdown total for each Customer at the end of the report.
Grand Totals by Customer
- Grand Totals by Group
- Check this box to include a breakdown total for each group at the end of the report.
Grand Totals by Group
After making changes as needed, click OK to store and continue to the next screen, or click Cancel to return to the previous screen without making any changes.
End of Period Modules and Reports
Use this screen to select which modules to execute during End of Period processing. The list includes all End of Period modules--End of Day, End of Month, and End of Year. Modules and reports marked '(Seq Upd)' run as part of Sequential Updates. For a description of each module, refer to End of Period [U04]: Overview. The update lists the modules and reports in the following order:
- Accruals
- Invoicing
- End of Day
- End of Month
- End of Year
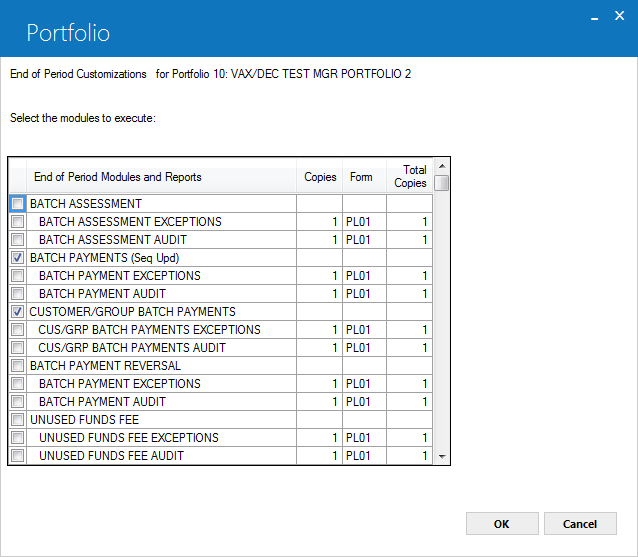
- Select the modules to execute
- For each module, check the box to include it in End of Period execution. Indented items are sub modules of the
item listed immediately above; you cannot include or exclude individual sub modules. The following are special
cases:
- CYCLE INVOICES - if you wish to select CYCLE INVOICES (formatting), you must also select this.
- SEQUENTIAL UPDATES - if you wish to select an item marked '(Seq Upd)', you must also select this.
- SEQUENTIAL UPDATES POST-PROCESSOR - if you wish to select SEQUENTIAL UPDATES, you must also select this.
- SEQUENTIAL UPDATES POST MERGE - if you wish to select SEQUENTIAL UPDATES, you must also select this.
- ITC LISTING - this report no longer runs as part of End of Period.
- ITC REVIEW - this report no longer runs as part of End of Period.
- ETC LISTING - this report no longer runs as part of End of Period.
- ETC REVIEW - this report no longer runs as part of End of Period.
Select the modules to execute- CYCLE INVOICES - if you wish to select CYCLE INVOICES (formatting), you must also select this.
- SEQUENTIAL UPDATES - if you wish to select an item marked '(Seq Upd)', you must also select this.
- SEQUENTIAL UPDATES POST-PROCESSOR - if you wish to select SEQUENTIAL UPDATES, you must also select this.
- SEQUENTIAL UPDATES POST MERGE - if you wish to select SEQUENTIAL UPDATES, you must also select this.
- ITC LISTING - this report no longer runs as part of End of Period.
- ITC REVIEW - this report no longer runs as part of End of Period.
- ETC LISTING - this report no longer runs as part of End of Period.
- ETC REVIEW - this report no longer runs as part of End of Period.
- End of Period Modules and Reports
- Lists the available modules and reports, along with their sub modules.
End of Period Modules and Reports
- Copies
- Type the number of copies to print for the selected End of Period report. If you set this to 0 on a selected
report, it will still run and produce a file in the End of Period directory, but it will not print.
Copies
- Form
- Name of the form (paper type or style) to use for the report. NetSol recommends setting this to the default,
'PL01' (P L zero 1), unless you have defined additional form names. Refer to the document
Server Configuration and Maintenance in the System Administration Guide for more information on
defining form names. This update does not verify the validity of the form name;
obtain the correct form name from your system administrator before typing it here.
Form
- Total Copies
- Type the number of Copies times the paper ply (2-ply, 3-ply, etc.). Do not add 1 for the microfiche copy.
Total Copies
After making changes as needed, click OK to complete the update and save, or click Cancel to return to the previous screen without making any changes.
 For Vertex O users only: Users must select Vertex O disbursal and Vertex Journal modules to EOP processes for the given portfolio to run during EOP. If these modules are not scheduled to run during EOP, they must be run manually on a regular basis. These modules will be available for selection when the Vertex O module is owned and a Vertex switch is on for the given portfolio.
© 2026 NETSOL Technologies. All rights reserved.
The information contained in this document is the sole property of NETSOL Technologies, Inc. Use of the information contained herein is restricted. Conditions of use are subject to change without notice. NETSOL Technologies, Inc. assumes no liability for any inaccuracy that may appear in this document nor does it have the obligation to update any of the information contained herein; the contents of this document do not constitute a promise or warranty. The software described in this document is furnished under license and may be used or copied only in accordance with the terms of said license. Unauthorized use, alteration, or reproduction of this document without the written consent of NETSOL Technologies, Inc. is prohibited.
The information contained in this document is the sole property of NETSOL Technologies, Inc. Use of the information contained herein is restricted. Conditions of use are subject to change without notice. NETSOL Technologies, Inc. assumes no liability for any inaccuracy that may appear in this document nor does it have the obligation to update any of the information contained herein; the contents of this document do not constitute a promise or warranty. The software described in this document is furnished under license and may be used or copied only in accordance with the terms of said license. Unauthorized use, alteration, or reproduction of this document without the written consent of NETSOL Technologies, Inc. is prohibited.