LeasePak Client Configuration »
 Software Setup »
Printer Configuration »
Software Modification, Repair, and Removal »
Software Setup »
Printer Configuration »
Software Modification, Repair, and Removal »
Return to LeasePak Client
LeasePak Client Configuration
Printer Configuration
You must use updates within LeasePak to configure printers for the client. You can find the documentation specified in this section in the LeasePak Reference Guide.
- Log on the LeasePak client as lpsuper or other user with full privileges. Refer to the document LeasePak Basics in the LeasePak Reference Guide for more information about logging on the client.
-
Define printers within LeasePak through the Device and Printer Customizations update of Custom General [U0712] in the LeasePak Reference Guide:
-
From the LeasePak menu, select Auxiliary Table Maintenance, Custom General [U0712].
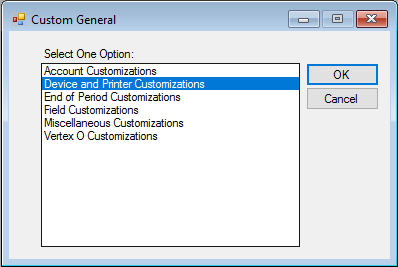
-
In the Custom General dialog box, select Device and Printer Customizations and click OK.
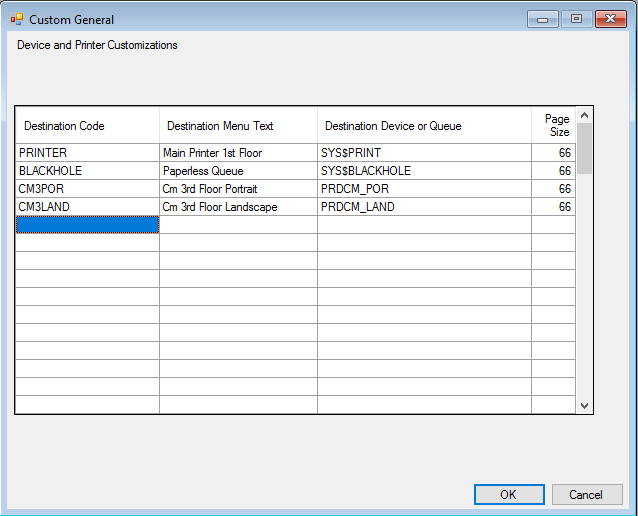
Field Descriptions
- Destination Code
- Custom code name or short name for the printer that will appear when the user is selecting a report destination. Must be unique within the particular LeasePak environment.
- Destination Device or Queue
-
LeasePak queue manager print queue name from
start_queues.com. Locate the queue name at the end of the the line:$ init/que/start/form=default/on=LP4SI: sys$print
Instart_queues.com, the queue name is in lowercase, but you must type the queue name in UPPERCASE in Destination Device or Queue.
- Page Size
-
Number of vertical print lines on a page. These correspond to the Length parameters defined at the top of the
start_queues.comfile. In most cases, portrait printers have 66 lines, while landscape printers have 45. Contact your NetSol representative for more information.
- Type the information for all printers and click OK.
-
From the LeasePak menu, select Auxiliary Table Maintenance, Custom General [U0712].
-
Configure the default report destinations for lpsuper within LeasePak through Report Profile [F4]:
In most cases, users have access to Report Profile [F4] and can set or change their own default report destinations. The document LeasePak Basics in the LeasePak Reference Guide describes the use of Report Profile [F4].
-
From the LeasePak menu, select Options, Report Profile [F4].
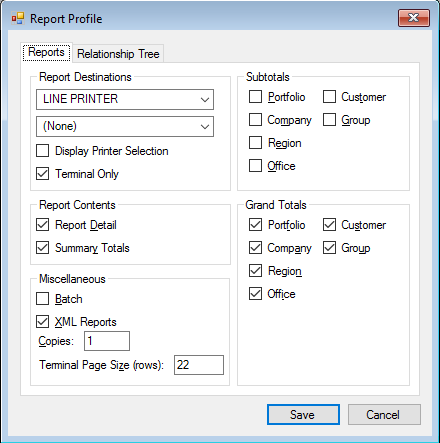
Field Descriptions
- Report Destinations
- Select 2 default destinations for your reports. One of these is usually the Paperless Queue or similar non-printing destination.
- Report Contents
- Select whether reports, by default, will contain detail information only, summaries and totals only, or both.
- Batch
- Select this if you want your reports to run in batch mode. Running in batch mode delays printing of the reports until you exit the reports menu.
- Copies
- Type the number of copies to print for each report. In most cases this is 1.
- Terminal Page Size (rows)
- Determines the maximum number of rows to display within a single report window. Leave this set at its default value, or contact your NetSol representative for more information.
- Subtotals
- Select which accounting units will group and break for subtotals.
- Grand Totals
- Select which accounting units will contain grand totals.
- When you have finished configuring your Report Profile, click Save.
-
From the LeasePak menu, select Options, Report Profile [F4].
You can change the report profiles for other users through the LeasePak Security [U0706] update. Refer to the Reports section of the document Security [U0706] for information.
© 2026 NETSOL Technologies. All rights reserved.
The information contained in this document is the sole property of NETSOL Technologies, Inc. Use of the information contained herein is restricted. Conditions of use are subject to change without notice. NETSOL Technologies, Inc. assumes no liability for any inaccuracy that may appear in this document nor does it have the obligation to update any of the information contained herein; the contents of this document do not constitute a promise or warranty. The software described in this document is furnished under license and may be used or copied only in accordance with the terms of said license. Unauthorized use, alteration, or reproduction of this document without the written consent of NETSOL Technologies, Inc. is prohibited.
The information contained in this document is the sole property of NETSOL Technologies, Inc. Use of the information contained herein is restricted. Conditions of use are subject to change without notice. NETSOL Technologies, Inc. assumes no liability for any inaccuracy that may appear in this document nor does it have the obligation to update any of the information contained herein; the contents of this document do not constitute a promise or warranty. The software described in this document is furnished under license and may be used or copied only in accordance with the terms of said license. Unauthorized use, alteration, or reproduction of this document without the written consent of NETSOL Technologies, Inc. is prohibited.