Application Setup: Field Security [U0814]
LeasePak menu: Updates, Tracking Setup, Application Setup [U08]
Corresponding End of Period process: None
Describes the Application Tracking [U08] setup update for adding, changing, or deleting application field security profiles.
 This is part of the optional LeasePak module
Application Tracking. For
information on individual Application functions, refer to
Application Tracking [U08].
This is part of the optional LeasePak module
Application Tracking. For
information on individual Application functions, refer to
Application Tracking [U08].
Use Application Field Security to create different security profiles for application and application asset fields. For example, a profile for a "transaction specialist" may permit access to address and contact fields but deny access to key financial fields, or, because you can specify different profiles for different application statuses, fields that are accessible during an Entry or Investigation status can be made inaccessible once an application moves to Approved. In addition to specifying field access, you can also indicate in Field Security which fields should appear highlighted as input-required. You can create as many profiles as needed and assign users (through User Profile [U0831]) different profiles for each application status based on individual privileges.
 Edit field security profiles when users are not in
Application Tracking or other parts of Application Setup.
Edit field security profiles when users are not in
Application Tracking or other parts of Application Setup.
Adding an Application Field Security Profile
From the main LeasePak menu select Updates, Tracking Setup, Application Setup [U08], Field Security [U0814].
LeasePak displays the list of field security profiles.
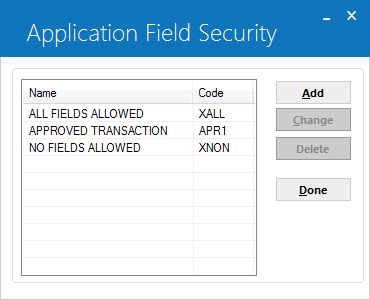
LeasePak provides two predefined field security profiles:
| Code | Description |
|---|---|
| XALL | All fields accessible |
| XNON | No fields accessible |
LeasePak reserves field security profile codes beginning with 'X' for the predefined field security profiles; you cannot change or delete any of the predefined field security profiles.
To add a field security profile, click Add. To instead exit the update, click Done.

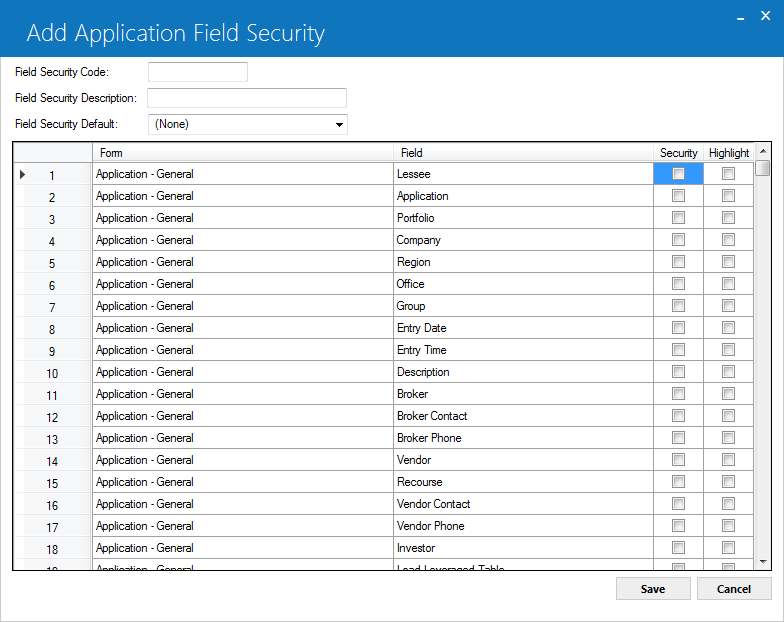
Field Descriptions
 Field Security Code
- Type a 4-character code for the field security profile. You cannot use 'X' as the first letter of the code.
Field Security Code
-
Field Security Default
- If you want to default from an existing field security profile, click
 and select the field security profile from the list.
You can make changes to the defaulted information on the next screen.
and select the field security profile from the list.
You can make changes to the defaulted information on the next screen.
Field Security DefaultClick OK to proceed or Cancel to return to the field security profile list window without making any changes. Proceed to Application Field Security Fields below for descriptions of the setup fields.
Changing an Application Field Security Profile
From the main LeasePak menu select Updates, Tracking Setup, Application Setup [U08], Field Security [U0814].
LeasePak then displays the list of field security profiles.
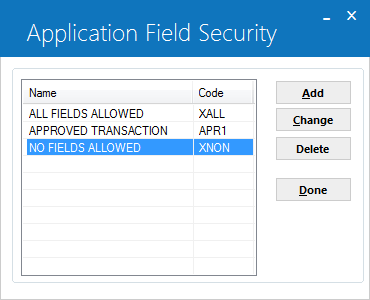
Click to highlight the field security profile you wish to change, then click Change. To instead exit the update, click Done. Proceed to Application Field Security Fields below for descriptions of the setup fields.
Application Field Security Fields
Field Descriptions
-
Field Security Code
- LeasePak displays the 4-character application field security profile code.
When using Change (after you have added a field security profile), you can only change the description and settings associated with the
code. To change the 4-character code, you must delete the field security profile and add a new one with a new code.
Field Security CodeWhen using Change (after you have added a field security profile), you can only change the description and settings associated with the code. To change the 4-character code, you must delete the field security profile and add a new one with a new code.
-
Field Security Description
- Add or change the description for the code. The description can be up to 20 characters long.
Field Security Description
-
Form Name
- For each field or security item, LeasePak displays where you can find it in
Application Tracking [U08].
Form Name Application Tracking Menu Item Assets Assets, first screen listing assets associated with the application, where you can add a pending asset,
add a booked asset, or change or delete a pending asset. Assets--1 Assets, Tab 1 Assets--2 Assets, Tab 2 Assets--3 Assets, Tab 3 Assets--4 Assets, Tab 4 Assets--5 Assets, Tab 5 Assets--6 Assets, Tab 6 Assets--7 Assets, Tab 7 Assets--8 Assets, Tab 8 Document Delete Documents and Tasks, Delete option Document & Task List Documents and Tasks, Setup option Enter Application--1 New or Change, Tab 1 Enter Application--2 New or Change, Tab 2 Enter Application--3 New or Change, Tab 3 Enter Application--4 New or Change, Tab 4 Enter Application--5 New or Change, Tab 5 Enter Application--6 New or Change, Tab 6 Enter Application--7 New or Change, Tab 7 Enter Application--8 New or Change, Tab 8 Enter Application--9 New or Change, Tab 9 Enter Application--10 New or Change, Tab 10 Insurance Insurance Title Filings Assets, Tab 6, Title Filings section
Form Name| Form Name | Application Tracking Menu Item |
|---|---|
| Assets | Assets, first screen listing assets associated with the application, where you can add a pending asset, add a booked asset, or change or delete a pending asset. |
| Assets--1 | Assets, Tab 1 |
| Assets--2 | Assets, Tab 2 |
| Assets--3 | Assets, Tab 3 |
| Assets--4 | Assets, Tab 4 |
| Assets--5 | Assets, Tab 5 |
| Assets--6 | Assets, Tab 6 |
| Assets--7 | Assets, Tab 7 |
| Assets--8 | Assets, Tab 8 |
| Document Delete | Documents and Tasks, Delete option |
| Document & Task List | Documents and Tasks, Setup option |
| Enter Application--1 | New or Change, Tab 1 |
| Enter Application--2 | New or Change, Tab 2 |
| Enter Application--3 | New or Change, Tab 3 |
| Enter Application--4 | New or Change, Tab 4 |
| Enter Application--5 | New or Change, Tab 5 |
| Enter Application--6 | New or Change, Tab 6 |
| Enter Application--7 | New or Change, Tab 7 |
| Enter Application--8 | New or Change, Tab 8 |
| Enter Application--9 | New or Change, Tab 9 |
| Enter Application--10 | New or Change, Tab 10 |
| Insurance | Insurance |
| Title Filings | Assets, Tab 6, Title Filings section |
-
Field Name
- LeasePak lists the name of the field or option.
Field Name
-
Security
- For each field or option, click to check or clear the box. A checked box means the field or option is accessible. A cleared box
means the field or option is not accessible.
Security
-
Highlight
- For each field or option, click to check or clear the box. A checked box means the field or option is highlighted as entry required
on its corresponding form. A cleared box means the field or option is not entry required.
HighlightYou can create field security profiles for different types of application users, different application statuses, or a combination of the two. For more information, see the section Using Application Field Security below.
Click Save to add or change the field security profile or Cancel to return to the field security profile list window without making any changes. Once you are finished editing field security profiles, from the field security profile list window click Done to exit the update. Any changes immediately become available for use with user profile settings (use Refresh Codes to update the LeasePak client code set). For more information, see the section Using Application Field Security below.
Deleting an Application Field Security Profile
From the main LeasePak menu select Updates, Tracking Setup, Application Setup [U08], Field Security [U0814].
LeasePak then displays the list of field security profiles. Click to highlight the field security profile you wish to delete, then click Delete. To instead exit the update, click Done.
You cannot delete a field security profile assigned to an application user through User Profile [U0831]. You also cannot delete any of the predefined field security profiles (codes beginning with 'X').
If LeasePak allows the deletion, it will prompt for confirmation.

Click Yes to delete the field security profile or No to return to the field security profile list window without making any changes.
Once you are finished editing field security profiles, from the field security profile list window click Done to exit the update.
Using Application Field Security
Following are the Application Setup updates and the Application Tracking menu item related to application field security profiles.
- Status [U0811]
- Use Application Status to add, change, or delete application status codes. Application status codes represent the stages that an application goes through on its way towards becoming a lease or loan. LeasePak's predefined status choices include Entry, Investigation, Approved, Booked, Withdrawn, Suspended, Default, and Rejected. Within User Profile [U0831], you can set users up with the same field security profile for all the statuses in their assigned flow, or set a different security profile for each status.
- User Profile [U0831]
- Use the User Profile to add, change, or delete Application Tracking users. LeasePak users may or may not also be Application users, but all Application users must be LeasePak users. Within User Profile, you can set which of the Application Tracking menu items the user has access to, approval limits, status flow, field security by status, work schedule sort order, and other parameters.
- Application Tracking [U08]
- For fields affected by security settings, refer to the various forms specified under Form Name above.
LeasePak Documentation Suite
©
by NetSol Technologies Inc. All rights reserved.
The information contained in this document is the property of NetSol Technologies Inc. Use of the information contained herein is restricted. Conditions of use are subject to change without notice. NetSol Technologies Inc. assumes no liability for any inaccuracy that may appear in this document; the contents of this document do not constitute a promise or warranty. The software described in this document is furnished under license and may be used or copied only in accordance with the terms of said license. Unauthorized use, alteration, or reproduction of this document without the written consent of NetSol Technologies Inc. is prohibited.