Web Services API (mPower) Server »
 System Requirements »
Server Preparation »
JEE: Web Services API Installation »
JSE/Apache Tomcat: Web Services API Installation »
mPower Configuration and Deployment »
Web Services (LinkIT) Deployment »
Response Codes and Messages »
System Requirements »
Server Preparation »
JEE: Web Services API Installation »
JSE/Apache Tomcat: Web Services API Installation »
mPower Configuration and Deployment »
Web Services (LinkIT) Deployment »
Response Codes and Messages »
 Web Services API (mPower) Server
JSE/JBoss: Web Services API Installation
 This document assumes you have a working knowledge of JSE and JBoss. Contact your NetSol representative for more information.
JSE Installation and Configuration
To install, refer to Java SE Platform Installation and follow the instructions specific to your operating system.
Installation of JBoss Web Server on Red Hat Enterprise Linux
Pre-requisite
Before installing JBoss Web Server, you must first install a supported Development Kit (JDK).
| Operating System | Chipset Architecture | Java Virtual Machine |
| Red Hat Enterprise Linux 8 | x86_64 | OpenJDK 8, OracleJDK 8 |
Execute
sudo yum install java-8-openjdk
to install JDK 8 as a root user.
Download and Extract JBoss Web Server
To install JBoss Web Server, download and extract the installation ZIP files. Following are the steps:
- Log in to the Red Hat Customer Portal
- Go to Downloads
- Select Red Hat JBoss Web Server in the Product Downloads list.
- Select the correct JBoss Web Server version from the Version drop-down menu.
- Download for each of the following files, ensuring the selection of correct platform and architecture for your system:
- The Red Hat JBoss Web Server 5.5 Application Server (jws-5.5.0-application-server-RHEL8-x86_64.zip).
- The Red Hat JBoss Web Server 5.5 Native Components for RHEL (jws-5.5.0-application-server.zip).
- Unzip the downloaded ZIP files to your installation directory.
unzip jws-5.5.0-application-server-RHEL8-x86_64.zip -d /opt/
unzip -o jws-5.5.0-application-server.zip -d /opt/
The directory created by extracting the ZIP archieves is the top-level directory for JBoss Web Server. This is referred to as /opt/jws-5.5.
Setting the JAVA_HOME Environment Variable
Setting JAVA_HOME environment variable for Tomcat before running JBoss Web Server.
- Create a file named setenv.sh in the bin directory of Tomcat (/opt/jws-5.5/tomcat/bin)
- Insert the JAVA_HOME path definition.
For example: export JAVA_HOME=/usr/lib/jvm/java-1.8.0-openjdk-1.8.0.432.b06-2.el8.x86_64
Create Tomcat User
Follow this procedure to create tomcat user and its parent group:
- In a shell prompt as a root user, change directory to /opt/jws-5.5.
- Execute following command to create tomcat user group:
groupadd -g 53 -r tomcat - Execute following command to create tomcat user in the tomcat user group:
useradd -c "tomcat" -u 53 -g tomcat -s /bin/sh -r tomcat
Move the ownership of tomcat directory to the tomcat user
- Execute
chown -R tomcat:tomcat tomcat/
from /opt/jws-5.5 to assign the ownership of the Tomcat directories to the tomcat user that allows a user to run Tomcat service. - Ensure that the tomcat user is permitted to all parent directories. If not then execute permissions first For example:
chmod -R u+X tomcat/
Setting up and using the JBoss Web Server with system
As a root user, execute .postinstall.systemd script:
cd /opt/jws-5.5/tomcat
sh .postinstall.systemd
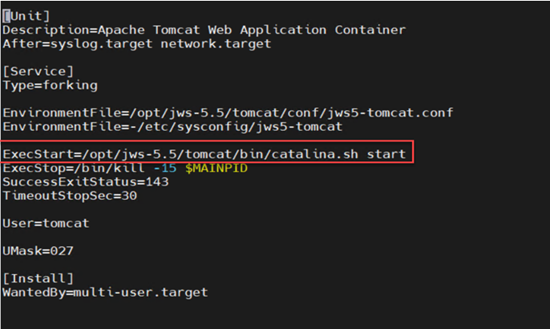
Edit jws5-tomcat-service
Edit following changes in jws5-tomcat.service.
- cd /usr/lib/systemd/system
- nano jws5-tomcat.service
See below image for details to edit the file.
Controlling the JBoss Web Server with systemd
Systemd commands can only be issued by the root user.
- To enable the JBoss Web Server services to start at boot using systemd:
systemctl enable jws5-tomcat.service - To start the JBoss Web Server using systemd:
systemctl start jws5-tomcat.service - To stop the JBoss Web Server using systemd:
systemctl stop jws5-tomcat.service - To verify the status of the JBoss Web Server using systemd (the status operation can be executed by any user):
systemctl status jws5-tomcat.service - Certificate Creation (jks Format):
keytool -genkey -alias tomcat -keyalg RSA -keystore "/opt/jws-5.5/tomcat/conf/nutcannon2.jks" - Edit server.xml file:
cd /opt/jws-5.5/tomcat/conf/
vi server.xml
add connector for port 8443 in server.xml file.
       <Connector port="8443" protocol="org.apache.coyote.http11.Http11NioProtocol"
               maxThreads="150" SSLEnabled="true">
        <SSLHostConfig>
            <Certificate certificateKeystoreFile="/opt/jws-5.5/tomcat/conf/nutcannon2.jks" certificateKeystorePassword="changeit" Alias="tomcat"
                         type="RSA" />
        </SSLHostConfig>
    </Connector>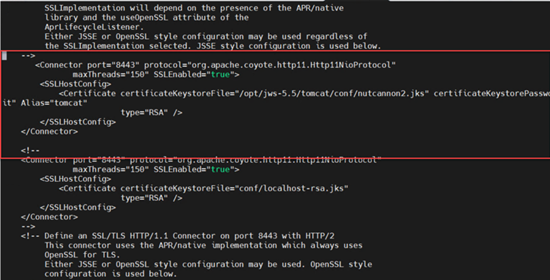
- Restart JBoss Web Server service.
Systemctl restart jws5-tomcat-service - Stop Tomcat if it is running using service jws5-tomcat.service stop.
- Copy the file
mpower-v77a.warto the/opt/jws-5.5/tomcat/webappsdirectory. . - Start the service it will extract the WAR file in the same directory.
By default JBoss Web server listen on port 8080. Paste the URL http://ipaddress:8080 in browser to confirm.
Jboss Web Server Redirection to Port 8443:
To redirect Jboss web server from port 8080 to 8443 we need to create certificate in jks format and edit server.xml file.
Where nutcannon2 is the name of the jks file created in this step.
Install Apache Web Server front-end and mod-ssl:
yum -y install httpd openssl openssl-devel mod_ssl
Apache Web Server:
Use valid CA certificate and place on this location /etc/httpd/ssl
Modify the /etc/httpd/ssl.conf file for httpd
vi /etc/httpd/conf.d/ssl.conf
* Set the server name
ServerName hostname:443
* Set stronger ssl/cipher strength
	SSLProtocol -All +TLSv1.2
	SSLCipherSuite ECDHE-ECDSA-AES256-GCM-SHA384:ECDHE-RSA-AES256-GCM-SHA384:ECDHE-ECDSA-CHACHA20-POLY1305:ECDHE-RSA-CHACHA20-POLY1305:ECDHE-ECDSA-AES128->
* Point to valid CA certifica
Line 88:
	SSLCertificateFile /etc/httpd/ssl/apache.crt
Line 96:
	SSLCertificateKeyFile /etc/httpd/ssl/apache.key
 Use CA certificate name which you have placed in above directory.
Create new file for httpd to perform vhost redirection:
vi /etc/httpd/conf.d/vhost_redir.conf

<VirtualHost *:80>
   ServerName hostname
   Redirect permanent / https://hostname/
</VirtualHost>
Startup and Shutdown Scripts
If you install JBoss directly (for example, using tar instead of the RPM or package installer), you may just have the script files startup.sh and shutdown.sh in the directory /opt/jws-5.5/tomcat/bin directory. In this case, you will need to use export or setenv to set values for JAVA_HOME and JAVA_OPTS before using these scripts. Contact your NetSol representative for assistance if needed.
Web Services API Installation
To install the mPower software:
© 2026 NETSOL Technologies. All rights reserved.
The information contained in this document is the sole property of NETSOL Technologies, Inc. Use of the information contained herein is restricted. Conditions of use are subject to change without notice. NETSOL Technologies, Inc. assumes no liability for any inaccuracy that may appear in this document nor does it have the obligation to update any of the information contained herein; the contents of this document do not constitute a promise or warranty. The software described in this document is furnished under license and may be used or copied only in accordance with the terms of said license. Unauthorized use, alteration, or reproduction of this document without the written consent of NETSOL Technologies, Inc. is prohibited.
The information contained in this document is the sole property of NETSOL Technologies, Inc. Use of the information contained herein is restricted. Conditions of use are subject to change without notice. NETSOL Technologies, Inc. assumes no liability for any inaccuracy that may appear in this document nor does it have the obligation to update any of the information contained herein; the contents of this document do not constitute a promise or warranty. The software described in this document is furnished under license and may be used or copied only in accordance with the terms of said license. Unauthorized use, alteration, or reproduction of this document without the written consent of NETSOL Technologies, Inc. is prohibited.