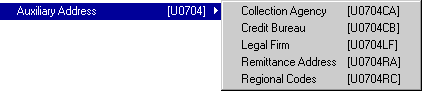
Auxiliary Address [U0704]
Contents
- Add/Change
- Delete Auxiliary Address
The Auxiliary Address update is used to add, change, or delete address and contact information of 4 types: collection agencies, credit bureaus, legal firms, and remittance addresses used in processing lease payments. If any of these address types is not used, it is not necessary to maintain it.
Note: This address information can be viewed on the Auxiliary Address Listing Report [R0919]. It is informational only.
Auxiliary Address Menu
This screen is used to select the auxiliary address type to add, change, or delete.
When Auxiliary Address is selected from the Updates menu, 4 options appear on a secondary menu. Select one:
- COLLECTION
AGENCY
Used to update Collection Agency addresses.
- CREDIT
BUREAU
Used to update Credit Bureau addresses.
- LEGAL
FIRM
Used to update Legal Firm addresses.
- REMITTANCE
ADDRESS
Used to update Remittance Address addresses. The remittance address is printed on invoices as the "Remit to" address (i.e. the return address for the lease payments).Note: Special remittance address codes may be needed to comply with the REMITTANCE CODE default set up for each portfolio. Refer to the Portfolio update [U0212MI] for more information.
- REGIONAL
CODES
Used to update Regional codes. These codes will work in conjunction with the collection/recovery queues. This code will represent one or many U.S states and/or country.
Add/Change Collection
Agency
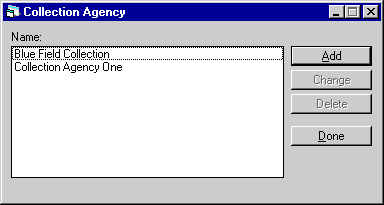
This screen is used to indicate whether an add, change, or delete update is desired for the Collection Agency. The screen lists all Collection Agency names currently on file, in alphabetic order. Either click on Add or highlight one address to be changed or deleted.
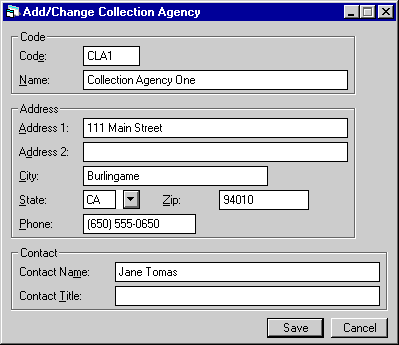
This screen is used to enter or change the Collection Agency address and contact information.
- CODE
Enter or change the code of the auxiliary address. Note that code values only need be unique within each auxiliary address type (e.g., a collection agency, legal firm, and remittance address may all be established with a code of 1).
- NAME
Enter or change the auxiliary address name.
- ADDRESS
1
Enter or change the first auxiliary address line. Use this field if there is only one address line.
- ADDRESS
2
Enter the second auxiliary address line, if available.
- CITY
Enter the auxiliary address city.
- STATE
Enter the auxiliary address state. STATE must be a valid post office abbreviation. Use Help for a list of valid states.
- ZIP
Type the auxiliary address postal/zip code, up to 9 characters maximum length. LeasePak expects specific postal code formats for the US, Canada, and several other countries. Refer to Postal Code Formats (opens in a new window) for more information on specified formats. - PHONE
Enter the auxiliary address area code and phone number.
- CONTACT
NAME
Enter the auxiliary address contact person. This field does not appear if Remittance Address was selected as the Auxiliary Address type.
- CONTACT
TITLE
Enter the contact person's position or title. This field does not appear if Remittance Address was selected as the Auxiliary Address type.
Add/Change Credit Bureau
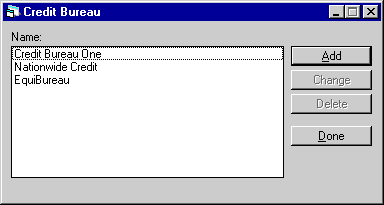
This screen is used to indicate whether an add, change, or delete update is desired for the Credit Bureau. The screen lists all Credit Bureau names currently on file, in alphabetic order. Either click on Add or highlight one address to be changed or deleted.
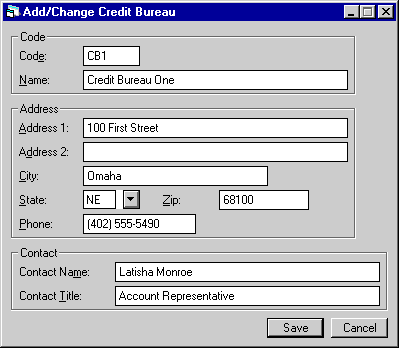
This screen is used to enter or change the Credit Bureau address and contact information.
- CODE
Enter or change the code of the auxiliary address. Note that code values only need be unique within each auxiliary address type (e.g., a collection agency, legal firm, and remittance address may all be established with a code of 1).
- NAME
Enter or change the auxiliary address name.
- ADDRESS
1
Enter or change the first auxiliary address line. Use this field if there is only one address line.
- ADDRESS
2
Enter the second auxiliary address line, if available.
- CITY
Enter the auxiliary address city.
- STATE
Enter the auxiliary address state. STATE must be a valid post office abbreviation. Use Help for a list of valid states.
- ZIP
Type the auxiliary address postal/zip code, up to 9 characters maximum length. LeasePak expects specific postal code formats for the US, Canada, and several other countries. Refer to Postal Code Formats (opens in a new window) for more information on specified formats. - PHONE
Enter the auxiliary address area code and phone number.
- CONTACT
NAME
Enter the auxiliary address contact person. This field does not appear if Remittance Address was selected as the Auxiliary Address type.
- CONTACT
TITLE
Enter the contact person's position or title. This field does not appear if Remittance Address was selected as the Auxiliary Address type.
Add/Change Legal Firm
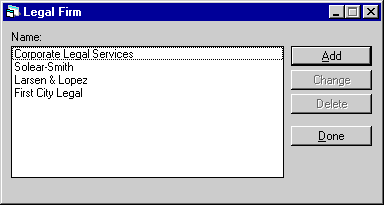
This screen is used to indicate whether an add, change, or delete update is desired for the Credit Bureau. The screen lists all Credit Bureau names currently on file, in alphabetic order. Either click on Add or highlight one address to be changed or deleted.
This screen is used to add or change the Legal Firm address and contact information.
- CODE
Enter or change the code of the auxiliary address. Note that code values only need be unique within each auxiliary address type (e.g., a collection agency, legal firm, and remittance address may all be established with a code of 1).
- NAME
Enter or change the auxiliary address name.
- ADDRESS
1
Enter or change the first auxiliary address line. Use this field if there is only one address line.
- ADDRESS
2
Enter the second auxiliary address line, if available.
- CITY
Enter the auxiliary address city.
- STATE
Enter the auxiliary address state. STATE must be a valid post office abbreviation. Use Help for a list of valid states.
- ZIP
Type the auxiliary address postal/zip code, up to 9 characters maximum length. LeasePak expects specific postal code formats for the US, Canada, and several other countries. Refer to Postal Code Formats (opens in a new window) for more information on specified formats. - PHONE
Enter the auxiliary address area code and phone number.
- CONTACT
NAME
Enter the auxiliary address contact person. This field does not appear if Remittance Address was selected as the Auxiliary Address type.
- CONTACT
TITLE
Enter the contact person's position or title. This field does not appear if Remittance Address was selected as the Auxiliary Address type.
Add/Change Remittance Address
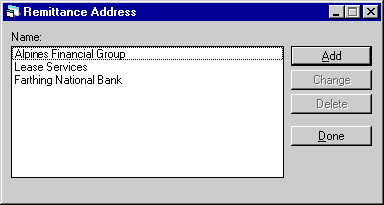
This screen is used to select the remittance code to add, change, or delete.
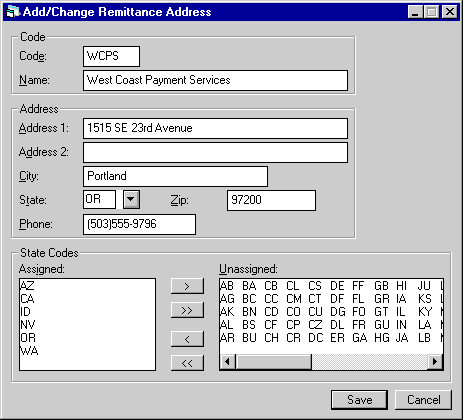
This screen appears for all Auxiliary Address update [U0704] options. If the Remittance Address address type was selected from the secondary menu in screen 1, STATE CODES appears as the field label instead of CONTACT NAME and CONTACT TITLE.
- CODE
Enter or change the code of the auxiliary address. Note that code values only need be unique within each auxiliary address type (e.g., a collection agency, legal firm, and remittance address may all be established with a code of 1).
- NAME
Enter or change the auxiliary address name.
- ADDRESS
1
Enter or change the first auxiliary address line. Use this field if there is only one address line.
- ADDRESS
2
Enter the second auxiliary address line, if available.
- CITY
Enter the auxiliary address city.
- STATE
Enter the auxiliary address state. STATE must be a valid post office abbreviation. Use Help for a list of valid states.
- ZIP
Type the auxiliary address postal/zip code, up to 9 characters maximum length. LeasePak expects specific postal code formats for the US, Canada, and several other countries. Refer to Postal Code Formats (opens in a new window) for more information on specified formats. - PHONE
Enter the auxiliary address area code and phone number. - STATE CODES ASSIGNED / UNASSIGNED
Enter the states associated with the remittance address. These fields appear only if Remittance Address was selected in screen 1.
The values entered assigned are used in conjunction with the REMITTANCE CODE default method to determine the default remittance address when adding or changing a lessee. That is, if the lessee's portfolio has been set up with a default REMITTANCE CODE of GEO1 (default based on geographic location), the first remittance address found with a STATE CODE matching the lessee's state is used as the default.
To move state codes from UNASSIGNED to ASSIGNED for the new remittance address, highlight a code by clicking on it, then move it to the Assigned column by clicking the left-pointing arrow. To move all codes from one column to the other, click the double arrow.Note: LeasePak allows a maximum of 30 state codes to be entered for each remittance code. LeasePak will display an error message when the state codes entered exceeds the maximum number.
- CODE
Enter the Code name,a maximum of 4 characters may be entered.
- NAME
Enter the Name of the Regional Code, a maximum of 36 characters may be entered.
- STATE
ASSIGNED/UNASSIGNED
Select the state (s) that will be assigned to the Regional code entered above. Up to 78 state codes may be assigned to a Regional code. - COLLECTION AGENCY
- CREDIT
BUREAU
- LEGAL
FIRM
- REMITTANCE
ADDRESS
- REGIONAL
CODES
- IS
THIS THE CORRECT COLLECTION AGENCY TO DELETE (Y/N)?
Click on Yes to delete the auxiliary address. Otherwise, click on No to quit without deleting the address.
If Remittance Address is the type of auxiliary address being added or changed, the bottom portion of the screen allows assignment of state codes.
The states entered must be valid post office abbreviations and should be separated by spaces. However, if there is not enough room to enter all the states on both lines, the spaces between the state codes may be deleted. For example:
STATE
CODES: CA_WA_OR_NV (first line)
STATE
CODES: (second line)
or
STATE
CODES: CAWAORNVMSNHNYWIMTVTC (first line)
STATE
CODES: TXFLGA (second line)
Note: For the purposes of verifying the validity of state codes, all spaces are stripped from the entry and the remaining letters are checked two by two. Therefore, if an inconsistency is discovered, the codes displayed as incorrect in the error message may not appear exactly as entered. The states are stored on file exactly as entered.
Add/Change Regional Codes

This screen appears when Regional Codes [U0704RC] is selected from the Auxiliary Address [U0704] main menu. Regional code values will represent one or many US states and/or Country codes. The Regional codes may be assigned from 1 to 30 State and/or Country codes. Each code may have a maximum of 78 state and/or country codes assigned to it. State/Country codes are not allowed to overlap into other regional codes.
The code values will be stored in the Non-lease Address table (RNA) and the Regional codes entered will work in conjunction with the Queue update [U0728].
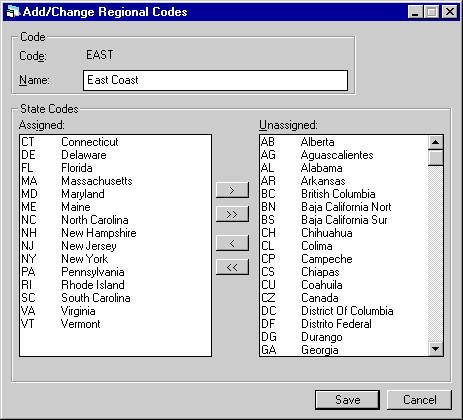
This screen is used to assign the states to the regional codes.
Note: Holding down the SHIFT key will allow the user to select multiple states to be assigned.
Delete Auxiliary Address
From the Auxiliary Address sub-menu, select one of the following:
Once this option is selected, the user can select which address is to be deleted.
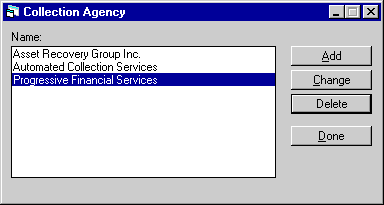
Choose the Name to delete by highlighting it, then click Delete button.
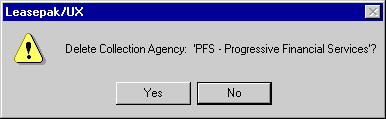
This message appears for the delete option. It is used to delete the selected auxiliary address. The name for the address or code selected is displayed and should be used to verify the address to be deleted.
DELETE COLLECTION AGENCY: (NAME)
LeasePak Documentation Suite
©
by NetSol Technologies Inc. All rights reserved.
The information contained in this document is the property of NetSol Technologies Inc. Use of the information contained herein is restricted. Conditions of use are subject to change without notice. NetSol Technologies Inc. assumes no liability for any inaccuracy that may appear in this document; the contents of this document do not constitute a promise or warranty. The software described in this document is furnished under license and may be used or copied only in accordance with the terms of said license. Unauthorized use, alteration, or reproduction of this document without the written consent of NetSol Technologies Inc. is prohibited.