Lender [U0220]
 Lender is a type of LeasePak client. If you are a beginning LeasePak user
or have not yet worked with LeasePak clients, first read the document LeasePak
Client for introductory information on how to add, change, and delete
LeasePak clients.
Lender is a type of LeasePak client. If you are a beginning LeasePak user
or have not yet worked with LeasePak clients, first read the document LeasePak
Client for introductory information on how to add, change, and delete
LeasePak clients.
Note: a lender may not be deleted if a note payable exists for the lender. Refer to the New Note Payable update [U0901] for information on removing notes.
Contents
- Introduction
- Lender Tabs
Introduction
The Lender update is part of the Notes Payable module, a separately purchased module of LeasePak. The Lender update is used to add, change, or delete lender information.
Once a lender has been added to the system, it may be associated with notes payable using the New Note Payable update [U0901]. A lender is independent of portfolio, company, region, and office, which means that notes payable in different P/C/R/Os may be assigned to the same Lender number.
When adding a lender, the user may either add the lender as a completely new client (if the lender does not exist in the system in any form), or as a new relationship for an existing client (if the lender already exists in the system, but only as a broker, guarantor, etc.). For more information on clients and relationships, refer to the Client Relationship section of LeasePak Key Structure.
As with all client relationships, the Lender number is a 9-character alphanumeric field, which must be unique system-wide. It may be assigned automatically by LeasePak (an increasing sequential number) or entered by the user. The CLIENT NUMBERING METHOD (system assigned or user entered) is specified through the Miscellaneous option of the Custom General update [U0712].
The LeasePak terminology "lender" may be changed through the Account Customizations option of the Custom General update [U0712]. The three forms (up to 3, 5, or 10 characters) of the lender alias should be specified. Refer to the Custom General update [U0712] for more information on defining account aliases.
Lender Address Tab
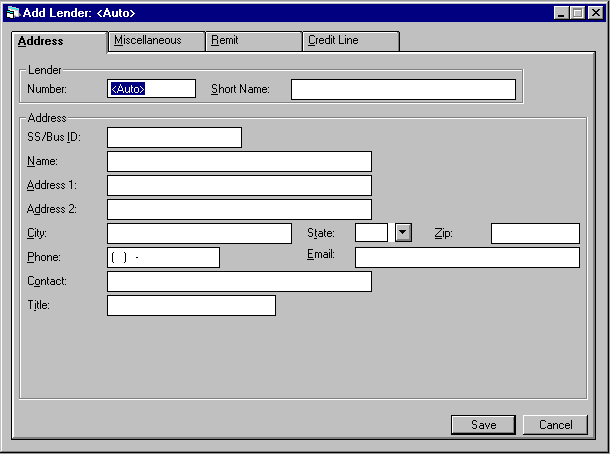
The Address tab is used to add or change a lender address and contact information.
- NUMBER
Enter a Lender number for the lender to be added. To perform a client search for current lenders, click . When entering a number that inlcludes letters, use uppercase letters A-Z.
Note: The ability to change the Lender number when adding a new lender is determined by the CLIENT NUMBERING METHOD (as set up in the Custom General update [U0712]), and the user's security (as set up in the Custom Security update [U0706]). If the CLIENT NUMBERING METHOD is set up for manual entry, a new Lender number may be entered by any user with the ability to access this update. If the CLIENT NUMBERING METHOD is not set for manual entry, the new Lender number automatically assigned may only be changed by a user having sufficient privilege. Refer to the Security update [U0706] or Custom General update [U0712] for more information.
- SHORT NAME
Enter or change the short name for this lender.
Note: Since the short name will be used for client searches, it is suggested that personal names be entered in the following order:
LAST, FIRST MIDDLE (for example: SUAREZ, MARIA J.)
If the ALLOW CLIENT RECORD NAME CHANGES switch in the Security [U0706] update is not selected, the user will be restricted from changing the short name of an existing Lender and the field will be display only.
- SS/BUS ID
Enter or change the Social Security or business ID number for this lender, if available.
Note: If the ALLOW CLIENT RECORD NAME CHANGES switch in the Security [U0706] update is not selected, the user will be restricted from changing the SS/Bus ID of an existing Lender and the field will be display only.
- NAME
Enter or change the complete name for this lender.
Note: If the ALLOW CLIENT RECORD NAME CHANGES switch in the Security [U0706] update is not selected, the user will be restricted from changing the name of an existing Lender and the field will be display only.
- ADDRESS 1
Enter or change the first address line of this lender. Use this field if there is only one address line.
- ADDRESS
2
Enter or change the second address line of this lender, if any.
- CITY
Enter or change the city of this lender.
- STATE
Enter or change the state of this lender's address. STATE must be a valid post office abbreviation.
Note: For locations where states do not exist, a "free form" code of FF may be entered. When addresses using FF are printed on reports, the state is blank.
- ZIP
Add or change the postal/zip code of the lender, up to 9 characters maximum length. LeasePak expects specific postal code formats for the US, Canada, and several other countries. Refer to Postal Code Formats (opens in a new window) for more information on specified formats.
Enter or change the area code and phone number of the lender. The phone number must be entered if the area code is entered.
- EMAIL
Enter or change the email address of the lender. The email address allows up to 50 alphanumeric characters to be entered. - CONTACT
NAME
Enter or change the name of the contact person for the lender.
- TITLE
Enter or change the title of the contact person.
Lender Miscellaneous Tab
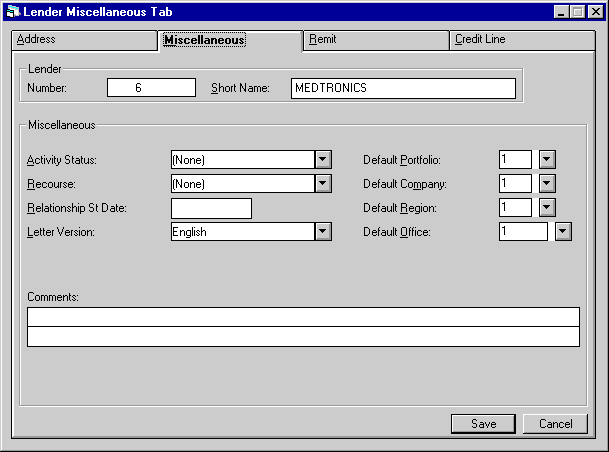
The Miscellaneous tab is used for additional information, including the activity status and the default portfolio/company/region/office.
Field Descriptions
- ACTIVITY
STATUS
Enter or change the activity status of the lender. Lender activity statuses are defined through the Custom Code update [U0722]. Use Help for a list of valid activity status codes. This field may not be left blank.
Advanced Note: Activity status codes are processed and grouped according to the first letter of the code. All codes must begin with one of the following letters:
| Axxx | Active |
| Ixxx | Inactive |
| Pxxx | Pending |
| Txxx | Terminated |
| Rxxx | Rejected |
where "xxx" denotes the portion of the code which is user defined. If a new of a code is desired, it must be added using the Custom Code update [U0722] before entry is allowed. No notes payable may be booked under lenders with an activity status of Inactive, Pending, Terminated or Rejected, and also no principal increases to existing notes payable under these lenders may be performed.
- RECOURSE
Enter or change the recourse type code for the lender. Use Help for a list of valid recourse types. Recourse types may be established using the Custom Codes update [U0722].
- RELATIONSHIP
ST DATE
Enter or change the date the relationship was established with this lender in MM/DD/YY or DD/MM/YY format, depending on the Date Format Preference field in Security [U0706].
- LETTER
VERSION
This field defaults to None. It is not used in LeasePak. Enter or change the code to be used for letters which are sent to this lender. The letter version codes are established through the Custom Code update [U0722]. Use Help for a list of valid letter version codes.
- DEF
PORT
Enter or change the default portfolio for this lender. Entering a default is required. If entered, the default may be used to restrict security access to the lender's information. Users restricted from access to the entered default values may not modify the lender's information.
- DEF
COMP
Enter or change the default company for this lender. Entering a default is optional. If entered, the default may be used to restrict security access to the lender's information. Users restricted from access to the entered default values may not modify the lender's information.
- DEF
REGN
Enter or change the default region for this lender. Entering a default is optional. If entered, the default may be used to restrict security access to the lender's information. Users restricted from access to the entered default values may not modify the lender's information.
- DEF
OFFCE
Enter or change the default office for this lender. Entering a default is optional. If entered, the default may be used to restrict security access to the lender's information. Users restricted from access to the entered default values may not modify the lender's information.
- COMMENTS
Enter any comments for this lender. COMMENTS consists of 2 lines. Use the Tab and Shift + Tab keys to move from one comment line to the other.
Lender Remittance Tab
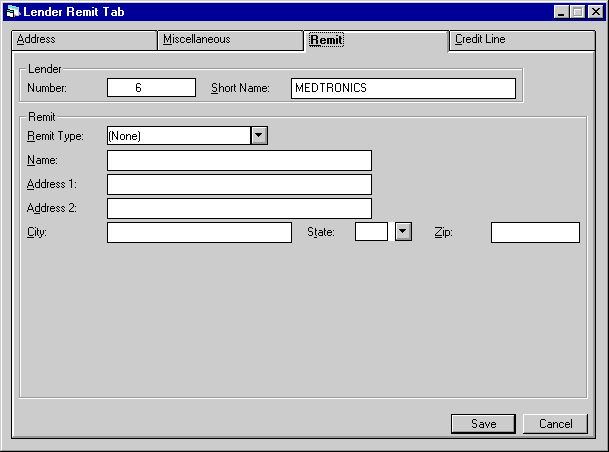
The Remit tab is used to input remittance information for the lender.
Field Descriptions
- REMIT
TYPE
Enter or change the remittance type code for the lender. This code indicates the method of payment used for remitting any payable to the lender. Press HELP for a list of valid remittance types. Remittance types may be established using the Custom Codes update [U0722].
- NAME
Enter or change the remit to name for this lender, i.e., the entity to which payments on notes payable will be made.
-
ADDRESS 1
Enter or change the first remit to address line of this lender. Use this field if there is only one remit to address line.
-
ADDRESS 2
Enter or change the second remit to address line of this lender, if any.
- CITY
Enter or change the remit to city of this lender.
-
STATE
Enter or change the remit to state of this lender's address. STATE must be a valid post office abbreviation.
-
ZIP
Add or change the remittance postal/zip code of this lender, up to 9 characters maximum length. LeasePak expects specific postal code formats for the US, Canada, and several other countries. Refer to Postal Code Formats (opens in a new window) for more information on specified formats.
Lender Credit Line Tab
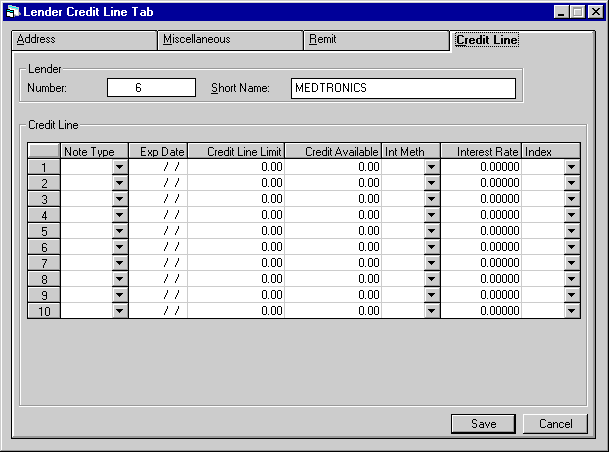
The Credit Line tab is used to define what types of Notes Payable are available for this lender.
Field Descriptions
- NOTE
TYPE (scrolled area)
Enter or change the type(s) of the notes payable available with this lender (e.g., secured, unsecured, investor, equipment remarketing, etc.). Use Help for a list of valid note types. NOTE TYPE is a user-definable code (refer to the Custom Code update [U0722]).
A note type may not be removed from the list if there are existing notes payable associated with that type on the Notes Payable (RNO) file. A maximum of 10 notes payable types may be entered. A NOTE TYPE may not be entered twice.
Note: Note type codes are processed and grouped according to the first letter of the code. All codes must begin with one of the following group letters:
| Rxxx | Revolving |
| Nxxx | Non-revolving |
where "xxx" is a user defined code added using the Custom Code update [U0722].
- EXPIRATION DATE(scrolled
area)
Enter or change the date (MM/DD/YY) the credit line is to expire. No notes payable may be entered for a NOTE TYPE after its line of credit has expired. A credit line will not expire if the expiration date is left blank.
- CREDIT
LINE LIMIT (scrolled area)
Enter or change the credit line limit for the NOTE TYPE.
- CREDIT
AVAILABLE (scrolled area)
The credit available is displayed.
Note: Each time credit is drawn from the line, the total outstanding notes payable under this line is compared to the credit line limit. The credit request is denied if there is insufficient credit available.
- INT
METH (scrolled area)
Enter or change the interest method for the NOTE TYPE. Valid interest methods are:
- INTEREST
RATE (scrolled area)
Enter or change the fixed interest rate if the INTEREST METHOD is FIX.
If the rate is 10%, enter 10.00000, not ___.10000 Interest rate must not be negative if FIX is entered in this field.
Enter or change the add-on rate if the INTEREST METHOD is FLT. This rate is added to the float rate indicated in the FLOAT INDEX field below.
| FIX | Interest is charged on the used portion of the credit line at a fixed rate. |
| FLT | Interest is charged on the used portion of the credit line at a floating rate. |
- INDEX (scrolled area)
Enter or change the code for the financial institution whose base rates are to be used for floating interest rate calculations. The float index entered must be a valid float rate (refer to the Base Rate update [U0705]). This field should be accessed if the INTEREST METHOD is FLT.
LeasePak Documentation Suite
©
by NetSol Technologies Inc. All rights reserved.
The information contained in this document is the property of NetSol Technologies Inc. Use of the information contained herein is restricted. Conditions of use are subject to change without notice. NetSol Technologies Inc. assumes no liability for any inaccuracy that may appear in this document; the contents of this document do not constitute a promise or warranty. The software described in this document is furnished under license and may be used or copied only in accordance with the terms of said license. Unauthorized use, alteration, or reproduction of this document without the written consent of NetSol Technologies Inc. is prohibited.