Document Generation »
 Sample Contract Letter To Lessee »
Sample Invoice »
Sample invoice for all leases on Portfolio 2 (dxGeneration) »
Sample Contract Letter To Lessee »
Sample Invoice »
Sample invoice for all leases on Portfolio 2 (dxGeneration) »
Return to Overviews
 Document Generation
Sample Contract Letter To Lessee
The following example shows how to create document template for a letter to lessee about the contract and to generate letters by using information from multiple tables of the database. It also shows how to use the content selector and XPath expression to merge the data into the document template from database. It also includes the construction of the XPath based on XML elements.
- Create the text form of the document in MS Word or in a similar application that allows you to save in ".docx" format. Following is a sample contract letter.
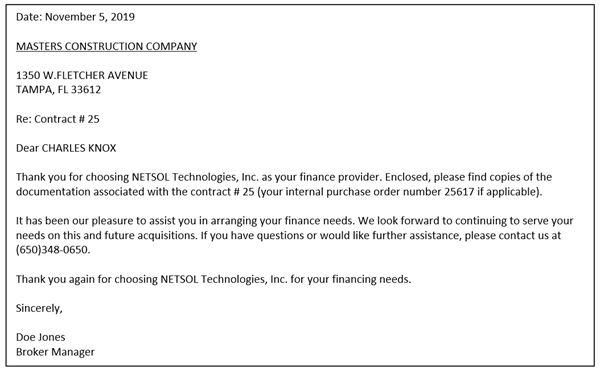
- Determine the text from your document that will contain information from the database, such as lease number, lessee name, address, address 2, city, state, zip code, and purchase order number of the asset tied to that contract.
- Identify the database table and column names for the text identified in the previous step. Refer to Database Reference for a detailed reference of LeasePak database table and column names. The following table lists the database table and column names for the information identified in the previous step.
Sr #. Text/Content Database Table Database Column Name 1 MASTER CONSTRUCTION COMPANY Lessee (ral) nam_long_s 2 1350 W. FLETCHER AVENUE Lessee (ral) add_s 3 TAMPA, FL 33612 Lessee (ral) cty_s, st_s, zip_s 4 CHARLES KNOX Lessee (ral) short_cont_nam_s 5 25 Lease (rls) lse_s 6 25617 Asset (req) pur_ord_s -
Identify which tracking module you want to use your document template with. Document generation works with specific LeasePak tracking modules only. Each tracking module works with a different component of LeasePak: Application, Lease, Lessee, and Asset. The following table explains the parameters that work with each of the tracking module fields:
Tracking Modules LeasePak Component Database Table.Column name Application Application rap.app_s Collection Lessee/Lease ral.les_s/rls.lse_s Customer Summary,
Insurance,
Maturing Lease,
Recovery,
Lease SummaryLease rls.lse_s Collateral Asset req.unit_s
The selected tracking module component will become the base parameter for document generation. The selected document template can be used to generate document from Collection, Customer Service, Insurance, Maturing Lease, Recovery, and Lease Summary tracking modules because it is based on a lease number. Therefore, the lease number will be used as a base parameter to retrieve other associated fields. The document template can also be used by dxGeneration to generate documents in a batch. The document generation screen captures a list of created documents with parameters to pass to the document generation merge engine by using the identified parameter value.
In this document template, lease number is a base parameter that will be used to retrieve associated lessee address information. The template also includes the purchase order number of an asset on lease.
Base parameter = Lease (lse_s)
Use the selected base parameter to retrieve the associated set of parameters identified in the step 3. These identified set of parameters will be used in the SQL select statements with the help of {arg.lse_s}. - Write an SQL select statement by using the identified database column names and base parameter to retrieve the information from database. Document Generation requires a minimum of two SQL select statements to retrieve a record from database, the ROOT level SQL, and SQL at level 1. Users can add more SQLs according to the fields required from database. The column names of the relevant SQL select statement will be passed as parameters to the document generation merge engine to retrieve the associated records. The following table lists the tracking modules and SQLs that build the parameter list and the parameters to use in the ROOT level SQL and other SQLs.
Tracking Module Base Parameter Database Table.Column name SQLs that builds parameter list Parameter available to use in ROOT level and other SQLs Application Application rap.app_s SELECT * FROM RAP
WHERE APP_S = '<selected application number>,The parameter would be:
• {arg.app_s}
• {arg.les_s}
• {arg.dlr_s}
• {arg.d_com_s} …Collection Lessee/Lease ral.les_s/rls.lse_s SELECT * FROM RAL
OR
WHERE LES_S = '<selected lessee number>'
SELECT * FROM RLS
WHERE LSE_S = '<selected lease number>'If lessee is selected then the parameters can be:
• {arg.les_s}
• {arg.cus_s}
• {arg.def_por_s}
• {arg.st_s}
If lease is selected then the parameters can be:
• {arg.lse_s}
• {arg.les_s}
• {arg.dlr_s}
• {arg.d_com_s} …Customer Summary
Insurance
Maturing Lease
Recovery
Lease SummaryLease rls.lse_s SELECT * FROM RLS
WHERE LSE_S = ‘<selected lease number>’• {arg.lse_s}
• {arg.les_s}
• {arg.dlr_s}
• {arg.d_com_s} …Collateral Asset req.unit_s SELECT * FROM REQ
WHERE UNIT_S = ‘<selected asset number>’• {arg.lse_s}
• {arg.unit_s}
• {arg.dlr_s}
• {arg.d_acq_s}
• {arg.cls_s} …
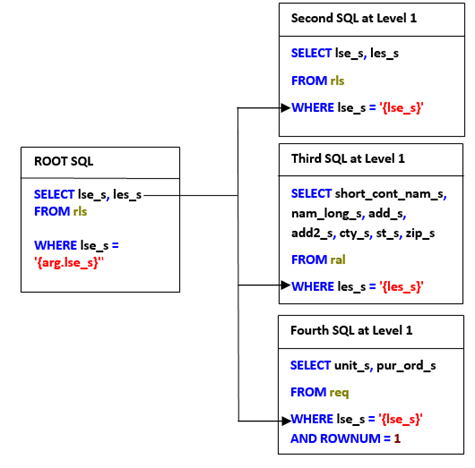
- ROOT Level SQL: The first SQL must be at ROOT level. Use the identified base parameter in the argument of the ROOT level SQL. In this letter to lessee, the identified base parameter is a lease number. Use the database column name of lease number in the argument of ROOT level SQL. The identified base parameter can be accessed with the help of special syntax in the ROOT level SQL and other SQLs. In this letter the ROOT level SQL would be as follows:
SELECT rls.lse_s
FROM rls
WHERE rls.lse_s = '{arg.lse_s}'
{} = The '{' and '}' brackets are used to identify the SQL parameters at run time.
arg = The arg is used to access the parameter passed in by the tracking modules at run time.
The results of the ROOT SQL will be used in the next SQLs. - Second SQL at level 1: Write an SQL select statement by using the identified database fields in step 3 to retrieve information from the database. Any of the column names from the ROOT Level SQL can be used in the WHERE clause in this SQL statement. These column names or result values will be identified in the SQL WHERE clause by using the curly brackets { }. In this document template, the second SQL at level 1 would be as follows:
SELECT lse_s, les_s
FROM rls
WHERE lse_s = '{lse_s}'
- Third SQL at level 1: The third SQL at level 1 would be as follows:
SELECT short_cont_nam_s, nam_long_s, add_s, add2_s, cty_s, st_s, zip_s
FROM ral
WHERE les_s = '{les_s}'
- Fourth SQL at level 1: The fourth SQL at level 1 would be as follows:
SELECT unit_s, pur_ord_s
FROM req
WHERE lse_s = '{lse_s}'
AND ROWNUM = 1
- Relationship of ROOT level SQL and SQLs at Level 1: The ROOT level SQL is the SQL statement with the base parameter, which validates the use of the base parameter, whereas the SQLs at level 1 retrieves the relevant record associated with the base parameter. In this contract letter, the base parameter is a lease number. This lease number will be used to retrieve the associated lessee address information from ral table. The purchase order number of the attached asset will be retrieved from req asset table.
- ROOT Level SQL: The first SQL must be at ROOT level. Use the identified base parameter in the argument of the ROOT level SQL. In this letter to lessee, the identified base parameter is a lease number. Use the database column name of lease number in the argument of ROOT level SQL. The identified base parameter can be accessed with the help of special syntax in the ROOT level SQL and other SQLs. In this letter the ROOT level SQL would be as follows:
- Use U0736 to add a document
- Use U0736→Data Definition SQL screen to add SQL select statements. Use the SQL select statements identified in the previous steps.
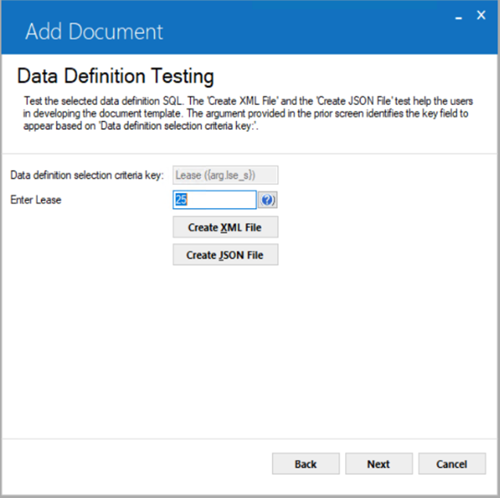
- Use U0736→Data Definition Testing screen to test the SQL select statements from the previous step. Use the base parameter defined in the ROOT level SQL.
- Use U0736 "Create XML File" to determine the XML element names. The XML element names will assist you in creating an XPath expression for your document.
In the above XML, the SQLs at level 1 are creating child elements of data element. By default, the root element name will be <data> in the XML file. The ROOT level SQL does not create any other XML element. Any valid XML element name can be used to set for ROOT level SQL.
- Use U0736→Data Definition SQL screen to add SQL select statements. Use the SQL select statements identified in the previous steps.
- Map the SQL select statement column names into the XML elements.
The database column names used in the SQL select statements will become the XML element names. The following table explains the XML elements derived from the SQL statement.
SQL Statement SQL Column Names XML Element Names SELECT lse_s, les_s
FROM rls
WHERE lse_s = '{arg.lse_s}'
SELECT lse_s, les_s
FROM rls
WHERE lse_s = '{lse_s}'
SELECT short_cont_nam_s, nam_long_s, add_s, add2_s, cty_s, st_s, zip_s
FROM ral
WHERE les_s = '{les_s}'
SELECT unit_s, pur_ord_s
FROM req
WHERE lse_s = '{lse_s}'
AND ROWNUM = 1rls.lse_s <lse_s>25</lse_s> rls.les_s <les_s>28</les_s> ral.add_s <add_s>10 Lake Oswego Blvd.</add_s> ral.add2_s ral.cty_s <cty_s>Union City</cty_s> ral.st_s <st_s>CA</st_s> ral.zip_s <zip_s>95789</zip_s> ral.short_cont_nam_s <short_cont_nam_s>JOHN SMITH</short_cont_nam_s> ral.nam_long_s <nam_long_s>WESTON HOLDING GROUP</nam_long_s> req.pur_ord_s <pur_ord_s>25617</pur_ord_s> - Use the XML elements to create an XPath expression.
Use XML document structured elements to define the XPath in your document. The following table explains how the XML elements are used to create XPath expression for the document template.
XML XPath Expression <?xml version="1.0"?> <data> <les_s>28</les_s> <nam_long_s>WESTON HOLDING GROUP</nam_long_s> /data/nam_long_s <add_s>10 Lake Oswego Blvd.</add_s> /data/add_s <add2_s/> /data/add2_s <cty_s>Union City</cty_s> /data/cty_s <st_s>CA</st_s> /data/st_s <zip_s>95789</zip_s> /data/zip_s <short_cont_nam_s>JOHN SMITH</short_cont_nam_s> /data/short_cont_nam_s <lse_s>25</lse_s> /data/lse_s <pur_ord_s>25617</pur_ord_s> /data/pur_ord_s </data> - Use the identified XPath expressions to create content selectors for your document. Below is an example of a content selector with XPath expression.
<# <Content Select="/data/lease/lse_s" /> #>
In this example, the ROOT level SQL, which always creates data element at root level by default is created as <data>. Users can skip this in XPath. The other SQLs at level 1 are retrieving the other associated records, which creates the child element of root element. The XPath must contain this child element to merge the retrieved records according to the parent child hierarchy of the XML elements.
The following table explains how the identified XPath expression can be used in the content selector root (data) element and lease element (child) of XML.
Sr #. Text/Content Database Table.Column Name Content Selector/XPath Expression 1 MASTER CONSTRUCTION COMPANY ral.nam_long_s <# <Content Select="/data/nam_long_s" /> #> 2 1350 W. FLETCHER AVENUE ral.add_s <# <Content Select="/data/add_s" /> #> 3 TAMPA, FL 33612 ral.cty_s, ral.st_s, ral.zip_s <# <Content Select="/data/cty_s" /> #> ,
<# <Content Select="/data/st_s" /> #>,
<# <Content Select="/data/zip_s" /> #>,4 CHARLES KNOX ral.short_cont_nam_s <# <Content Select="/data/short_cont_nam_s" /> #> 5 25 rls.lse_s <# <Content Select="/data/lse_s" /> #> 6 25617 req.pur_ord_s <# <Content Select="/data/pur_ord_s" /> #> - Replace the identified text from step (2) with the XPath and content selector in the appropriate location of your document template.
This is how the document will look after placing the content selector with the XPath expressions.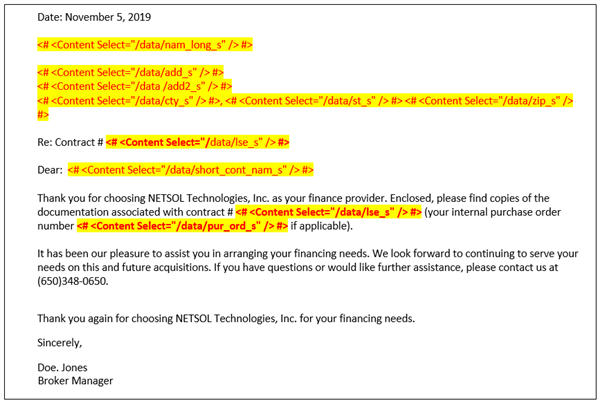
- Save your document template as .docx type on your PC.
- Use U0712 Custom General→Document Generation Customizations option to set the directory path for your created document template. U0736 requires this directory path and file name to generate a document.
- Use U0736 Document to generate a document. The first two screens require the same data as set in step (6). Refer to U0736 Document for more information.
The SQLs are retrieving record based on the lease number. In this example when user enters a lease number, document generation looks for the associated lessee and asset tied to that lease from ral & req tables. The second SQL at Level 1 retrieves the lease associated lessee number from rls table. The third SQL at level is retrieving the address information of the associated lessee. Whereas the fourth SQL at level 1 is retrieving the asset attached to lease with the asset purchase order number.
© 2026 NETSOL Technologies. All rights reserved.
The information contained in this document is the sole property of NETSOL Technologies, Inc. Use of the information contained herein is restricted. Conditions of use are subject to change without notice. NETSOL Technologies, Inc. assumes no liability for any inaccuracy that may appear in this document nor does it have the obligation to update any of the information contained herein; the contents of this document do not constitute a promise or warranty. The software described in this document is furnished under license and may be used or copied only in accordance with the terms of said license. Unauthorized use, alteration, or reproduction of this document without the written consent of NETSOL Technologies, Inc. is prohibited.
The information contained in this document is the sole property of NETSOL Technologies, Inc. Use of the information contained herein is restricted. Conditions of use are subject to change without notice. NETSOL Technologies, Inc. assumes no liability for any inaccuracy that may appear in this document nor does it have the obligation to update any of the information contained herein; the contents of this document do not constitute a promise or warranty. The software described in this document is furnished under license and may be used or copied only in accordance with the terms of said license. Unauthorized use, alteration, or reproduction of this document without the written consent of NETSOL Technologies, Inc. is prohibited.