Multi Lease Ins Maintenance [U0234]
LeasePak menu: Updates, Maintenance [U02]
Corresponding End of Period process: None
Similar to Demographic [U0204], except that Multi Lease Ins Maintenance [U0234] allows the user to add, change, or delete insurance information for one or more leases under the same Customer.
From the LeasePak main menu, select Updates, Maintenance [U02], Multi Lease Ins Maintenance [U0234]. LeasePak displays a Customer selection screen:

 Customer
- Type the Customer number or click
 to use
Client Search.
 Customer
 to use
Client Search.
Click Select to continue or Cancel to exit the update.

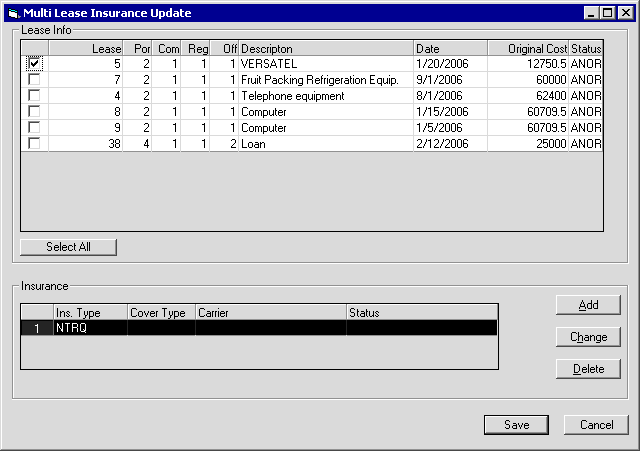
This screen displays all leases belonging to the specified Customer. From here you can select the leases for which you wish to update the insurance information.
 Lease
Lease- LeasePak displays the number of the lease (rls.lse_s).
 Lease
Lease
 Por
Por- LeasePak displays the lease's portfolio (rls.por_s).
 Por
Por
 Com
Com- LeasePak displays the lease's company (rls.com_s).
 Com
Com
 Reg
Reg- LeasePak displays the lease's region (rls.reg_s).
 Reg
Reg
 Off
Off- LeasePak displays the lease's office (rls.off_s).
 Off
Off
 Description
- LeasePak displays the description of the lease (rls_desc_s).
 Description
 Date
Date- LeasePak displays the commencement date of the lease (rls.d_com_s).
 Date
Date
 Original Cost
- LeasePak displays the total original cost for the lease (rls.tot_org_d).
 Original Cost
 Lease Info Status
- LeasePak displays the lease activity status for the lease (rls.act_s).
 Lease Info Status
For each lease you wish to select, check the box to the left of the lease number. For each lease you wish to exclude from selection, clear the box to the left of the lease number. You can also use the Select All/Deselect All toggle button to check or clear the boxes for all the listed leases.
You can add, change, or delete insurance records attached to the selected leases. If you select more than one lease, the changes you make will apply to all selected leases.
 Ins. Type
- LeasePak displays the insurance type of the insurance record (rdmi.ins_typ_s).
 Ins. Type
 Cover Type
- LeasePak displays the insurance coverage type of the insurance record (rdmi.ins_cov_s).
 Cover Type
 Carrier
- LeasePak displays the insurance carrier for the insurance record (rdmi.ins_car_s).
 Carrier
 Insurance Status
- LeasePak displays the insurance status for the insurance record (rdmi.ins_stat_s).
 Insurance Status
Click Add to add an insurance record (you can attach up to 5 insurance records to a lease). Select an insurance record and click Change to modify information on that record. Select an insurance record and click Delete to remove the record from the selected leases.
Changes made through this update do not take effect until you click Save from this screen.
The form and fields for the insurance record correspond to those in Demographic [U0204] (opens in a new window).
Click Save to save changes, or click Cancel to exit the update without making any changes.
LeasePak Documentation Suite
©
by McCue Systems Incorporated. All rights reserved.
The information contained in this document is the property of McCue Systems, Inc. Use of the information contained herein is restricted. Conditions of use are subject to change without notice. McCue Systems, Inc. assumes no liability for any inaccuracy that may appear in this document; the contents of this document do not constitute a promise or warranty. The software described in this document is furnished under license and may be used or copied only in accordance with the terms of said license. Unauthorized use, alteration, or reproduction of this document without the written consent of McCue Systems, Inc. is prohibited.