dx Generation
Introduction
 mPower users:
Document Generation (DocGen) and dx Generation are also known as DocIT.
dx Generation works in conjunction with LeasePak's Document Generation (DocGen) module. Once you have created a DocGen template (such as an invoice or letter template), you can use dx Generation to schedule and automate the data merge and print processes. You can print documents directly or save them to a user-specified location.
To get started with dx Generation, you must first create a DocGen template. Then start the program, and, if this is the first time, enter the Registration Code. Next, set up the Data Directory in the Options window. Then set up at least one User Profile. Finally, set up and schedule at least one Task. When a task executes, it will produce as many documents as required to process all primary keys as specified on the Custom SQL Tab.
Primary Key
The content of the primary key depends on the Document Type. Keys for the different Document Types are:
| Key | Document Type |
|---|---|
| cus_s + grp_s | Customer/Group |
| app_s | Application |
| lse_s | Lease |
| invo_s | Invoice |
| les_s | Lessee |
Registration
You will need two registration codes to use this module: one for dx Generation and one for Print Spy. To obtain the registration
codes, you will need to log on the LeasePak Server as msiadmin and run the following command:
$uexe/lpadriver.exe /ver
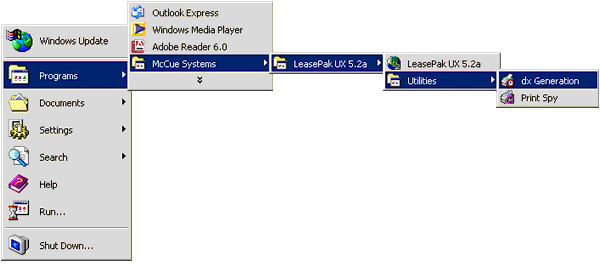
To start dx Generation for the first time, from Start Menu/Programs select McCue Systems, LeasePak UX , Utilities, dx Generation.
The program will prompt you for the Registration Code.
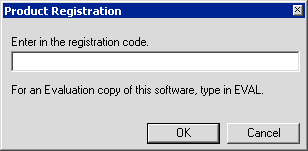
Type the dx Generation Registration Code and click OK. If the program also prompts you for the Print Spy Registration Code, type it as well and click OK.
Status Window
When first started, dx Generation displays the status window. Once setup is complete, clicking on
 User Profiles,
 Tasks, or
 Scheduled Tasks
will display existing users, tasks, or scheduled tasks, respectively. You can determine which list the Status Window is showing by the icon displayed immediately below the File menu in the upper left corner.
 You must start dx Generation and leave it running in order to process
scheduled tasks. If you need to close the program temporarily (to reboot the computer, for example), you will not lose setup and
scheduled task information.
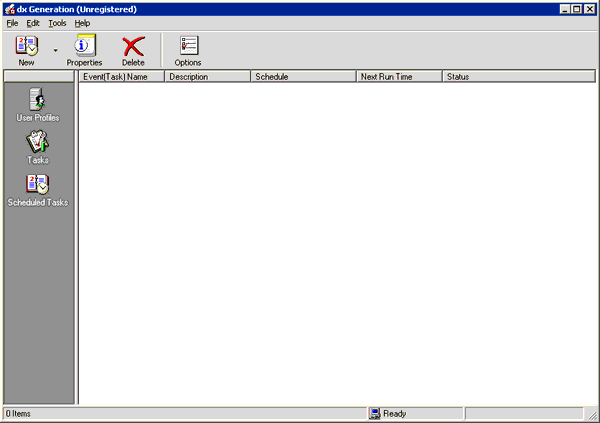
From the list of users, tasks, or scheduled tasks, select a list item by clicking on it. You can then click
 to make changes to the item's setup or click
 to delete the item.
Field Descriptions
- Event(Task) Name
- The name of the item--user, task, or scheduled task--as defined in its setup.
- Description
- The item description as defined in its setup.
- Schedule
- For scheduled tasks, the frequency scheduled for the task run.
- Next Run Time
- For scheduled tasks, the next time (in the future) the task is scheduled to run.
- Status
- For scheduled tasks, the current status.
Setup
Options
Before completing any other setups or running tasks, you must first provide a location for the Data Directory on the Options
screen. To access the Options screen, select Tools, Options from the menu or click
 .
.
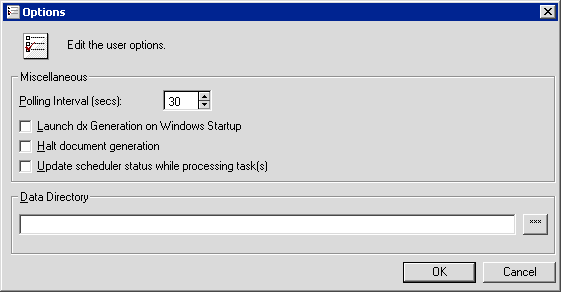
Type the setup information and click OK to save or Cancel to abandon changes.
Field Descriptions
- Polling Interval (secs)
- Type a time interval in seconds or use
 to increase or
decrease the number of seconds displayed. The Polling Interval determines how often dx Generation checks to see if a task is
scheduled to run.
 - Launch dx Generation on Windows Startup
- Check this box to start dx Generation every time Windows is started or restarted. This is useful if you want to ensure that dx Generation is always ready to process scheduled tasks.
- Halt document generation
- Check this box to suspend the processing of all future tasks. This will not stop tasks that are already running. You must use the Windows Task Manager to stop running tasks.
- Update scheduler status while processing task(s)
- Check this box to view continuous updates to the Status Window while tasks are running.
- Data Directory
- Type the full path and directory or click
 to browse. dx Generation uses this
directory for internal setup files, including user profile, task, and scheduled task setups.
User Profiles
Create one or more users to log on the LeasePak database and perform queries of the data. You can define multiple User Profiles to allow different tasks to run on different databases and environments (for example, Test and Production environments). After typing the information for the user, click OK to save or Cancel to abandon changes.
Profile Tab
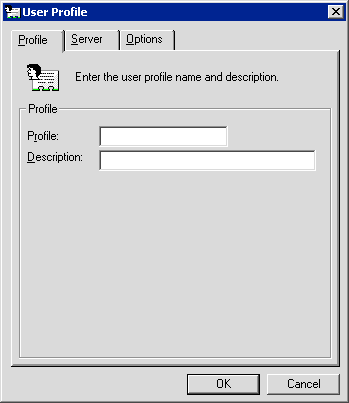
Field Descriptions
- Profile
- Type the User Profile (user) name. This field allows up to 12 alphanumeric characters.
- Description
- Type the User Profile description. This field allows up to 36 alphanumeric characters.
Server Tab
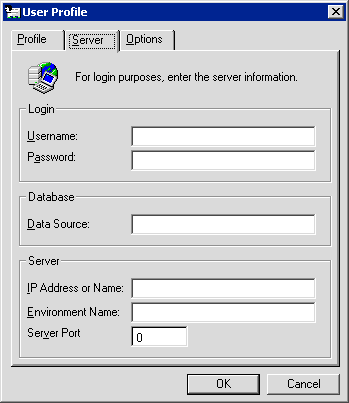
Field Descriptions
- Username
- Type the user's LeasePak client user name.
- Password
- Type the user's LeasePak client string password. Characters typed in this field appear as asterisks
- Data Source
-
 Sybase: type the IP Address or Name
 Oracle: type the Net Service Name
- IP Address or Name
- Type the LeasePak server (computer) name or IP address.
- Environment Name
- Type the name of the LeasePak environment to use.
- Server Port
- Type the TCP port number for the appropriate LeasePak daemon.
Options Tab
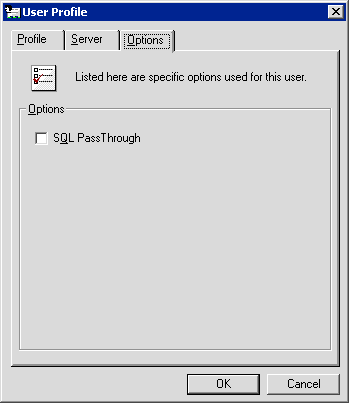
Field Descriptions
- SQL PassThrough
- Determines whether or not the SQL parser processes statements from dx Generation.
 Sybase: you must check this (turn it on)
 Oracle: you must uncheck this (turn it off)
Tasks
Create one or more tasks specifying data and templates to be merged into finished documents. After typing in the task information, click OK to save or Cancel to abandon changes.
Task Info Tab
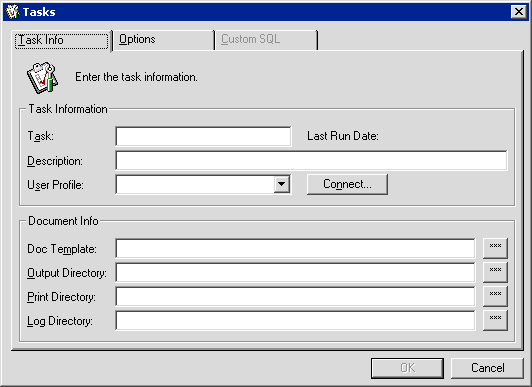
Field Descriptions
- Task
- Type the name of the task.
- Last Run Date
- If the task is scheduled and has been previously run, the last run date will appear here.
- Description
- Type a short description of the task.
- User Profile
- Click
 to select a valid user for the task.
Tasks require user profile information to connect to the LeasePak database.
 - Connect/Disconnect
- Click Connect to connect to the LeasePak database. You will need to connect to the database in order to access the Custom SQL tab. Click Disconnect to disconnect from the database.
- Doc Template
- Template to use for creating the document for this task. Type the full path and file name or click
 to select a template.
 - Output Directory
- Directory for merged documents. Type the full path or click
 to browse.
 - Print Directory
- Directory for documents to print. Make this different from the Output Directory to use with
Print Spy. Type the full path and file
name or click
 to browse.
 - Log Directory
- Directory for log files. Type the full path or click
 to browse.
 mPower users:
provide a location for this directory.
Options Tab
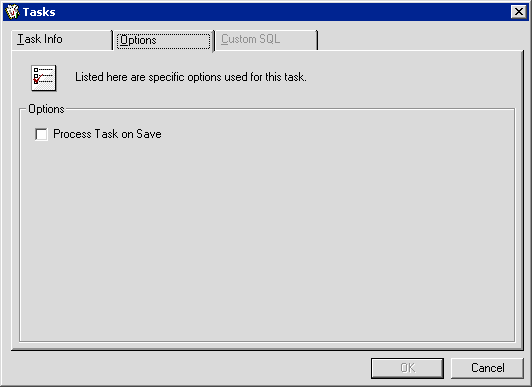
Field Descriptions
- Process Task on Save
- Check this box and click OK to immediately run the task. Useful for testing newly defined or updated tasks.
Custom SQL Tab
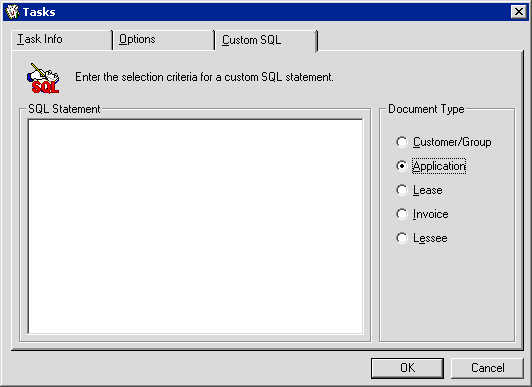
Field Descriptions
- SQL Statement
- Type an SQL statement specifying which LeasePak database records the task will process. Use one of the primary keys listed in the Introduction section above as the basis for the record selection. dx Generation will run the task on each record returned by the query. For more information on using SQL with dx Generation, contact your MSI representative.
- Document Type
- Select the document type corresponding to your primary key.
 mPower users: you must select Application as your
document type and use app_s as your primary key.
Scheduled Tasks
You can create periodic schedules for defined tasks. Tasks can be set to run once, one or more times weekly, or on a certain day of one or more months each year. For each schedule you will need to complete the following fields:
- Event
- Type a name for the scheduled task.
- Type a description for the scheduled task.
- Task
- Type the name of the task to run or click
 for a list of valid defined tasks.
 - Task set to run
- Check this to schedule the task to run at the set time. Uncheck this (turn it off) if you do not want to run the task. This option allows you to suspend tasks without losing their setup information.
Interval: One Time
Select the One Time option to schedule the task to run once at a future date or time.
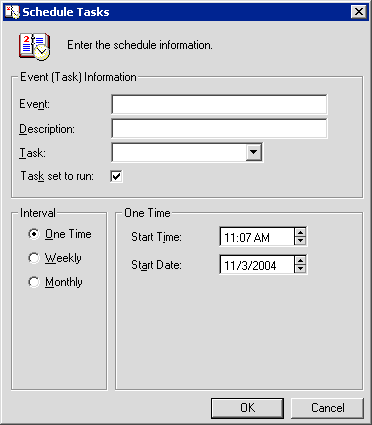
Field Descriptions
- Start Time
- Type a future time or use
 to change the time displayed.
 - Start Date
- Type today's date, a future date, or use
 to change the
date displayed.
Interval: Weekly
Select the Weekly option to schedule the task to run at a certain time one or more days each week. You can set the task to run Monday through Friday or every day to create a daily task.
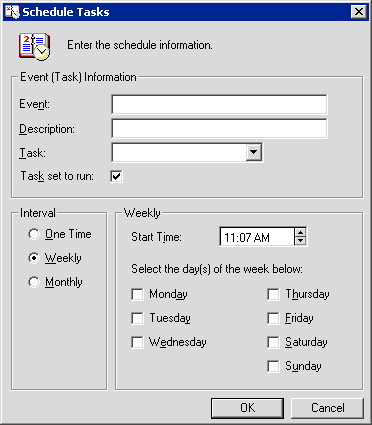
Field Descriptions
- Start Time
- Type a time or use
 to change the time displayed.
 - Select the day(s) of the week below
- Check each day of the week you want the task to run.
Interval: Monthly
Select the Monthly option to schedule the task to run at a certain time on a certain day of one or more months. You can set the task to run certain months to create an annual, semiannual, quarterly, etc., or monthly task.
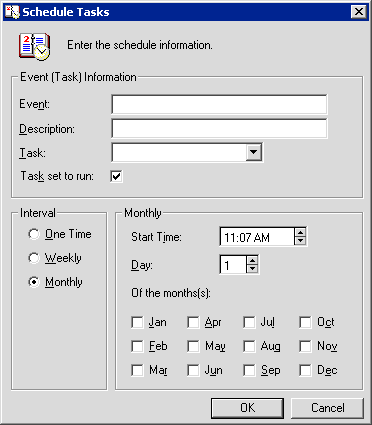
Field Descriptions
- Start Time
- Type a time or use
 to change the time displayed.
 - Day
- Type a day of the month or use
 to change the day
displayed.
 Setting this field to 31 will not process tasks on the last day
of the month. Instead, MSI recommends scheduling an end of month task to run very early on the first day of the month.
 - Of the month(s)
- Check each month of the year you want the task to run.
Print Spy
Use the Print Spy utility to automatically print any Microsoft Word and Excel document, including those from DocGen or dx Generation. To access Print Spy from the Windows Start Menu, select Programs, McCue Systems, LeasePak UX , Utilities, Print Spy.
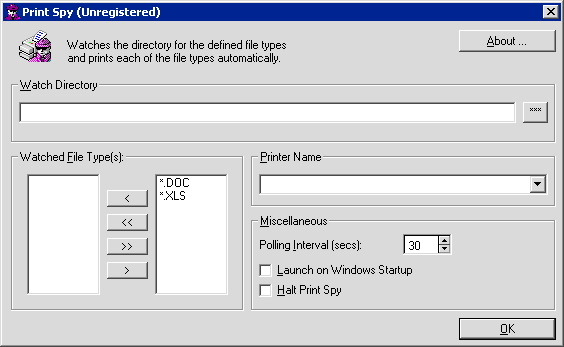
Field Descriptions
- Watch Directory
- Directory where Print Spy looks for documents to print. for documents to print. Print Spy creates three subdirectories under the
Watch Directory: Pending, Printed, and Failure. Print Spy first moves a document to the Pending subdirectory. The program then
attempts to print the document. If printing is successful, Print Spy moves the document to the Printed subdirectory. If printing is
unsuccessful, the program moves the document to the Failure subdirectory. Type the full path or click
 to browse.
 - Watched File Type(s)
- Print Spy can watch for Microsoft Word and Excel documents. Select a file type from the list on the right and click
 to move it to the left (Watched File Type(s)) list, or click
 to move all items from the right list to the left.
Select a file type from the list on the left and click
  to move it out of the Watched File Type(s) list and back to the right, or click
 to move all items from the left list to the right.
 - Printer Name
- Click
 to select from the list of printers set up on
the computer. Use Settings, Printers from the Windows Start menu to set up additional printers.
 - Polling Interval (secs)
- Type a time interval in seconds or use
 to increase or
decrease the number of seconds displayed. The Polling Interval determines how often Print Spy checks to see if new documents have
been added to the Watch Directory.
 - Launch on Windows Startup
- Check this box to start Print Spy every time Windows is started or restarted. This is useful if you want to ensure that Print
Spy is always ready to process incoming documents.
 You must start Print Spy and leave it running in order to process
documents coming into the Watch Directory. If you need to close the program temporarily (to reboot the computer, for example),
you will not lose setup information.
 - Halt Print Spy
- Check this box to have Print Spy suspend the processing of documents without losing setup information or exiting the program.
LeasePak Reference Guide
©
by McCue Systems Incorporated. All rights reserved.
The information contained in this document is the property of McCue Systems, Inc. Use of the information contained herein is restricted. Conditions of use are subject to change without notice. McCue Systems, Inc. assumes no liability for any inaccuracy that may appear in this document; the contents of this document do not constitute a promise or warranty. The software described in this document is furnished under license and may be used or copied only in accordance with the terms of said license. Unauthorized use, alteration, or reproduction of this document without the written consent of McCue Systems, Inc. is prohibited.